# Olympus — Full Documentation Export
> Complete text of every Olympus docs page in one fetch. See /llms.txt for a
> concise product summary and page map.
## Olympus Introduction
https://www.olympusx.app/docs/01-introduction
Learn what Olympus is, how copy trading on Polymarket works, and how to access the Olympus trading platform.
# 🏛️ Introduction
Welcome to **Olympus** — a trading platform for Polymarket that makes copy trading, manual trading, perps, combos, and liquidity workflows easier to manage in one place.
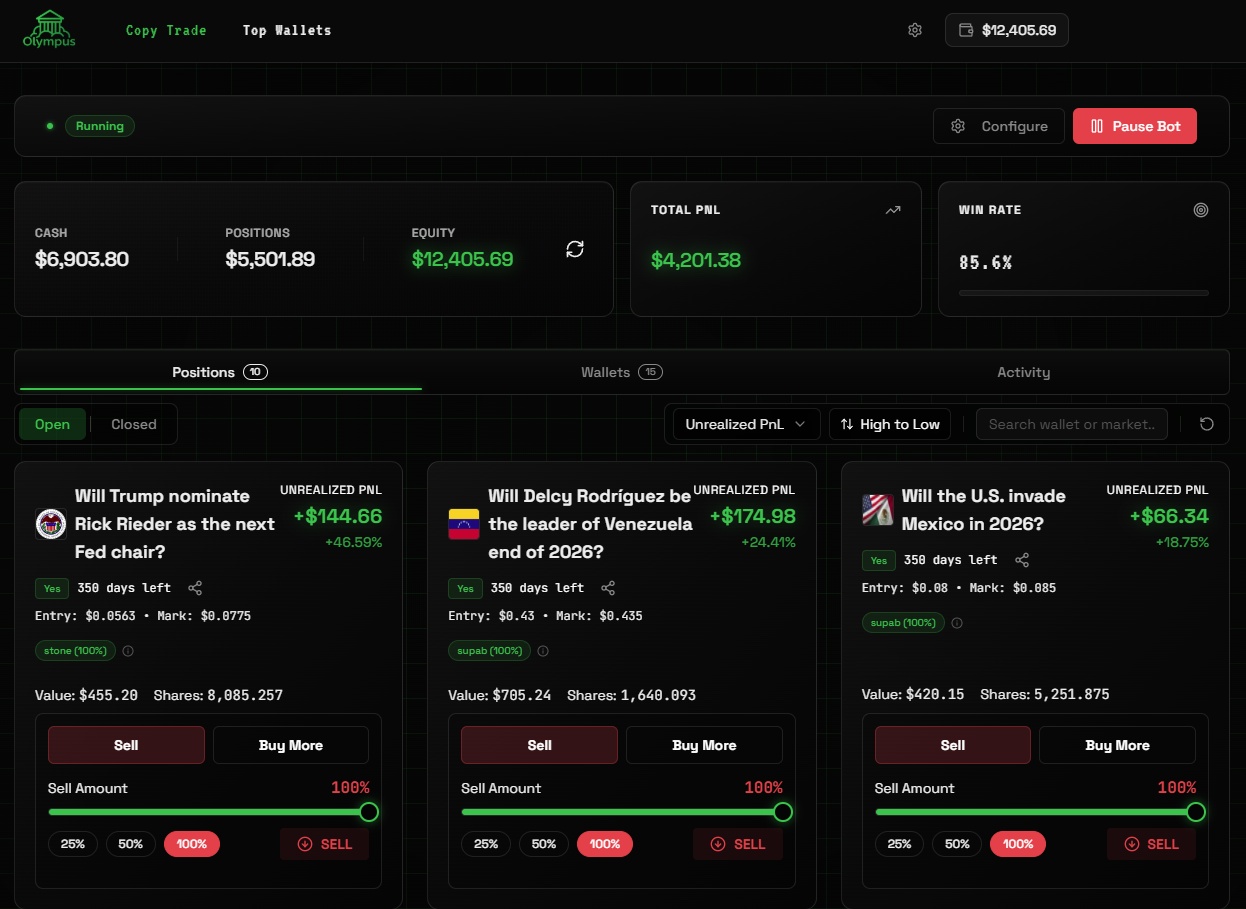 Olympus is a fully featured web terminal that lets you trade Polymarket markets manually, automatically mirror the trades of top-performing wallets, trade perps, build combos, and manage LP reward workflows. Built by the team that brought you **SOL Decoder / Valhalla**, Olympus combines automation, filters, and simplicity to make prediction market trading easier to understand and easier to use.
---
## ⚙️ What Olympus Does
Olympus gives you a **web terminal** to trade on Polymarket: manually buy markets, place limit orders, browse positions, and manage your portfolio in one place. You can also **view trader profiles** to see performance, PnL history, and positions before deciding who to follow.
On top of that, Olympus has copy trading for Polymarket, replicating the trading activity of any wallet you choose to follow. Whenever your selected wallet opens or closes a position, your trading wallet automatically does the same — respecting your custom settings such as:
- **Trade ratio & max trade size** — control position sizing
- **Market filters** — odds range, expiry limits, position caps
- **Min trigger amount** — ignore small "test" trades from leaders
- **Stop-loss / Take-profit** — automatic exits based on your configured thresholds
- **Limit buy mode, split, and merge support** — stay aligned with more advanced leader behavior
---
## 🔑 How to Access Olympus
Olympus is open to everyone.
- 👉 Get started for free and begin trading with Olympus right away
- 👉 Sign in with **Discord** or **Gmail**
- 👉 If someone referred you, you can also use a **referral code** to get started through that path
Join 👉 [our Discord](https://discord.gg/sol-decoder) 👈 to connect with the community and get help getting started
> 💡 **Note:** Olympus uses a fee system with discounts available through subscriptions and certain community perks. Fee ranges may change over time, so check the app for the latest rates.
---
## 💡 Why Olympus
- **Trade Manually** — use the web terminal to buy any Polymarket market, manage positions, and run your own strategy alongside copy trading.
- **Perps** — trade Polymarket perpetuals with leverage, position controls, and optional automation.
- **Combos** — build multi-leg parlays from eligible markets and manage them from one slip.
- **Advanced Trading Tools** — place limit orders, use stop-loss / take-profit, and manage split or merge flows directly in Olympus.
- **Trader Stats & Profiles** — view PnL, performance history, and open positions for any wallet so you can decide who to follow with real data.
- **Backtesting** — replay any trader against your own settings before you follow them, and see the simulated PnL, drawdown, and skipped trades.
- **Fully Automated copy trading** — mirror trades instantly, 24/7.
- **LP Rewards Tools** — discover reward opportunities and manage liquidity-focused workflows from inside Olympus.
- **Seamless Access** — log in via Discord or Gmail on any device; no setup headaches.
- **Non-Custodial** — your wallet, your funds, your control.
> 🔒 **Olympus uses Privy** — a trusted authentication and wallet management system built by industry experts. Your wallet is always yours; Olympus only initiates trades you approve through the bot. Funds and private keys remain fully under your control.
---
## 🌐 Olympus Links
- 👉 **Website:** [olympusx.app](https://olympusx.app/)
- 👉 **Discord:** [discord.gg/8e3bnMsVce](https://discord.gg/sol-decoder)
- 👉 **X/Twitter:** [@olympusappX](https://x.com/olympusappX)
- 👉 **Linktree:** [linktr.ee/olympusapp](https://linktr.ee/olympusapp)
- 👉 **Make your own Polymarket account:** [https://polymarket.com/?via=olympus](https://polymarket.com/?via=olympus)
---
## Olympus Getting Started
https://www.olympusx.app/docs/02-getting-started
Learn how to sign in, fund your wallet, follow traders, and start copy trading on Olympus and Polymarket.
# 🚀 Getting Started
This guide shows you how to get set up on Olympus, fund your wallet, and start manual trading or copy trading on Polymarket.
---
## 🔑 Step 1: Sign In
1. Visit the 👉 [Olympus Website](https://olympusx.app/)
2. Click **Login**
3. Sign in with **Discord** or **Gmail** using **Privy**
4. Once authenticated, you'll land in the **Olympus Dashboard**
> ✨ **Note:** If you have a referral code, you can use it to get started through the referral flow as well.
> 💡 **Need help?** Join [our Discord](https://discord.gg/sol-decoder) for support, updates, and community discussion.
---
## 👛 Step 2: Wallet Setup
When you log in for the first time, Olympus automatically creates your trading wallet.
You'll see a summary of your wallet directly on the dashboard.
Olympus is a fully featured web terminal that lets you trade Polymarket markets manually, automatically mirror the trades of top-performing wallets, trade perps, build combos, and manage LP reward workflows. Built by the team that brought you **SOL Decoder / Valhalla**, Olympus combines automation, filters, and simplicity to make prediction market trading easier to understand and easier to use.
---
## ⚙️ What Olympus Does
Olympus gives you a **web terminal** to trade on Polymarket: manually buy markets, place limit orders, browse positions, and manage your portfolio in one place. You can also **view trader profiles** to see performance, PnL history, and positions before deciding who to follow.
On top of that, Olympus has copy trading for Polymarket, replicating the trading activity of any wallet you choose to follow. Whenever your selected wallet opens or closes a position, your trading wallet automatically does the same — respecting your custom settings such as:
- **Trade ratio & max trade size** — control position sizing
- **Market filters** — odds range, expiry limits, position caps
- **Min trigger amount** — ignore small "test" trades from leaders
- **Stop-loss / Take-profit** — automatic exits based on your configured thresholds
- **Limit buy mode, split, and merge support** — stay aligned with more advanced leader behavior
---
## 🔑 How to Access Olympus
Olympus is open to everyone.
- 👉 Get started for free and begin trading with Olympus right away
- 👉 Sign in with **Discord** or **Gmail**
- 👉 If someone referred you, you can also use a **referral code** to get started through that path
Join 👉 [our Discord](https://discord.gg/sol-decoder) 👈 to connect with the community and get help getting started
> 💡 **Note:** Olympus uses a fee system with discounts available through subscriptions and certain community perks. Fee ranges may change over time, so check the app for the latest rates.
---
## 💡 Why Olympus
- **Trade Manually** — use the web terminal to buy any Polymarket market, manage positions, and run your own strategy alongside copy trading.
- **Perps** — trade Polymarket perpetuals with leverage, position controls, and optional automation.
- **Combos** — build multi-leg parlays from eligible markets and manage them from one slip.
- **Advanced Trading Tools** — place limit orders, use stop-loss / take-profit, and manage split or merge flows directly in Olympus.
- **Trader Stats & Profiles** — view PnL, performance history, and open positions for any wallet so you can decide who to follow with real data.
- **Backtesting** — replay any trader against your own settings before you follow them, and see the simulated PnL, drawdown, and skipped trades.
- **Fully Automated copy trading** — mirror trades instantly, 24/7.
- **LP Rewards Tools** — discover reward opportunities and manage liquidity-focused workflows from inside Olympus.
- **Seamless Access** — log in via Discord or Gmail on any device; no setup headaches.
- **Non-Custodial** — your wallet, your funds, your control.
> 🔒 **Olympus uses Privy** — a trusted authentication and wallet management system built by industry experts. Your wallet is always yours; Olympus only initiates trades you approve through the bot. Funds and private keys remain fully under your control.
---
## 🌐 Olympus Links
- 👉 **Website:** [olympusx.app](https://olympusx.app/)
- 👉 **Discord:** [discord.gg/8e3bnMsVce](https://discord.gg/sol-decoder)
- 👉 **X/Twitter:** [@olympusappX](https://x.com/olympusappX)
- 👉 **Linktree:** [linktr.ee/olympusapp](https://linktr.ee/olympusapp)
- 👉 **Make your own Polymarket account:** [https://polymarket.com/?via=olympus](https://polymarket.com/?via=olympus)
---
## Olympus Getting Started
https://www.olympusx.app/docs/02-getting-started
Learn how to sign in, fund your wallet, follow traders, and start copy trading on Olympus and Polymarket.
# 🚀 Getting Started
This guide shows you how to get set up on Olympus, fund your wallet, and start manual trading or copy trading on Polymarket.
---
## 🔑 Step 1: Sign In
1. Visit the 👉 [Olympus Website](https://olympusx.app/)
2. Click **Login**
3. Sign in with **Discord** or **Gmail** using **Privy**
4. Once authenticated, you'll land in the **Olympus Dashboard**
> ✨ **Note:** If you have a referral code, you can use it to get started through the referral flow as well.
> 💡 **Need help?** Join [our Discord](https://discord.gg/sol-decoder) for support, updates, and community discussion.
---
## 👛 Step 2: Wallet Setup
When you log in for the first time, Olympus automatically creates your trading wallet.
You'll see a summary of your wallet directly on the dashboard.
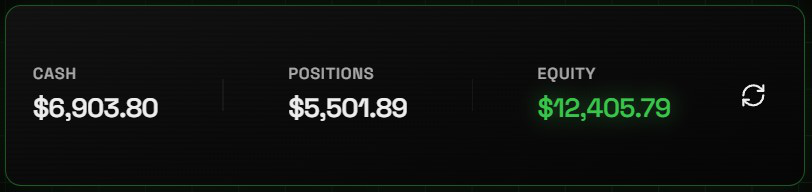 **Understanding your wallet summary:**
- **Cash** — Your available trading balance
- **Positions** — The current market value of your open positions
- **Equity** — Your total portfolio value (**Cash + Positions**)
**Understanding your wallet summary:**
- **Cash** — Your available trading balance
- **Positions** — The current market value of your open positions
- **Equity** — Your total portfolio value (**Cash + Positions**)
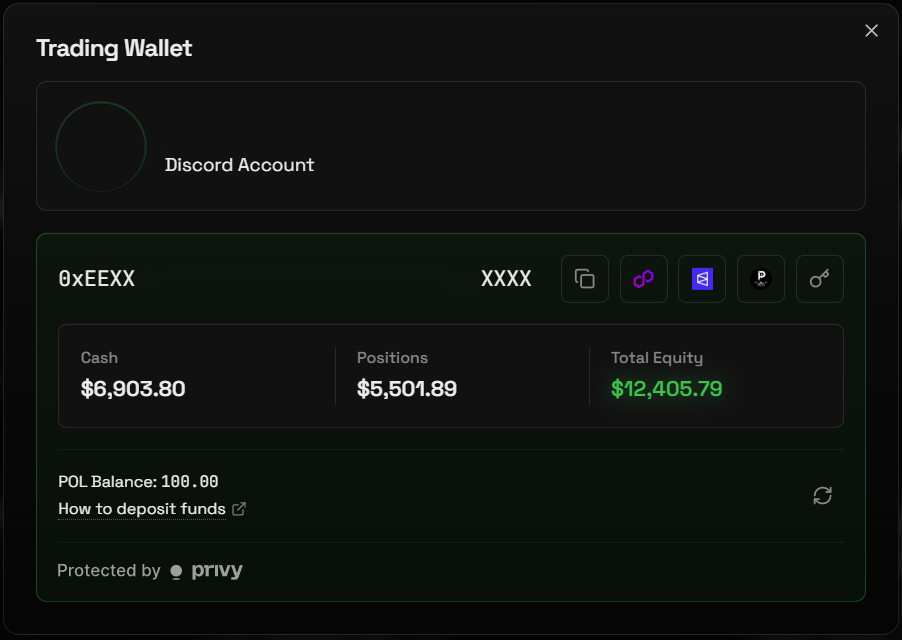 Click the wallet button next to your username to open the **Trading Wallet** panel.
Inside, you can view:
- **Cash / Positions / Total Equity** — Your balance breakdown (see above)
- **POL Balance** — Your gas balance on Polygon
- **Deposit instructions** — Funding help for your wallet
---
## 💵 Step 3: Fund Your Wallet
To start trading, open your **Trading Wallet** panel and use the **Deposit** flow to fund your Olympus wallet.
Olympus shows supported **chains**, **tokens**, minimum deposit amounts, and your deposit address/QR code directly in the app.
You'll generally want:
- **pUSD** for trading after the Polymarket V2 migration
- **USDC / USDC.e** can be deposited and converted in Olympus
- A small amount of **POL** for gas
> 💡 **Don't have funds on Polygon yet?**
>
> You can fund through Olympus using one of the supported deposit routes.
Once your deposit arrives, your wallet balance will update in Olympus.
If your funds arrive as **USDC** or **USDC.e**, Olympus may prompt you to convert them to **pUSD**, which is used for Polymarket V2 trading.
---
## 👤 Step 4: If You Want to Copy Trade, Follow a Wallet
> 💡 **Want to trade manually instead?** Go to the [Market pages](/docs/09-market-pages) and use the search bar in the header to find and trade any Polymarket event.
To start copy trading, you first need to follow at least one wallet.
**Find wallets to follow:**
- Visit the **Top Wallets** page in Olympus to browse traders and discover wallets to follow
Click the wallet button next to your username to open the **Trading Wallet** panel.
Inside, you can view:
- **Cash / Positions / Total Equity** — Your balance breakdown (see above)
- **POL Balance** — Your gas balance on Polygon
- **Deposit instructions** — Funding help for your wallet
---
## 💵 Step 3: Fund Your Wallet
To start trading, open your **Trading Wallet** panel and use the **Deposit** flow to fund your Olympus wallet.
Olympus shows supported **chains**, **tokens**, minimum deposit amounts, and your deposit address/QR code directly in the app.
You'll generally want:
- **pUSD** for trading after the Polymarket V2 migration
- **USDC / USDC.e** can be deposited and converted in Olympus
- A small amount of **POL** for gas
> 💡 **Don't have funds on Polygon yet?**
>
> You can fund through Olympus using one of the supported deposit routes.
Once your deposit arrives, your wallet balance will update in Olympus.
If your funds arrive as **USDC** or **USDC.e**, Olympus may prompt you to convert them to **pUSD**, which is used for Polymarket V2 trading.
---
## 👤 Step 4: If You Want to Copy Trade, Follow a Wallet
> 💡 **Want to trade manually instead?** Go to the [Market pages](/docs/09-market-pages) and use the search bar in the header to find and trade any Polymarket event.
To start copy trading, you first need to follow at least one wallet.
**Find wallets to follow:**
- Visit the **Top Wallets** page in Olympus to browse traders and discover wallets to follow
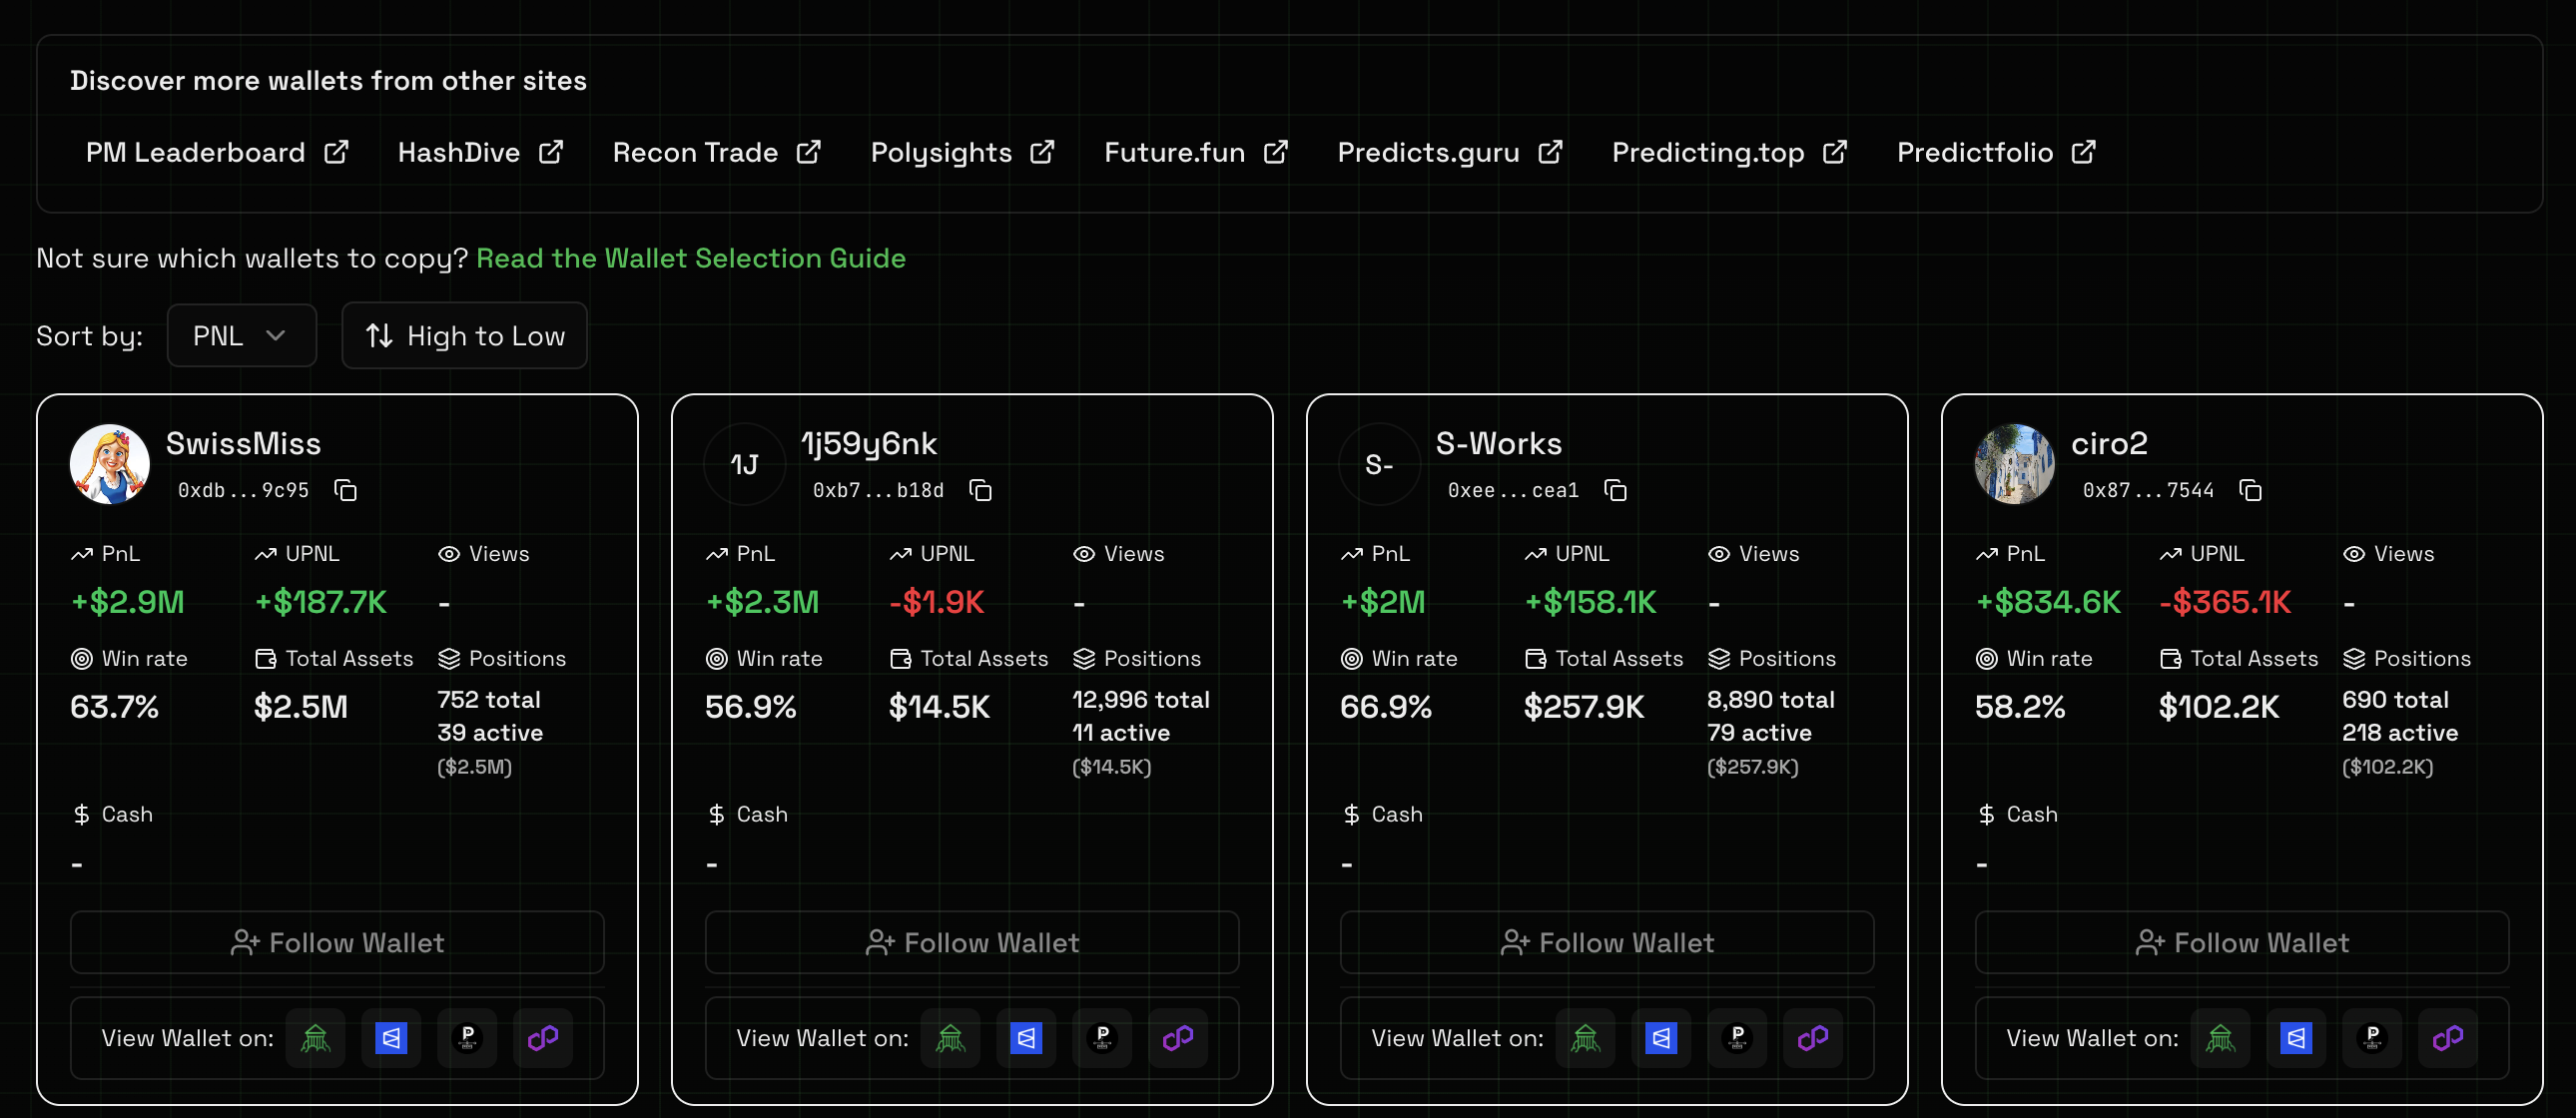 > 💡 **Before you follow anyone:** open the trader's profile and click **Backtesting**. It replays their history against your settings and simulates what you would have made copying them. It is a simulation rather than a guarantee, but it is the cheapest way to find out that a wallet is wrong for you. See [Backtesting](/docs/18-backtesting).
---
**In Olympus:**
1. Click the green **+ Add Wallet** button
2. Paste the wallet address you want to follow
3. Complete the follow flow
> 💡 **Before you follow anyone:** open the trader's profile and click **Backtesting**. It replays their history against your settings and simulates what you would have made copying them. It is a simulation rather than a guarantee, but it is the cheapest way to find out that a wallet is wrong for you. See [Backtesting](/docs/18-backtesting).
---
**In Olympus:**
1. Click the green **+ Add Wallet** button
2. Paste the wallet address you want to follow
3. Complete the follow flow
 ---
## 📢 Step 5: Set Up Discord Webhooks for Notifications
If you want trade alerts sent to Discord, you can add a webhook.
1. Create a Discord webhook using this guide: [https://www.youtube.com/watch?v=xIZXDdVwNaE](https://www.youtube.com/watch?v=xIZXDdVwNaE)
2. Copy the webhook URL
3. In Olympus, open **Settings** and go to the **Alerts** tab
4. Paste the webhook URL into the Discord webhook field
5. Click **Test** to send yourself a sample message
6. Click **Save Changes**
On the same tab you choose what you hear about, and how often the portfolio
summary arrives.
---
## 📢 Step 5: Set Up Discord Webhooks for Notifications
If you want trade alerts sent to Discord, you can add a webhook.
1. Create a Discord webhook using this guide: [https://www.youtube.com/watch?v=xIZXDdVwNaE](https://www.youtube.com/watch?v=xIZXDdVwNaE)
2. Copy the webhook URL
3. In Olympus, open **Settings** and go to the **Alerts** tab
4. Paste the webhook URL into the Discord webhook field
5. Click **Test** to send yourself a sample message
6. Click **Save Changes**
On the same tab you choose what you hear about, and how often the portfolio
summary arrives.
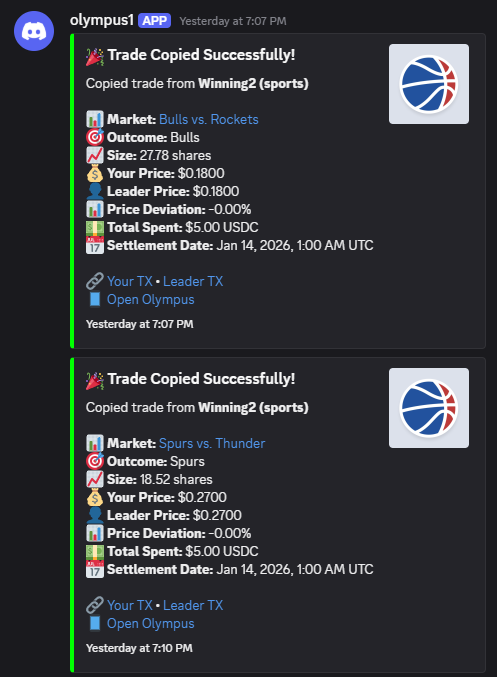 > You can use one global webhook for all activity, or set wallet-specific webhooks for individual followed wallets.
> 💡 **Why set up a webhook?**
>
> It gives you real-time trade notifications without needing to watch the dashboard.
> ❗ **Note:** Wallet-specific Discord webhooks override the global webhook.
---
## ▶️ Step 6: You're Live
By default the bot is ON!
That means:
- When a followed wallet opens or closes a trade, your trading wallet can mirror that action
- Your configured limits and settings will still be respected
> **Note:** Olympus continues running server-side, so your copy trading can keep working even if your browser is closed.
---
## 🎉 You're All Set!
You're now ready to use Olympus for manual trading, copy trading, or both.
---
## How Copy Trading Works on Olympus
https://www.olympusx.app/docs/04-how-copy-trading-works
Learn how copy trading works on Olympus for Polymarket, including trade mirroring, ratios, filters, limit modes, and wallet settings.
# ⚙️ How Copy Trading Works on Olympus
Olympus lets you copy trade on Polymarket by following trader wallets and mirroring their activity from your own trading wallet.
When a wallet you follow opens or closes a position, Olympus attempts to place the corresponding trade for you based on your wallet settings, risk limits, and execution rules.
Olympus is designed for instant mirroring, with copied trades submitted within the same second (0-second delay) when conditions allow.
That means your results are shaped by more than just the leader's trade. Your copy settings control position size, market filters, price protection, and whether Olympus uses market or limit orders.
---
## 🧠 The Core Mechanism
When a trader you follow opens or closes a position on Polymarket:
1. Olympus detects the trade activity.
2. Your wallet checks whether the trade passes your copy settings.
3. Olympus places the mirrored trade using your configured execution mode.
4. The result appears in your **Positions** and **Activity** tabs.
A copied trade may be skipped or changed if:
- it exceeds your size limits
- it fails your filters
- it falls outside your allowed price deviation
- a limit order does not fill in time
So copy trading is automated, but still governed by your own controls.
---
## 🧩 Where You Control Copy Trading
Each followed wallet has its own settings panel.
Those controls are grouped into three areas:
- **Overview** — size, ratio, and execution behavior
- **Filters** — which trades and markets are allowed
- **Advanced** — webhook, fallback execution, and special trading modes
This is where you decide how aggressively or conservatively each wallet should be copied.
---
## 📏 Overview Settings
These settings control how much you copy and how orders are placed.
| Setting | Description |
| --- | --- |
| **Ratio %** | The percentage of the leader's trade size that you copy. |
| **Max Trade Size (USD)** | The maximum size allowed for any single copied trade. |
| **Max Market Size (USD)** | A lifetime cap on how much total capital you can deploy into one market for that wallet. |
| **Below Min Limit, Buy at Min** | If your calculated trade amount is very small, Olympus rounds up to the minimum tradable amount instead of skipping it. |
| **Accumulation Buy** | Olympus can combine small buys in the same market outcome until they reach a tradable size. In limit mode, partial fills still accumulate per leader order. |
> Example:
>
> If a leader buys **$400 YES**, and your **Ratio %** is **25%**, your copied trade would aim for **$100**. If your **Max Trade Size** is **$80**, Olympus caps your trade at **$80**.
Olympus also includes a **Recalculate Ratio** option to help size your wallet relative to the leader's current balance.
---
## 📊 Filters
Filters let you control which copied trades are allowed.
### Trade and Position Limits
| Filter | Description |
| --- | --- |
| **Maximum Price Deviation (%)** | Limits how far your fill price is allowed to drift from the leader's trade before Olympus skips the copy. You can set a global default in General Settings and optionally override it per wallet in that wallet's Filters settings. |
| **Max Trades / Market** | Limits how many times Olympus can add into the same market for that wallet. |
| **Max Open Markets** | Limits how many different open markets this wallet can have at once. |
| **Max Trades / 24h** | Caps how many copied trades can be taken from that wallet in a 24-hour period. |
| **Minimum Trigger Amount (USD)** | Ignores very small leader trades that fall below your threshold. |
| **Skip Markets Expiring After (days)** | Skips trades in markets that expire too far in the future. |
### Market Quality Filters
| Filter | Description |
| --- | --- |
| **Minimum Odds (%)** | Skips trades below your chosen odds floor. |
| **Maximum Odds (%)** | Skips trades above your chosen odds ceiling. |
| **Minimum Liquidity (USD)** | Avoids illiquid markets where execution may be worse. |
| **Minimum 24h Volume (USD)** | Avoids inactive markets with weak price discovery. |
These filters are some of the most important tools for keeping copy trading disciplined instead of blindly following every move.
> Note:
>
> **Maximum Price Deviation (%)** has both a global default and an optional per-wallet override. If you leave the wallet-level field empty, Olympus uses your global setting. If you set it on a wallet, that wallet uses its own value instead.
---
## 🧱 Limit Buy Mode
By default, Olympus uses standard market-style copy execution for buys.
Market-style copied buys prioritize fast fills, but they can cross the bid/ask spread and pay taker fees. That drag can compound quickly when copying many trades, thin markets, or fast 5- or 15-minute markets.
You can enable **Limit Buy Mode** when you want to prioritize price discipline over fill certainty.
With **Limit Buy Mode**, Olympus places buy orders at the leader's fill price instead of forcing market-style execution.
### Why use it?
- potentially better entries
- less spread crossing and slippage
- more control in thin or fast-moving markets
- possible maker liquidity if the order rests instead of filling immediately
### Trade-off
- the order may not fill if the market moves away before your order lands
- you trade fill certainty for price discipline
- if your limit price crosses the current ask, the order can still fill immediately as a taker order and may still incur taker fees
This can reduce spread crossing and may let orders rest as maker liquidity, but fills are not guaranteed. Resting limit orders may earn liquidity rewards on eligible Polymarket markets, even if they never fill. That is a possible upside, not a guarantee.
For fast or bot-like wallets, Olympus may show a **Risk checkpoint** recommending Limit Buy Mode before you follow the wallet. That warning means the wallet's pace may be hard to copy profitably with market-style execution, even when concurrent processing is enabled.
You can also choose how long those limit buy orders stay active using **Order Expiration**.
In practice:
- **Market-style copy:** faster fills, more spread and fee drag.
- **Limit Buy Mode:** better price control, possible missed trades.
---
## 🧱 Limit Sell Mode
Olympus also supports **Limit Sell Mode**.
When enabled, Olympus tries to exit copied positions using a limit sell at the leader's execution price instead of immediately selling at market.
This can improve exits, but it comes with extra risk:
- the limit sell may not fill quickly
- if it stays open too long, market conditions can worsen
- Olympus uses a **Sell Timeout** so unfilled limit sells can fall back to a market sell
In practice, this gives you more control over exits, but requires tighter timeout settings and more caution than standard sell behavior.
---
## 🛟 Fallback Limit Orders
Olympus also supports **Fallback Limit Order** in the **Advanced** settings tab.
When enabled, if a copied buy cannot execute immediately, Olympus can place a short-lived limit order at the leader's price instead of skipping the trade outright.
This helps in fast or thin markets where immediate execution may fail, but it also means you can end up with pending orders that never fill if price runs away.
---
## 🔄 Counter-Trading Mode
In the **Advanced** settings tab, you can enable **Reverse Copy Mode (Counter-Trade)**.
That means if the wallet you follow buys **YES**, your wallet takes the opposite side instead.
This mode is useful for specialized strategies, but it should be used carefully. It changes the logic of the copied trade completely and is best treated as a separate strategy, not a minor setting tweak.
---
## 🧱 Merge / Split Copying and Safeguards
Olympus supports **merge and split copying** so your positions stay aligned with more complex leader behavior.
That includes:
- **Merge copy** — when a leader merges positions back into pUSD
- **Split copy** — when a leader splits capital into YES/NO legs
Olympus also applies safeguards through your settings, including:
- per-trade caps
- per-market caps
- trade-count limits
- trigger thresholds
- market quality filters
- price-deviation protection
These controls help reduce unwanted exposure and keep copied trades inside your own risk boundaries.
---
## 🤖 Optional: AI Trade Analysis
Olympus also includes **AI Trade Analysis**, which reviews your recent copy-trading activity and helps you improve settings using your own execution data.
It can help you:
- compare your fills against the leader's entries
- spot slippage patterns
- identify skipped-trade patterns
- refine ratios and filters
This is best thought of as an optimization tool, not part of the basic copy-trading flow.
---
## 🧪 Optional: Backtesting
Every setting on this page changes what you would have copied — and you do not have to guess how. [Backtesting](/docs/18-backtesting) replays a leader's past trades through these exact filters and reports the simulated PnL, ROI, drawdown, and a per-trade reason for everything your settings skipped.
The two tools sit on opposite sides of the decision:
- **Backtesting** runs **before** you follow, on a leader's history, with modeled fills
- **AI Trade Analysis** runs **after** you follow, on your own trades, with real fills
Backtesting is a simulation and cannot replay your real fills, since Polymarket publishes no historical order book. A few settings on this page — stop loss, take profit, max drawdown, counter trading, and min spend — are accepted by the backtest but not simulated yet.
---
## 🎯 Stop-Loss and Take-Profit
Olympus supports **stop-loss and take-profit** for copy-traded positions.
You can set them as defaults or per wallet, and Olympus will automatically place an exit when your configured threshold is hit.
For the full setup and behavior details, see [Stop-Loss & Take-Profit](/docs/11-stop-loss-take-profit).
---
## How to Choose Wallets to Copy on Olympus
https://www.olympusx.app/docs/07-wallet-selection-guide
Learn how to choose copy trading wallets on Olympus and Polymarket by spotting good habits, avoiding red flags, and finding traders you can realistically mirror.
# 🎯 How to Choose Wallets to Copy on Olympus
Not every profitable wallet is a good wallet to copy.
Some traders make money in ways that are hard for followers to replicate. Others may look strong on the surface but take too much risk, trade too fast, or spread themselves across too many markets.
The goal is not just to find winning wallets. The goal is to find wallets you can **realistically copy well** on Olympus.
> 💡 **Quick start:** Browse [Top Wallets](/app/top-wallets) to discover active traders, then inspect them more closely before following.
---
## 🧭 Where to Find Wallets
### 1. Polymarket Leaderboard
The [Polymarket leaderboard](https://polymarket.com/leaderboard) is one of the fastest ways to discover active traders.
It is useful for finding wallets that:
- trade meaningful size
- have recent realized profits
- are active in current markets
A good way to use it:
- check **Monthly** to find traders who are active now
- check **All-time** to avoid chasing one-off lucky runs
- click into traders and review their behavior before copying
> ⚠️ The leaderboard is a discovery tool, not proof of skill.
---
### 2. Olympus Trader Pages
After you find a wallet, paste the address into the Olympus search bar to open that trader's profile page.
This is where wallet selection gets serious.
Use the profile to check:
- open vs. closed positions
- overall consistency
- what categories they trade
- how often they trade
- whether their activity looks copyable in practice
This is usually more useful than looking at raw profit alone.
The profile also has a **Backtesting** button, which is the closest thing to an answer this page can give you. It replays the leader's history against your own settings and reports what the simulation says you would have made — with your ratio, your filters, and your fees. A leader can be genuinely profitable and still be a bad wallet for *you* to copy, and this is where that shows up as a number instead of a hunch. See [Backtesting](/docs/18-backtesting).
> 💡 **Pro tip:** Backtest **before** you follow, then use **AI Trade Analysis** **after** you follow to review your real copied results. The first is a simulation of a past window; the second uses your actual fill data. They answer different questions, and the second one is the one that counts.
---
### 3. Whale Alerts and Trade Feeds
Whale alerts can help you find wallets to investigate, but they should not be treated as automatic copy signals.
Use them for lead generation only.
Why blind whale-following is dangerous:
- some wallets trade too fast to copy well
- some rely on speed or execution edge
- some rotate wallets or behave inconsistently
- some are profitable for reasons that do not translate well to followers
Use whale alerts to **find candidates**, then inspect them properly before following.
---
## ⚡ Short-Horizon Crypto Bot Wallets
Fast crypto wallets can be profitable, whether they trade 5-minute markets, 15-minute markets, or both. They need stricter testing than slower traders. Before copying one seriously, treat it like an experiment.
### ⚠️ The #1 mistake: copying a bot with Buy Minimum on
This is the single most common way followers lose money copying a fast wallet, so it is worth understanding before anything else.
A "bot-speed" leader fires hundreds of tiny trades a day. Polymarket enforces a minimum order size (about `$1` for market orders, or 5 shares for limit orders). If your copy ratio would place an order below that minimum, **Buy Minimum** rounds it up to the floor. When a leader sends hundreds of tiny trades, that rounding happens on almost every one, so your real spend can run many times your intended ratio.
The result: you can **lose money even in a window where the leader profits**, because your oversized copies land on the leader's losing trades while your intended small size would have kept those losses tiny. In one reviewed case, a follower lost money over a day where the leader made thousands.
**The fix is Accumulation Buy.** Instead of forcing each tiny trade up to the minimum, Accumulation Buy adds up the small copies in the same market outcome and places one right-sized order once they cross the minimum. Your spend tracks your ratio instead of overshooting it.
Because this matters so much, Olympus now warns you in three places:
- a **bot-speed badge** on any followed wallet in your Wallets and Multi-Wallet tables when the leader is trading at bot speed and Accumulation Buy is off
- an inline warning in the wallet's settings, next to the Buy Minimum / Accumulation Buy toggle
- a **risk checkpoint** when you first follow a bot-speed wallet, with a one-click option to apply bot-safe defaults
If you see any of those warnings, switch that wallet to Accumulation Buy before scaling up.
### Where to find candidates
Good places to look:
- automated Olympus wallet feeds in Discord, especially the wallet-talk channel
- pinned wallet suggestions from the community
- the [Polymarket leaderboard](https://polymarket.com/leaderboard), filtered for top crypto traders today, this week, or this month
- wallets already being discussed by experienced users
Do not follow a wallet just because it had one good day. Use those sources to find candidates, then inspect the wallet before copying.
### What to look for
A good 5- or 15-minute crypto bot wallet usually has:
- consistent recent activity, ideally at least around 30 trades per hour when active
- a PnL curve that trends upward over time
- trades that are held long enough for followers to enter
- behavior that looks repeatable rather than random
- very rare, or better yet, no split/merge trades
- enough activity to evaluate, but not constant spam that is impossible to follow cleanly
Be cautious with wallets that trade extremely fast, frequently split or merge positions, or rely on execution that followers are unlikely to match.
Avoid wallets that routinely buy both outcomes in the same market. That often means the wallet is arbitraging or managing inventory in a way copy traders usually cannot mirror. You can end up filled on the losing side while your limit orders miss the winning side.
Also be cautious when a wallet is crowded. If a bot has many Olympus copy traders or very high Polymarket attention, followers may compete for the same fills. In that case, Old Analysis and the trade activity feed matter more than the wallet's headline PnL.
When possible, prefer wallets that hold until expiry or at least hold long enough that your copy orders have time to fill.
### Suggested starting settings
When testing a new fast crypto wallet, start conservatively:
- use **Limit Buy Mode**
- set **Minimum Odds** around `10-22%`
- set **Max Price Deviation** around `200%`
- set a **Max Drawdown** you are comfortable losing during the test
- let Olympus calculate the **Ratio %** automatically
- avoid manually pushing the **Ratio %** much higher than the calculator suggests
- avoid a high **Max Open Markets** setting while testing, since a bot can lose several trades in a row
- keep **Max Market Size** around `5%` of your total account
- set **Max Trade Size** to about one-fifth of Max Market Size
- be cautious with **Buy at Min**
- be cautious with **Concurrent Buy Processing**
Example:
- account size: `$500`
- max market size: `$25`
- max trade size: `$5`
The goal is not to maximize size immediately. The goal is to see whether the wallet copies well with your settings.
#### Buy at Min risk
Buy at Min can make a low ratio behave like a much higher ratio when the leader sends many tiny fills. For example, if your intended 5% copy size would be `$0.50`, but the order is rounded up to the minimum copy size, you are no longer copying close to 5%.
If Old Analysis shows your actual exposure is far above your configured ratio and Buy at Min is enabled, disable Buy at Min and use Accumulation Buys so tiny entries can batch into fewer meaningful orders.
#### Concurrent buy risk
Concurrent Buy Processing can help Olympus keep up with very fast wallets, but it can also amplify overbuying. When many buy jobs start at the same time, they can temporarily read the same current exposure, open-trade count, and balance before earlier jobs finish recording their orders.
That can exceed your intended copy ratio, Max Market Size, max open trades, or available balance checks. If Old Analysis shows you are already over your target exposure and Concurrent Buy Processing is on, turn it off while testing that wallet.
### How to test safely
When testing a new wallet:
- **backtest it first** — replay it against your intended settings before risking anything. For a fast bot, use the **Number of last trades** mode rather than a date window, since a bot firing thousands of trades a day will not fit a full week inside the data limits
- copy only that wallet at first
- use a separate Olympus wallet if possible
- compare your copied PnL against the target wallet's PnL
- use **AI Analysis** and **Old Analysis** to see skipped trades, unfilled limit orders, position coverage, and whether you overbought your intended ratio
- adjust settings slowly based on actual results
- move profits out to other wallets or strategies once the setup works
Fast crypto bots can look attractive, but execution quality matters a lot. A wallet can be profitable for itself and still perform poorly when copied if your fills are worse, your limits are too loose, or your sizing is too aggressive.
---
## ✅ What Makes a Wallet Copyable?
This is the most important question on the page.
A wallet is not just "good" because it made money. A wallet is copyable when its style still makes sense after follower lag, spread, slippage, and your own settings are factored in.
Wallets are usually more copyable when they:
- hold positions long enough for followers to enter reasonably
- avoid constant hyperactive in-and-out trading
- trade markets with decent liquidity
- show a clear style or category focus
- do not overload themselves with too many open positions at once
In plain English:
> **You want wallets whose edge survives being copied.**
---
## ✅ Good Signs
### 1. Recent Activity
A wallet should still be actively trading.
Inactive wallets do not help you, no matter how good their older results look.
Check whether they have:
- recent trades
- recent openings and exits
- signs of ongoing participation
> 💡 In Olympus, search the wallet and check the **Activity** tab on their trader page.
---
### 2. Manageable Position Count
Wallets with a reasonable number of open positions are often easier to understand and copy.
That usually suggests:
- more selectivity
- clearer conviction
- less random spray-and-pray behavior
A wallet holding too many positions at once can become hard to mirror cleanly, especially for smaller accounts.
---
### 3. Repeatable Market Types
Wallets are often easier to copy when they focus on market types that are:
- short to medium duration
- liquid enough to enter cleanly
- repeated often enough to judge over time
Examples include:
- sports
- short-horizon crypto markets
- recurring event-driven markets
These styles are often easier to evaluate because capital frees up faster and results become visible sooner.
> 💡 Olympus can help filter long-dated markets using **Skip Markets Expiring After (days)** in wallet Filters.
---
### 4. Clear Style and Specialization
A wallet with a recognizable style is usually easier to trust than one that jumps randomly between everything.
Look for traders who seem to have:
- a category focus
- repeatable habits
- similar trade structure over time
- a coherent approach to entries and exits
You do not need them to trade only one category. You just want them to look intentional rather than chaotic.
---
### 5. Realistic Execution Fit
A wallet may be profitable but still bad for followers if its trades depend on speed, low latency, or aggressive market timing.
Good follower-friendly wallets usually:
- do not rely on micro-second execution
- are not constantly sniping tiny inefficiencies
- leave enough room for followers to get acceptable fills
- trade in ways that still make sense after spread and slippage
This matters a lot.
Some wallets win because they are good traders.
Some wallets win because they are fast.
Those are not always the same thing.
---
## ❌ Red Flags
### 1. Extremely High Trade Frequency
Wallets doing very high numbers of trades per day are often poor copy candidates.
That includes:
- bot-like behavior
- constant rapid entries and exits
- very short holding periods
- heavy market churn
Why this is dangerous for followers:
- by the time you copy, the edge may be gone
- slippage becomes more painful
- your fills may be much worse than theirs
- the strategy may depend on speed you do not have
Not every active trader is bad. But if the wallet looks too fast to follow cleanly, it usually is.
---
### 2. Too Many Open Positions
A wallet with a huge number of simultaneous open positions can be hard to copy responsibly.
This can lead to:
- overexposure
- fragmented attention
- weaker conviction
- too much capital tied up in too many places
It may also be a bad fit for smaller followers who need tighter limits and cleaner selection.
---
### 3. Mostly Long-Duration Markets
Long-dated markets are not automatically bad, but they are harder on capital efficiency.
They can:
- lock up your funds for long periods
- reduce flexibility
- slow down learning and evaluation
- make it harder to rotate into better opportunities
If a wallet lives mostly in long-duration markets, make sure that actually fits your own goals.
---
### 4. No Clear Pattern
If you cannot explain how a wallet seems to win, be careful.
That does not mean every trader needs to be simple. But if their activity looks random, scattered, or inconsistent, it becomes much harder to copy with confidence.
Be cautious with wallets that:
- jump between unrelated narratives constantly
- change style every few days
- show no clear market preference
- seem profitable without any obvious repeatable logic
---
### 5. Looks Good on PnL, Bad for Followers
This is the trap many users fall into.
A wallet can look great on realized profit and still be a poor choice for copy trading.
That can happen when:
- entries are too fast
- markets are too thin
- spreads are too wide
- trades are too frequent
- the wallet's size or speed gives it an edge you cannot mirror
The right question is not:
> "Did this wallet make money?"
The better question is:
> "Could I have copied this wallet with acceptable fills and acceptable risk?"
---
## 🧪 A Simple Checklist Before Following
Before you follow a wallet, ask:
- Is the wallet still active?
- Does it trade in a style I can realistically copy?
- Are the markets liquid enough?
- Does it hold positions long enough for follower execution to make sense?
- Is the number of open positions manageable?
- Does the wallet have a clear style or edge?
- Would this still fit my account size and settings?
If too many of those answers are unclear, keep looking.
---
## 🎯 Final Rule
**Copy behavior, not outcomes.**
A wallet becomes worth following when you understand how it trades, why it may work, and whether that style still makes sense once copied through your own settings on Olympus.
---
## Backtesting
https://www.olympusx.app/docs/18-backtesting
Replay any Polymarket trader against your own copy settings before you follow them, and see the simulated PnL, ROI, drawdown, and skipped trades.
# 🧪 Backtesting
Backtesting replays a leader's past trades against **your** copy settings and shows what the simulation says you would have made. It answers the question the trader page cannot: _the leader was profitable, but would **I** have been profitable copying them with **my** ratio, **my** filters, and **my** balance?_
Those are different questions. A leader pays no copy fees, has no follower lag, and never has a trade filtered out. You have all three. Backtesting is where that gap becomes a number.
Open it from any trader profile: search a wallet address, or pick a trader from [Top Wallets](/app/top-wallets), then click **Backtesting** in the header. You need to be signed in.
> ⚠️ **Read this first:** a backtest is a **simulation, not a recording**. Polymarket does not publish historical order books. Olympus therefore reconstructs executions from the public historical trade tape and marks positions from historical price data, while reporting when either source is missing. See [What The Simulation Does Not Model](#what-the-simulation-does-not-model) before you trust a number.
---
## Step-By-Step: Running A Backtest
### Step 1 — Open A Trader Profile
Find a wallet through [Top Wallets](/app/top-wallets), the [Polymarket leaderboard](https://polymarket.com/leaderboard), or by pasting an address into the Olympus search bar.
### Step 2 — Click Backtesting
The **Backtesting** button sits in the profile header, next to **AI Analyze** and **Copy trade**.
### Step 3 — Choose Your Window
Two ways to bound the replay:
- **By date** (default) — `7d`, `30d`, or a `Custom` from/to range. Windows are capped at **90 days**.
- **By trade count** — turn **By date** off and set **Number of last trades** instead (default `100`, up to `80,000`). This replays the leader's most recent N trades, scanning back up to 90 days.
Trade count mode exists for fast leaders. A bot firing thousands of trades a day will not fit a full week inside the data limits, so asking for "the last 500 trades" gets you a complete, honest sample where "the last 7 days" would get you a truncated one. If the leader trades fast enough for this to matter, Olympus estimates their pace when the modal opens and warns you before you run.
### Step 4 — Pick A Settings Source
- **My settings** — the settings you already use for this leader, if you follow them
- **Manual** — start from defaults and edit freely
- **Public preset** — a shared preset, when one is available
Tabs only appear when you have more than one option. Edits here are local to the backtest and never touch your live copy settings.
### Step 5 — Set Your Sizing
**Starting balance** seeds from your active wallet's equity, and defaults to `$1,000` if that is unavailable. Leave it blank to simulate an unlimited bankroll — useful for judging the strategy in isolation, but it changes what ROI means (see [Reading The Results](#reading-the-results)).
**Ratio %** is what fraction of the leader's trade you copy. The refresh icon next to it recalculates the ratio from your starting balance against the leader's balance, both including open positions — the same calculation the live ratio calculator uses.
Everything else lives in collapsible sections: **Entry filters**, **Market filters**, **Execution mode**, and **Risk exits**.
### Step 6 — Run It
The run is queued and polls until it finishes, with a progress bar tracking rows fetched. Identical requests share one run, and results are cached for about 15 minutes.
---
## Reading The Results
### The Headline Numbers
| Metric | What it actually means |
| ------------------- | ----------------------------------------------------------------------------------- |
| **PnL** | Realized PnL plus mark-to-market on still-open positions, **net of estimated fees** |
| **ROI** | PnL divided by your bankroll — but see the warning below |
| **Win rate** | Share of positions with a terminal outcome that ended positive |
| **Participation** | Leader BUY/SELL fills mirrored out of every eligible leader trade fill |
| **Follower orders** | Filled follower orders; one accumulated order may represent several leader fills |
| **Drawdown** | The largest peak-to-trough fall during the window |
> ⚠️ **ROI means two different things.** If you set a **Starting balance**, ROI is measured against that bankroll — return on the money you committed. If you leave it blank, ROI is measured against **capital at risk**: the peak amount deployed at once. The second number is almost always larger and is _not_ a return on your account. Compare two backtests only when both used the same basis.
### The Chart
Your simulated equity curve is plotted against the **leader's** curve on the same grid. The leader's line is deliberately raw — no fees, no sizing, and no filters. Drag the timeline brush to zoom, use **Reset zoom** to return to the full window, and click either legend series to hide it; Shift-click isolates that series. The Y-axis follows only the visible series and selected time range.
### Evidence Gates
Six conservative checks on whether the result is worth believing at all. They are about **sample quality**, not profit:
| Gate | Passes when |
| ----------- | ------------------------------------------------------------------ |
| Trades | at least **100** copied trades |
| Markets | at least **20** unique markets |
| Active days | at least **14** distinct trading days |
| Top market | no single market drives more than **40%** of realized PnL |
| Unrealized | no more than **50%** of PnL is still marked-open |
| Unpriced | no more than **25%** of capital at risk sits in unpriced positions |
A big green PnL that passes two of six gates is a small sample with a lucky streak, not an edge. The gates exist specifically so that a thin result cannot present itself as a confident one.
### The Verdict
Olympus grades each run as **Do not follow**, **Cautiously follow**, or **Strong candidate**, with a confidence level. The rules are fixed:
- **Do not follow** — the sample is too thin, or the simulation lost money
- **Strong candidate** — requires the walk-forward test to hold **and** every quality gate to pass. There is no shortcut to this grade
- **Cautiously follow** — everything in between
The verdict is a heuristic over the gates above. It is not advice.
### Walk-Forward
The covered window is split into **three consecutive sub-periods** and your settings are replayed in each. If a strategy only worked in one of the three, you are looking at a streak rather than a method.
> 💡 **What this is not:** nothing is trained on one period and tested on another. The same settings run on all three. It catches results that depend on one hot streak; it does **not** validate that your parameters generalize to a wallet or period the backtest never saw.
Sub-periods where you copied zero trades are excluded rather than counted as failures.
### Execution Sensitivity
The replay still reports the existing spread-sensitivity passes for compatibility. Evidence-priced fills do not receive an invented spread adjustment, so these passes may be identical when historical execution coverage is complete. Treat a flat sensitivity result as “the historical evidence was reused,” not proof that future slippage cannot matter.
### Skipped Trades
Every skipped leader trade is tagged with a reason, and the top reasons are counted with the leader dollars behind them. Each reason links to the setting that caused it, so you can go straight to the knob.
Skips are not automatically bad — filtering out a leader's worst markets is the entire point of filters. What matters is _which_ trades you skipped. Skipping their losers is an edge. Skipping their winners is a leak. Some reasons are not filters at all: `ACCUMULATING_BUY` means small buys were batched, and `LEADER_PRICE_EXTREME` means the leader traded under 1¢ or over 99¢, which Olympus never copies regardless of settings.
### Leader vs You
The result itemizes _why_ your number differs from the leader's: position sizing, fees, execution spread, filtered trades, size caps, bankroll limits, and missed fills.
> 💡 The leader baseline here is **windowed and coverage-matched**, so it will not match the lifetime PnL on their trader page. That is intentional — comparing your 30-day simulation against their all-time profit would be meaningless.
---
## Auto-Tune With AI
**Auto-tune with AI** reads the finished run — your settings, the metrics, the skip reasons, the verdict, and your cached Wallet Analysis if you have one — and suggests settings changes with a written rationale. The changes are applied and the backtest re-runs automatically.
It can adjust 14 knobs: ratio, max trade size, max market size, the odds band, liquidity and volume floors, max days out, the trade-count caps, min trigger, and the buy-at-minimum / accumulation choice. Every value is clamped to a valid range, so a tuned re-run cannot fail validation.
> ⚠️ **Auto-tune does not guarantee a better result.** It is a single model suggestion, and nothing compares the tuned run against the previous one or rejects a worse outcome. Treat it as a starting hypothesis and read the new numbers yourself. If the tuned run is worse, that is a real and useful answer.
Auto-tune is limited to **once per hour per user**, and the button shows a live countdown when it is on cooldown. A failed attempt does not burn your hour. Auto-tune also recalculates your ratio from balances, which overrides whatever ratio the model suggested.
---
## What The Simulation Does Not Model
This is the most important section on the page. Olympus reports these limits inside the result rather than hiding them, and you should read a backtest with all of them in mind.
**Executions are reconstructed from trades, not historical books.** Polymarket does not expose historical order-book snapshots. For an immediate order, Olympus searches the public trade tape from the next whole second through the next 15 seconds and supports partial fills. For a resting maker order, the tape must trade at least one tick through the submitted limit; merely touching it is classified as uncertain and unfilled. This cannot prove queue position or exact depth, so the result labels this source as trade-proxy evidence rather than full book coverage.
**Missing execution evidence never invents a fill.** Limit-order runs fetch complete public trade slices only for markets that the selected settings could copy. If the requested interval contains more candidate markets than one run can support, the replay uses the newest contiguous fully evidenced interval and reports the shorter duration. If no non-empty supported interval remains, the run fails instead of treating missing evidence as an unfilled order. Post-only execution also requires historical book state that Polymarket does not provide, so it is reported as unavailable rather than guessed.
**Settlement coverage can shorten a fast leader's window.** One run can enrich at most 2,500 replay markets with complete lifecycle and filter metadata. When a leader exceeds that budget, Olympus uses the newest contiguous supported suffix and shows both the requested and effective durations. If lifecycle, metadata, reconciliation, execution, or terminal valuation remains incomplete, diagnostics retain the partial accounting but PnL, ROI, win rate, drawdown, leader comparison, and setting advice are shown as unavailable.
**Resting orders use their actual evidence time.** Cash or shares are reserved while an order rests. Later trades see those reservations, expirations release them, and every order whose configured expiry falls after the replay remains pending at the window boundary. A configured limit-sell fallback runs only when its expiry is reached inside the replay. BUY and SELL expiration settings therefore affect the replay.
**Some settings are accepted but not simulated.** These do nothing to the replay today, and the result panel lists them explicitly:
- Stop loss
- Take profit
- Max drawdown, and Include unrealized PnL
- Counter trading
- Min spend
**Open positions are marked without lookahead.** At each replay timestamp, Olympus uses only the latest historical price at or before that time, carries it forward with a reported age, and uses execution price before the first mark. Historical windows never substitute today's price. Positions with no defensible historical or terminal price remain unpriced and are excluded from PnL, ROI, and win rate; the Unpriced gate exposes how much capital this affects.
**Coverage may be shorter than you asked for.** Activity pulls and limit-execution evidence are bounded by separate row, market, and time budgets. On a fast leader those bind long before the 90-day cap does. The Coverage panel reports the actual interval, the requested interval, why it was shortened, and the candidate markets covered by complete trade evidence.
**Fees are modeled at the standard rate.** The replay charges the Olympus fee of **0.75%** of notional — tapering toward zero below 3¢ and above 97¢ — plus Polymarket's own market fee where the market has one. Subscription and community fee discounts are **not** modeled, so if you have one, your real fees would be lower than simulated. The leader's baseline curve pays no fees at all.
---
## Limits
- **Sign-in required.** Backtesting itself is not geo-restricted; the **start copying** action inside the modal is
- **10 runs per 10 minutes** per user. Joining an identical in-flight run or getting a cached result does not count against it
- **Auto-tune: once per hour** per user
- **90-day cap** on date windows; up to **80,000** trades in trade-count mode
- Results are cached for roughly **15 minutes**; identical requests share one run
- Interactive rows are capped for browser performance, while summaries use the full ledger. Diagnostic CSV export fetches every retained detail page and aborts instead of producing a partial file if any page expired
---
## Reproducibility
The replay itself is deterministic — no randomness anywhere, so the same request returns the same result. But **re-running later can legitimately give a different answer**, because:
- the `7d` / `30d` presets and trade-count mode all end at _now_, so the window slides
- current-ending windows may use live terminal marks, and those marks move
- markets resolve and data coverage improves over time
Pin a **Custom** window if you want a stable basis for comparing settings.
---
## Good Practices
- **Backtest before you follow, not after you lose money.** That is the entire point of the feature
- **Check the gates before the PnL.** A result that fails the sample gates is noise, no matter how green it is
- **Change one setting at a time.** Otherwise you learn that something helped, but not what
- **Check execution and valuation coverage.** A profitable result with missing trade evidence or stale marks is not a fully evidenced result
- **Check what you skipped.** If your filters removed the leader's winners, tighten the thesis, not the filters
- **Use a fixed Custom window when comparing runs**, so you are comparing settings rather than comparing two different weeks
- **Do not read a backtest as a forecast.** A good backtest tells you a leader was _plausibly copyable over one past window_. It does not tell you what next month does
> ⚠️ **Past performance is not a promise of future results.** A backtest is a simulation over a window the market has already resolved, using reconstructed executions, historical marks, and estimated fees. It cannot know about a leader who changes strategy, a market regime that shifts, or liquidity that dries up. Use it to eliminate wallets you should not copy — that is what it is genuinely good at — rather than to predict what you will earn.
---
## Olympus Sample Copy Trading Settings
https://www.olympusx.app/docs/05-sample-settings
Example copy trading settings for Olympus and Polymarket, with sample profiles for conservative, event-driven, active, and conviction-based trading styles.
# 🧭 Olympus Sample Copy Trading Settings
This page gives you **example copy trading settings** for different styles of trading on Olympus.
These are not magic numbers or one-size-fits-all presets. They are meant to help you start with a setup that matches your risk tolerance, trading pace, and market preference.
Use them as a starting point, then adjust based on your own balance, goals, and experience.
---
## 💡 Before You Copy These Settings
A good wallet setup should match:
- your account size
- your risk tolerance
- the type of wallets you follow
- how active or selective you want your bot to be
A setup that works well for a slow macro trader can be terrible for a fast sports or high-frequency wallet.
If you're new, start more conservatively than you think you need.
Olympus may also show a **Risk checkpoint** before you copy a wallet that looks bot-like or extremely high-frequency. Treat that as a sign to reduce size, tighten filters, and consider **Limit Buy Mode** before enabling copying.
> 💡 **Do not guess which profile fits.** Every setup below is a starting point, not an answer. Open the trader's profile, click **Backtesting**, and replay these settings against that specific leader's history before you apply them. A profile that suits one wallet can be badly wrong for another, and a backtest tells you which in about a minute. See [Backtesting](/docs/18-backtesting).
---
## 💰 Example Assumptions
The examples below assume:
- **Account size:** around `$10,000`
- **Max Trade Size:** usually around `5%` of account value or less
- **You are using wallet-specific filters**
- **You may need to adjust these settings upward or downward based on the trader you follow**
- **Maximum Price Deviation (%)** can use your global default or a wallet-specific override
If your balance is much smaller or larger, your settings should usually scale with it.
---
## ⚡ Following 5-Minute Crypto Wallets
_High-frequency copying of crypto bot wallets that trade Polymarket's 5-minute (and 15-minute) up/down markets._
This style is different enough from the profiles below that it gets its own dedicated guide, including a real example setup. Click below to expand it.
Fast crypto bot wallets can place dozens of trades per hour. They can be profitable to copy, but they punish sloppy sizing and loose execution harder than any other wallet type. Before copying one, read the [5 and 15 minute crypto bot wallet guidance](/docs/07-wallet-selection-guide#-short-horizon-crypto-bot-wallets) and treat your first weeks as an experiment.
### Get the ratio right first
Your **Ratio %** is the single most important setting here, and the rule is simple:
> **Match the leader's risk, not their dollar size. If the trader is risking `1%` of their portfolio per position, your copied position should also be about `1%` of yours.**
The ratio that achieves this is your portfolio value divided by the leader's portfolio value. That is exactly what the **Ratio Recalculator** (the circular-arrows button next to the Ratio % field) computes for you — click it instead of guessing.
In the example below, the recalculated ratio is `5%`, which means this follower's portfolio is about a twentieth the size of the leader's. When the leader risks `1%` of their stack on a position, the copied trade lands at roughly `1%` of the follower's stack too.
Never reuse a ratio number you saw someone else use. The correct ratio is specific to **your balance vs. that leader's balance**, and it changes as either one grows or shrinks — recalculate it periodically.
### Real example setup
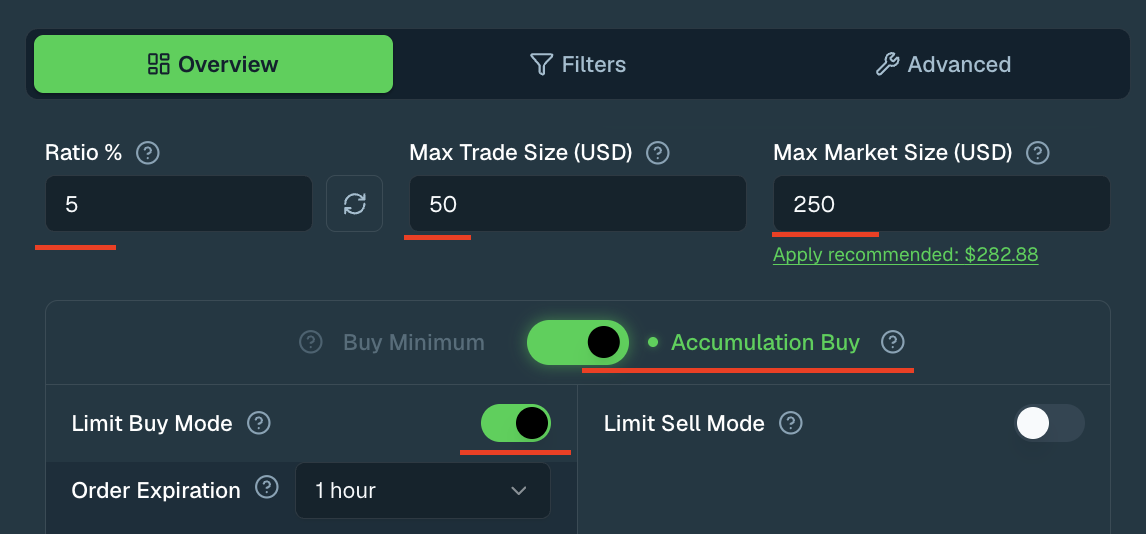
**Overview tab:**
- **Ratio %:** set via the **Ratio Recalculator** (the circular-arrows button next to the field) — `5%` here, but yours will differ
- **Max Trade Size (USD):** `$50` — keeps any single copied trade modest while testing
- **Max Market Size (USD):** `$250` — deliberately tighter than the recommended `$282.88` shown under the field; you can apply the recommendation later once the wallet proves it copies well
- **Accumulation Buy:** enabled, so tiny eligible copies are batched into fewer, right-sized orders instead of each one being rounded up to the minimum tradable size — 5-minute bots often send hundreds of small clips, and rounding each one up to the minimum is the single most common way followers lose money copying a fast wallet (see the watch-out below)
- **Limit Buy Mode:** enabled, with **Order Expiration** at `1 hour` — limit entries protect you from spread crossing and taker-fee drag, which compound fast at this trade frequency
- **Limit Sell Mode / Post-Only:** off
- **Stop-Loss / Take-Profit:** left empty — 5-minute markets resolve too quickly for them to matter much here
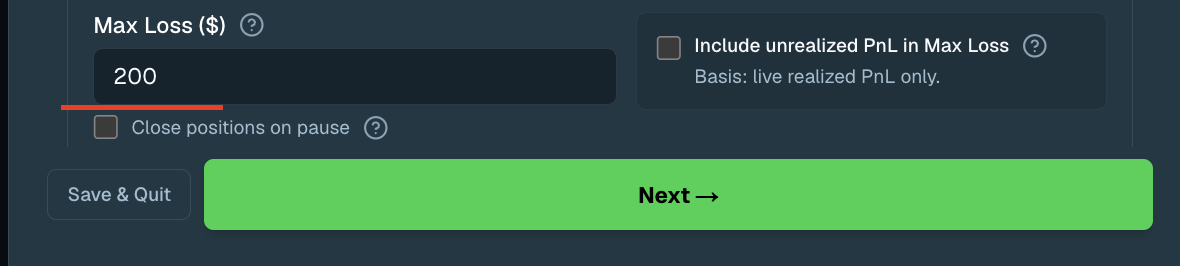
- **Max Loss ($):** `$200` — a hard kill switch that pauses copying this wallet once your realized losses on it reach the threshold. Always set this when testing a fast bot; a bot can lose many trades in a row before you notice. **Include unrealized PnL in Max Loss** and **Close positions on pause** are both left off, so the kill switch is based on live realized PnL only and won't force-close open positions when it trips
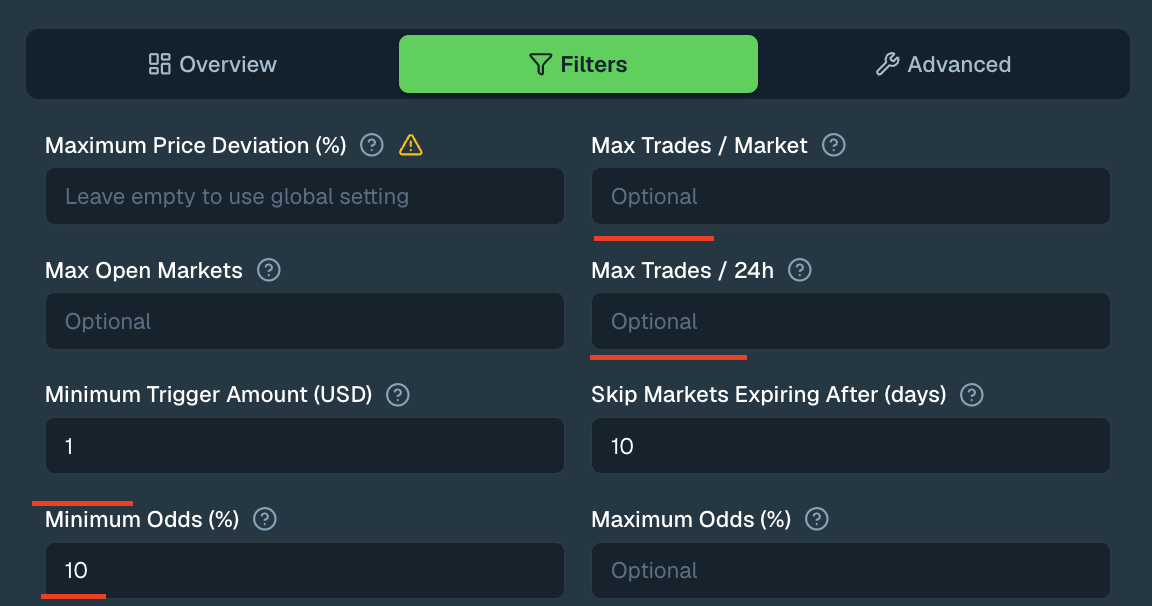
**Filters tab:**
- **Minimum Trigger Amount (USD):** `$1` — effectively no trigger filter, because bot wallets often split entries into small clips you still want to follow
- **Skip Markets Expiring After (days):** `10` — a light backstop in case a longer-dated market ever shows up under the same wallet
- **Minimum Odds (%):** `10` — skips extreme long-shots and very late entries below 10¢
- **Maximum Price Deviation (%):** left on the global default; fast markets move quickly, so an overly tight deviation will skip most entries
- **Max Trades / Market** and **Max Trades / 24h:** left open in this example — the small trade size and the Max Loss kill switch do the capping instead. Set them if you want a harder bound on activity
- Liquidity and volume filters are unnecessary here since the wallet only trades one market type
### Watch-outs
- **Buy Minimum can inflate your effective ratio — this is the #1 way followers lose money on fast wallets.** If your intended copy size is `$0.50` and it gets rounded up to the minimum on every one of hundreds of daily clips, your real spend can run many times your configured ratio, so you can lose money even in a window where the leader profits. Olympus warns you about this in three places — a bot-speed badge on the wallet in your Wallets and Multi-Wallet tables, an inline warning next to the Buy Minimum / Accumulation Buy toggle, and a risk checkpoint when you first follow a bot-speed wallet — but the fix is always the same: use **Accumulation Buy**, as in the example above.
- **Test in isolation.** Copy only this wallet at first (a separate Olympus wallet is ideal), compare your copied PnL against the leader's, and only scale up after the results hold.
- **Crowded bots copy worse.** If a wallet has many copiers, you compete for the same fills — judge it by your own fill quality, not its headline PnL.
---
## 🟢 Conservative Macro Trader
_Long-hold, lower-frequency copying for political, macro, or slower-moving markets._
**Best for:** Users who want steadier exposure, fewer trades, and tighter control over position sizing.
### Suggested Settings
- **Ratio %:** `0.5%`
- **Max Trade Size (USD):** `$500`
- **Max Market Size (USD):** `$1,000`
- **Minimum Trigger Amount (USD):** `$1,000`
- **Max Open Markets:** `10`
- **Max Trades / Market:** `2`
- **Skip Markets Expiring After (days):** `30-90`
- **Minimum Odds (%):** `15`
- **Maximum Odds (%):** `90`
- **Maximum Price Deviation (%):** `3-5`
**Limit Buy Mode:** Usually optional. It can help with entry quality, but slower-moving wallets often work fine without it.
**Why this works:** This setup is built to avoid overtrading, ignore noise, and keep sizing controlled in markets where trades tend to be more thesis-driven.
---
## 🟡 Event or Sports Trader
_Medium-frequency copying for sports, event-driven, or faster-resolving markets._
**Best for:** Users who want more activity than macro trading, but still want reasonable guardrails.
### Suggested Settings
- **Ratio %:** `0.25%`
- **Max Trade Size (USD):** `$500`
- **Max Market Size (USD):** `$1,000-$1,500`
- **Minimum Trigger Amount (USD):** `$2,000`
- **Max Open Markets:** `7`
- **Max Trades / Market:** `3`
- **Skip Markets Expiring After (days):** `7-21`
- **Minimum Odds (%):** `20`
- **Maximum Odds (%):** `85`
- **Maximum Price Deviation (%):** `4-6`
**Limit Buy Mode:** Often worth testing, especially in thinner or fast-moving event markets.
**Why this works:** This profile gives you more flexibility for active event trading while still limiting churn and avoiding very small or low-quality entries.
---
## 🔵 Active Trader
_Higher-frequency copying for wallets that enter often, scale in, or trade shorter-term setups._
**Best for:** More advanced users who understand slippage, missed fills, and execution trade-offs.
### Suggested Settings
- **Ratio %:** `0.1%`
- **Max Trade Size (USD):** `$100-$250`
- **Max Market Size (USD):** `$500`
- **Minimum Trigger Amount (USD):** `$500`
- **Max Open Markets:** `5`
- **Max Trades / Market:** `3-5`
- **Skip Markets Expiring After (days):** `1-7`
- **Minimum Odds (%):** `40`
- **Maximum Odds (%):** `65`
- **Minimum Liquidity (USD):** `$10,000+`
- **Minimum 24h Volume (USD):** `$5,000+`
- **Maximum Price Deviation (%):** `5-8`
**Limit Buy Mode:** Often helpful. If you copy active traders without price protection, slippage can add up quickly.
**Limit Sell Mode:** Use carefully. If you enable it, keep the sell timeout short.
**Why this works:** This setup is designed to stay selective, reduce slippage risk, and avoid getting dragged into too many weak or noisy markets.
If Olympus flags the wallet as bot-like or shows very high recent trade counts, avoid copying it with aggressive market-style buys until you understand the fill quality. Limit Buy Mode may miss some trades, but it can reduce spread crossing and taker-fee drag.
For fast 5 and 15 minute crypto bot wallets, see the **Following 5-Minute Crypto Wallets** section above and the [5 and 15 minute crypto bot wallet guidance](/docs/07-wallet-selection-guide#-short-horizon-crypto-bot-wallets) before sizing up. Those wallets usually need isolated testing, conservative market caps, and stricter execution controls.
---
## 🟣 Conviction Trader
_Lower-frequency copying for larger directional trades and stronger conviction entries._
**Best for:** Users who want exposure to bigger thesis trades without letting one wallet dominate the whole account.
### Suggested Settings
- **Ratio %:** `0.3-0.5%`
- **Max Trade Size (USD):** `$500`
- **Max Market Size (USD):** `$1,000-$1,500`
- **Minimum Trigger Amount (USD):** `$3,000+`
- **Max Open Markets:** `5`
- **Max Trades / Market:** `1-2`
- **Minimum Odds (%):** `25`
- **Maximum Odds (%):** `75`
- **Maximum Price Deviation (%):** `4-6`
**Limit Buy Mode:** Optional, but useful when you want cleaner entries on larger trades.
**Why this works:** This profile is meant to participate in strong trades without overexposing your balance to one leader, one market, or one idea.
---
## ⚠️ A Few Practical Rules
- Start with a lower **Ratio %** than feels exciting.
- Always set a **Max Market Size (USD)**.
- Use **Maximum Price Deviation (%)** to protect against bad fills, but remember that setting it too tight can cause missed entries, especially on market buys.
- Use **Minimum Trigger Amount (USD)** to filter out tiny leader trades.
- Use **Buy at Min** only for slower wallets where tiny eligible trades are rare — for any bot-speed wallet (500+ trades/48h), use **Accumulation Buy** so small copies build into right-sized orders instead of each one being rounded up.
- High-frequency wallets usually need stricter filters than slower wallets.
- If you enable **Limit Buy Mode** or **Limit Sell Mode**, expect different fill behavior than standard copying.
- Consider **Fallback Limit Order** for fast or thin markets where you would rather leave a short-lived order than skip the trade entirely.
- If you want automatic exits, you can layer **Stop-Loss / Take-Profit** on top of these profiles after your core copy settings are dialed in.
---
## 🎯 Final Note
These examples are meant to help you get started faster, not replace judgment.
The best settings depend on the wallet you follow, the market category, and how much execution risk you are willing to accept. Start simple, stay conservative, and adjust over time as you learn how your bot behaves.
---
## Olympus Risk & Ratio Management
https://www.olympusx.app/docs/06-risk-ratio-management
Learn how to manage copy trading risk on Olympus and Polymarket using better sizing, ratio settings, market caps, and execution controls.
# ⚠️ Olympus Risk & Ratio Management
Copy trading can save time, but it can also magnify mistakes fast if your settings are too aggressive.
The goal is not to copy every trade as closely as possible. The goal is to copy in a way that fits **your own balance, risk tolerance, and execution limits**.
Olympus gives you the tools to do that, but they only work if you use them well.
---
## 📐 Start With Ratio Sizing
Your **Ratio %** is one of the most important settings in Olympus.
It controls how much of a leader's trade you copy. If your ratio is too high for your account size, you can become overexposed very quickly.
### Simple rule of thumb
> **Your Ratio % should roughly reflect your balance compared with the leader's portfolio size.**
Example:
- Your balance: `$1,000`
- Leader balance: `$2,000,000`
That is roughly `0.05%` of their size.
If they place a `$60,000` trade, your copied size would be about `$30`.
That is much safer than blindly using the same ratio on every wallet.
### Best practice
- use a lower ratio than feels exciting
- treat each wallet differently
- recalculate your ratio as your balance changes
- do not use the same ratio for a whale and a smaller trader
Olympus includes a **Ratio Recalculator** for each wallet. It helps you size more realistically based on your portfolio, the leader's portfolio, and current open positions.
In practice, it is usually a conservative place to start. If you are not sure what ratio to use for a specific wallet, clicking that button is a good way to get an initial value instead of guessing.
From there, you can watch how the wallet behaves and raise the ratio gradually by hand if the recommended size feels too small for your goals.
---
## 💰 Control Market Exposure
Even a good ratio can still create bad risk if you do not cap exposure at the market level.
### The most important protection
**Max Market Size (USD)** is one of the best safety settings in the product.
It acts as a cap on how much total capital you can commit to one market for that wallet.
That matters because some traders:
- scale in multiple times
- re-enter after partial exits
- keep adding to the same idea
Without a market cap, one active wallet can quietly pull too much of your account into one prediction.
### Good rule of thumb
> Keep **Max Market Size (USD)** modest relative to your total balance, especially when starting out.
For many users, something around `2-5%` of account value per market is a much safer place to start than leaving it wide open.
### Other settings that help control exposure
- **Max Trade Size (USD)** limits the size of any one copied trade
- **Max Trades / Market** limits how many times the bot can add into one market
- **Max Open Markets** limits how many separate markets a wallet can have open at once
- **Max Trades / 24h** helps keep very active wallets from overwhelming your account in a single day
---
## 🎯 A Practical Sizing Mindset
If you are not sure where to start, keep it simple:
- keep single-trade size small relative to your account
- keep market-level exposure capped
- assume some wallets will trade more often than expected
- increase size only after you understand how a wallet behaves
A small setup that survives is better than an aggressive setup that blows up early.
---
## 💸 Execution Risk Matters More Than Most Users Expect
A leader can be directionally right and still give you a bad copy-trading result if execution is sloppy.
That is because your performance is affected by:
- spread
- slippage
- trade timing
- market liquidity
- price deviation settings
If a wallet constantly enters in thin markets or aggressive spots, your fills may be worse than theirs even when copying correctly.
### Two settings that matter a lot here
**Maximum Price Deviation (%)**
This controls how far your fill is allowed to drift from the leader's price before Olympus skips the trade.
- too tight: you may miss many entries
- too loose: you may enter poor fills
You can set a global default in General Settings and optionally override it per wallet in Filters.
**Limit Buy Mode**
This can help reduce slippage by placing a limit order at the leader's execution price instead of forcing an immediate market-style fill.
That can improve entries, but it also creates fill risk. Some trades simply will not fill if the market moves away too quickly.
Limit buys are not guaranteed maker orders. If your limit price crosses the current ask by the time the order lands, the buy can fill immediately as a taker order and may still incur taker fees.
**Market-style copied buys**
When Limit Buy Mode is off, Olympus prioritizes faster copied buys. This can help capture more leader trades, but market-style buys may cross the bid/ask spread and pay taker fees.
For active wallets, thin markets, and fast 5- or 15-minute markets, that fee and spread drag can compound quickly.
**Fallback Limit Order**
If you prefer not to skip a copied buy when immediate execution fails, Olympus can place a short-lived fallback limit order instead.
That can recover some otherwise missed trades, but it also means you may have more pending orders sitting open in fast markets.
### The real trade-off
> Better protection usually means more skipped trades. More aggressive copying usually means worse fills.
That is normal. You are choosing where to sit on that trade-off.
### Stop arguing with yourself and measure it
[Backtesting](/docs/18-backtesting) puts numbers on both sides of that trade-off for a specific leader. Two panels matter most here:
- **Slippage sensitivity** re-runs the whole simulation at 0.5×, 1×, 2×, and 3× the modeled spread. If the result only works at 1×, execution risk is not a footnote for that wallet — it is the whole story
- **Skipped trades** shows what your protection actually cost you, broken down by which setting did the skipping
Keep in mind the backtest models fills with an assumed spread rather than replaying real ones, so treat it as a way to compare settings against each other, not as a promise of your fill quality.
---
## 🧪 Use Filters to Avoid Bad Markets
Not every copied trade is worth taking.
Filters help you avoid low-quality setups before they become expensive mistakes.
Useful filters include:
- **Minimum Odds (%)**
- **Maximum Odds (%)**
- **Minimum Liquidity (USD)**
- **Minimum 24h Volume (USD)**
- **Minimum Trigger Amount (USD)**
- **Skip Markets Expiring After (days)**
These are especially helpful when copying:
- fast traders
- noisy wallets
- traders who jump into thin or low-volume markets
- wallets that make lots of tiny probe trades
If you are taking too many weak entries, the answer is often not a higher ratio. It is better filters.
Another practical choice is how Olympus handles very small copied buys:
- **Buy at Min** rounds tiny eligible trades up to the minimum tradable size
- **Accumulation Buy** lets small buys build up until they reach tradable size
That setting affects how much noise or overtrading you pick up from active wallets.
---
## 🧘 Be Careful With High-Churn Wallets
Some wallets trade too often, too broadly, or too noisily to copy well.
That does not always mean they are bad traders. It may simply mean their style is not a good fit for your account size or your execution settings.
Be more cautious with wallets that:
- jump between too many unrelated categories
- trade very frequently without clear selectivity
- scale in constantly
- rely on aggressive execution in thin markets
- generate more activity than your account can comfortably absorb
For those wallets, you usually want:
- a lower **Ratio %**
- a lower **Max Market Size (USD)**
- stricter filters
- tighter daily trade caps
- more caution around market buys
- a stronger preference for **Limit Buy Mode** when price discipline matters
---
## 🚨 Common Mistakes
- setting a high **Ratio %** without comparing your account to the leader's size
- leaving **Max Market Size (USD)** blank
- copying active wallets with no trade caps
- using overly loose settings in thin markets
- using overly tight **Maximum Price Deviation (%)** and wondering why trades do not enter
- assuming Olympus automatically manages your risk for you
Olympus helps enforce your rules. It does not replace judgment.
---
## ⏳ Stop-Loss and Take-Profit
Stop-loss and take-profit are now part of Olympus's live risk controls.
They should not replace good ratio sizing or exposure caps, but they can add another layer of protection once your core copy settings are already disciplined.
For full setup details, see [Stop-Loss & Take-Profit](/docs/11-stop-loss-take-profit).
For now, the more important live protections are:
- **Ratio %**
- **Max Trade Size (USD)**
- **Max Market Size (USD)**
- **Max Trades / Market**
- **Max Trades / 24h**
- **Maximum Price Deviation (%)**
- **Limit Buy Mode**
- market quality filters
---
## 🎯 Final Takeaway
The safest copy-trading setups usually look a little boring.
They use smaller ratios, tighter market caps, better filters, and more patience.
That may feel less exciting at first, but it gives you more room to learn how a wallet behaves before you scale up.
---
## Stop-Loss & Take-Profit
https://www.olympusx.app/docs/11-stop-loss-take-profit
Automatically protect your positions with stop-loss and take-profit
# Stop-Loss & Take-Profit
Olympus can automatically sell your positions when they hit a price threshold you set. **Stop-loss** sells when your position drops too much. **Take-profit** sells when your position gains enough.
Triggers execute automatically once your threshold is hit — Olympus places a market sell as soon as the trigger condition is detected.
---
## Where to Set SL/TP
You can configure stop-loss and take-profit at three levels:
### 1. Global Defaults
Set default SL/TP percentages that apply to copy trading across all your followed wallets.
**How:** Settings > Trading > Default Stop-Loss & Take-Profit
These are used as fallbacks when a wallet doesn't have its own SL/TP configured. They apply to copy trading only — manual trades use per-position SL/TP settings.
### 2. Per-Wallet (Copy Trading)
Override the global defaults for a specific followed wallet. These apply to all copy-traded positions from that wallet.
**How:** Click a followed wallet > Overview tab > Risk Management section
Per-wallet settings take priority over global defaults.
### 3. Per-Position (Manual Trades)
Set SL/TP when placing a manual buy order, or add/edit them later from the Triggers tab on any market page.
**How:**
- **At buy time:** Check the "Take Profit / Stop Loss" box in the buy panel
- **After buying:** Go to the market page > Triggers tab > click "Add SL/TP" or edit existing triggers
---
## How It Works
1. You set a stop-loss (e.g. 20%) and/or take-profit (e.g. 50%) on a position
2. Olympus monitors the price in real time
3. When the price drops 20% below your entry → stop-loss triggers an automatic sell
4. When the price rises 50% above your entry → take-profit triggers an automatic sell
5. Whichever threshold is hit first executes — the other is cancelled
6. You get a Discord notification (if configured) with the result
---
## Good to Know
- **One trigger per position** — If you buy the same token twice, the first SL/TP values are kept. You can change them anytime from the Triggers tab.
- **You can edit or remove triggers** at any time from the Triggers tab on the market page.
- **Triggers sell your entire position** when they fire — partial sells are not supported for triggers.
- **If a sell fails** (rare), a 30-minute cooldown prevents repeated attempts. The trigger stays active and will try again after the cooldown.
---
## Recommended Starting Points
| Strategy | Stop-Loss | Take-Profit |
| ------------ | --------- | ----------- |
| Conservative | 10% | 25% |
| Balanced | 20% | 50% |
| Aggressive | 50% | 100%+ |
These are suggestions — adjust based on your risk tolerance and the market.
---
## Olympus Market Pages
https://www.olympusx.app/docs/09-market-pages
Learn how Olympus market pages work for manual trading on Polymarket, including charts, order books, live trades, and order types.
# 📊 Olympus Market Pages
Olympus market pages are where you research markets and place manual trades on Polymarket.
Whether you are checking a market before following a wallet or trading directly yourself, these pages give you the core tools you need in one place.
---
## 🔍 Finding Markets
You can open any market page through the **global search bar** in the header.
Start typing a market name, topic, team, or event, then click the result you want to open.
Market pages are useful for:
- researching price action
- checking liquidity
- watching live trades
- placing manual trades directly
---
## 📈 Price Chart
The price chart shows how a market has moved over time.
Depending on the market, you can use it to:
- switch between different timeframes
- inspect recent or long-term price action
- compare outcomes
- hover to see exact prices and timestamps
For binary markets, the chart helps you understand how **Yes** and **No** have moved.
For multi-outcome events, it helps you compare different candidates or outcomes more clearly.
On sports markets, Olympus can also show live game context directly on the market page.
---
## 📕 Order Book
The order book shows current bids and asks in the market.
This is one of the most useful parts of the page if you care about execution quality.
### What to look at
| Column | Description |
| --- | --- |
| **Price** | The price level for current orders |
| **Size** | The size available at that level |
| **Total** | The cumulative size up to that level |
### Why it matters
- **Bids** show what buyers are willing to pay
- **Asks** show what sellers are asking
- **Spread** shows the gap between the best bid and best ask
- **Depth** shows how much size is sitting near the current market
Tighter spreads and better depth usually mean cleaner execution.
If the spread is wide, market orders can become much more expensive than they first appear.
---
## ⚡ Live Trades
The live trades feed shows market activity as trades happen.
This helps you see:
- whether the market is active right now
- where recent executions are happening
- whether aggressive buyers or sellers are moving the market
- whether a sudden price move is happening with real volume behind it
Watching live trades is especially useful before entering thinner or faster-moving markets.
---
## 🎯 Multi-Outcome Events
Some Polymarket events have more than two possible outcomes.
In these cases, Olympus lets you inspect the event at a broader level instead of treating it like a simple Yes/No market.
You can:
- view the different outcomes in one event
- compare probabilities across outcomes
- switch between outcomes in the chart and trading panel
- inspect volume and liquidity for each outcome
This is especially useful for markets like elections, awards, or other outcome sets with many candidates.
---
## 💹 Trading Panel
The trading panel is where you place manual trades.
It updates based on the market, outcome, and order type you choose.
### Common controls
- **Buy / Sell** selection
- **Outcome selection**
- **Amount or share inputs**
- **Price previews**
- **execution or slippage warnings**
- **order-type controls**
Depending on the market and your current position, the panel can also support:
- **Split / Merge** actions for eligible positions
- quick access to **Stop-Loss / Take-Profit** setup through the market page workflow
Manual trading on market pages is separate from copy trading.
Your copy bot handles followed-wallet trades automatically, while market pages are for your own direct trading decisions.
---
## 🛒 Order Types
Olympus market pages support multiple order types depending on how you want to trade.
### Market Buy
Use this when you want to enter immediately.
- buys at the best available ask
- prioritizes speed
- can cost more when spreads are wide
This is the most direct way to enter a position, but it also means you are crossing the spread.
---
### Market Sell
Use this when you want to exit immediately.
- sells at the best available bid
- prioritizes speed
- can give you a worse exit when liquidity is thin
Like market buys, this crosses the spread.
---
### Limit Buy
Use this when you want more control over your entry price.
- you choose the maximum price you are willing to pay
- the order rests until someone sells into it
- you avoid paying above your limit price
- the trade may never fill if price runs away
This is often the better choice when spreads are wide or when you care more about price discipline than instant execution.
---
### Limit Sell
Use this when you want more control over your exit price.
- you choose the minimum price you are willing to accept
- the order rests until someone buys from you
- you avoid dumping immediately at a weak bid
- the trade may stay open longer or fail to fill if price moves away
This can help protect exits, but it also introduces timing risk.
---
## ⏱️ Limit Order Expiration
When using limit orders, Olympus lets you control how long those orders stay open.
That matters because an unfilled order can sit for a while if the market never returns to your price.
In practice, expiration settings help you balance:
- patience for a better fill
- risk of missing the trade
- how long you want capital tied up in an open order
You can then monitor those orders through the market's order views and the dashboard's **Open Orders** section.
---
## 🛡️ Triggers Tab
Market pages also include a **Triggers** tab for manual **Stop-Loss / Take-Profit** management.
From there, you can:
- add SL/TP to positions in the current market
- edit existing triggers
- remove triggers you no longer want
This gives you a direct way to manage exits without leaving the market page.
---
## 📱 Mobile Experience
Market pages also work on mobile.
On smaller screens, the layout is organized into tabs so you can switch between the main views more easily, such as:
- trading
- chart
- order book
- live market activity
That makes it possible to research and trade without needing the full desktop layout.
---
## 💡 Tips for Using Market Pages
- check the **spread** before placing market orders
- use the **order book** to judge whether your size is realistic
- watch **live trades** to see whether the move is active or fading
- use **limit orders** when price matters more than immediate entry
- compare outcomes before trading multi-outcome events
- be more careful in thin markets, especially when entering with size
---
## 🎯 Final Takeaway
Market pages are where Olympus becomes more than just a copy-trading tool.
They give you a full manual trading workspace for Polymarket, with the context you need to evaluate a market, understand execution, and choose how to enter or exit with more control.
---
## Bonds
https://www.olympusx.app/docs/18-bonds
Buy Polymarket outcomes the market has already made up its mind about, at 97¢ and up — and see exactly what you keep after fees before you commit a dollar.
# 🏦 Bonds
Every prediction market ends at exactly one of two prices: **$1.00** or **$0.00**.
Which means that somewhere on Polymarket, right now, there are outcomes trading at 98¢ because the market thinks they are very likely to land there. Usually most of the news is already in. What stands between that price and a dollar is **time, and the 2% chance the market has it wrong** — and somebody has to be willing to carry both.
Bonds finds those outcomes for you. All of them. Sorted, priced, and stress-tested.
Open [Bonds](/app/markets/bonds) from the app header.
---
## The Idea In One Line
**You pay 98¢ for something that pays $1.00 when it settles.** That's the whole product.
The catch — and there is always a catch — is that it pays $1.00 *if it wins*. If it loses, it pays zero. High probability is not certainty. We'll come back to that, and we'll be blunt about it, because the people who make money here are the ones who took that sentence seriously.
But first, the part nobody tells you.
---
## Why Anyone Buys These
**A high probability is not a decided outcome.**
At 97¢+ the market is saying something is very likely, usually because most of the news is already in. That's a genuinely different thing to hold than a coin flip, and it's why these behave a little like short-dated paper: a small return in exchange for parking USDC for a defined stretch of time. But the price is an estimate, not a verdict. At 97¢ the market itself is telling you that about 3 in 100 of these go the other way, and the ones that do cost you the entire stake. Everything below assumes you've taken that sentence seriously.
**A small edge, annualized, is not a small number.**
2% over 10 days is roughly **90% a year** at simple interest. Even 0.5% over 3 days annualizes to something no savings product will offer you. That's the part people miss when they see "2%" and move on: the number that matters isn't the return, it's the return *per unit of time your money was tied up*. The catch is symmetrical and you should hold both halves at once: the same math means one loss at 98¢ wipes out roughly 50 winners. This scales with patience and position count, not with size or cleverness.
**Somebody has to want out early, and they do.**
Winners often don't want to wait weeks for a market to formally resolve. They'd rather have their capital back today and put it into the next thing, so they sell at 96¢–98¢ and leave the last few cents on the table. That's where your return comes from, and it's worth being precise about what you're being paid for: not patience, but risk transfer. They hand you the remaining upside *and* the tail where the market or the oracle lands somewhere else. It isn't a mispricing you have to be smart enough to spot, and it isn't free money either.
**And the work is already done.**
There are thousands of markets. Finding the handful trading above your threshold *with* real depth *and* a tight spread *and* a near-term resolution date is hours of manual work that has to be redone every morning. Bonds is that scan, kept warm, sorted by what each one actually pays you after fees.
---
## Why Costs Decide This Trade
Here's the uncomfortable math of buying near-certainty: your upside is thin. A $100 bond at 98¢ buys you about 102 shares, and 102 shares pay out about $102 when they win. Two cents on the dollar. That's the trade.
Which means **costs are not a footnote — costs are the entire game.** When your gross return is 2%, the fee isn't a rounding error you can ignore. It's a real slice of the only thing you came for. It is, very often, the difference between a bond being worth doing and being a waste of capital.
That is exactly where these prices sit best on Olympus. **Positions this close to certainty fall into the cheapest band on the platform** — the rate slides down further the closer the price gets to $1 — and whatever discount you've already earned comes off on top of that. A bond that doesn't clear the bar somewhere else can still clear it here.
You don't have to take that on faith, and you shouldn't. **Every row shows your net return after fees, not the headline price.** Log in and it's calculated at your own rate, not a generic one — so the number on the row is the number that applies to you. Your current rate is always visible under [Fees](/docs/08-faq#-fees) and in your settings.
This is why Bonds is its own page. The pricing was already there. Bonds is the surface that finds every position that qualifies for it.
---
## Read This Before You Trade
We could sell this page harder if we left this section out. We're not going to.
**A 98¢ outcome that loses costs you the whole 98¢.** You risked $98 to make $2. That ratio is brutal and it is the honest shape of this trade: you will be right most of the time, and the times you are wrong will erase a lot of the times you were right.
This is the exact trade that feels safest and punishes carelessness hardest — because "97% likely" reads to your brain as "basically done," and your brain is wrong about that roughly 3 times in 100. Three percent doesn't sound like much until it's your position.
There's also a second failure mode that has nothing to do with the event. Even when the real-world outcome is settled beyond argument, Polymarket's oracle still has to say so, and it can be delayed, disputed, or land somewhere you didn't expect on a technicality. **Resolution risk is not the same as event risk**, and a bond can be right about the world and still cost you.
So Bonds is built to argue with you. Every row carries a risk label, a spread, real fill depth, and a plain-language list of what's wrong with it. **High**-risk rows are hidden until you deliberately go looking for them. None of that is decoration. It's there because the losing trade on this page always looks fine right up until it doesn't.
Trade this like an insurer, not like a lottery player: many small positions, priced carefully, never one that can hurt you.
---
## How People Actually Make Money Here
Three things separate the traders who compound on this from the ones who donate:
**1. Time is your real cost.** Two cents in three days is a completely different business than two cents in eight months. Same profit, same risk of being wrong — but one of them ties up your capital for a season while the world gets a chance to change its mind. Sort by **Ends**. Short windows are where the edge lives.
**2. Volume beats size.** The way you win at 2% is by doing it repeatedly with money you can afford to lose entirely, not by doing it once with everything you have. One 98¢ bond that resolves against you eats fifty winners. Position sizing *is* the strategy.
**3. Read the resolution rules.** Every single time. The most expensive losses on this page aren't surprises — they're markets that resolved exactly as written while the trader was reading the headline instead of the terms. Click **Open market** and read the actual winning condition before you size up.
And one thing that quietly ruins portfolios: **correlation**. Six bonds on six different markets that all hinge on the same election, the same ruling, or the same game is not six positions. It's one position, six times over, and it can go to zero all at once. Spread across *events*, not just across rows.
---
## Step-By-Step: Finding And Trading A Bond
### Step 1 — Open Bonds
Go to [/app/markets/bonds](/app/markets/bonds). The page opens on **97%+** with sensible defaults already applied.
### Step 2 — Pick Your Threshold
The **97%+ / 98%+ / 99%+** tabs set how certain you want the market to be. Higher threshold, less chance of it flipping, less profit per dollar. This is the trade-off, and it's yours to make.
### Step 3 — Cut The List Down
Use the filters: keyword search, resolution window (**6h** through **180d**), minimum 24h volume, maximum spread, and outcome side.
If you only touch one filter, make it **resolution window**. Start at 7d or shorter.
### Step 4 — Set Your Risk Appetite
Toggle the **Risk** chips — Low, Medium, Elevated, High. High is off by default and you have to opt in to see it. If you're new here, leave it off.
### Step 5 — Scan The Table
Sort by any column. The two that matter most: **Net Return** (what you actually keep after fees) and **Ends** (how long your money is locked up earning it).
### Step 6 — Open The Row
Click any row for the full picture: a 7-day price chart, payout previews at $100/$1k/custom, what your fill would actually cost at size, every reason the risk score flagged it, and the market's own rules.
**Check the price chart.** A bond that was at 80¢ yesterday and 98¢ today is a very different animal from one that's sat at 98¢ for a month.
### Step 7 — Trade It
Hit the cart icon for a quick buy pre-loaded with the right market and outcome, or **Open market** for the full trading panel. Bonds isn't a separate exchange — it's the same Polymarket order book you already trade, just filtered down to the part that qualifies for the cheapest fees.
---
## What The Numbers Mean
| Column | What it's telling you |
| --- | --- |
| **Buy** | What one share costs now. A winning share pays $1.00 at settlement |
| **Net Return** | What you keep on $100 if it wins, after fees. Not annualized. **This is the honest number** |
| **Ends** | How long your capital is committed |
| **Executable** | How much you can actually buy at this price. If this is small, your real price is worse than the one shown |
| **Vol 24h** | Real trading in the last 24h. Thin volume means you may be alone in this position |
| **Spread** | Gap between buy and sell price. Wide spread = expensive to change your mind |
| **Risk** | Our label, with reasons attached in the detail view |
**Net Return** is calculated on a simulated $100 fill and already has estimated fees baked in. Log in and it uses *your* rate rather than a generic one. Fees are estimates — the book can move between looking and trading.
**APR** annualizes that return so you can compare a 3-day bond against a 3-month one. It's a simple rate, not compounding — a bond settles once. On very short windows we cap the displayed number and show it with a `>`, because a true annualized figure on a 6-hour position is a fantasy number and we won't print it.
---
## The Risk Label, Plainly
Every row gets scored on what's visibly wrong with it: how far from certain the price is, how wide the spread is, whether there's real depth behind the price, whether anyone's actually been trading it, how soon it settles (too far out is risk; so is *right now*), whether the price just jumped, and what kind of market it is.
**Low** (0–14) · **Medium** (15–34) · **Elevated** (35–59) · **High** (60+)
Anything above Low tells you exactly why in the detail view. Read those reasons.
This score describes what the order book looks like today. **It is not a prediction and it is not a promise.** A Low-risk bond can lose. It just doesn't have anything visibly broken about it.
---
## Freshness
The badge next to the title tells you whether prices are **Fresh**, **Stale**, **Degraded**, or still **Warming up**, plus when they were last updated. If it isn't fresh, hit **Refresh** before you commit money.
Prices come from a cached snapshot that refreshes in the background, which is why the page is instant. It also means the number you're looking at is seconds-to-minutes old, not live to the millisecond. On a 98¢ bond that rarely matters. On a bond that's moving, it does — which is why we show you the badge instead of hiding it.
---
- You're buying outcomes at 97¢+ that pay $1.00 **if** they win and $0.00 if they don't. You're paid for carrying that risk, not for waiting.
- The return looks small until you annualize it. 2% over 10 days is roughly 90% a year at simple interest.
- The profit is small, so **costs decide whether this works at all** — these prices sit in the cheapest band on the platform, with your own discount on top, and every row shows the net return at your rate.
- Being wrong costs you the entire stake, not the 2%. Size accordingly.
- Prefer bonds that settle **soon**. Time is the thing you're actually being paid for.
- Read the resolution rules. Check **Executable** and **Spread** before sizing up.
- Don't stack six bonds that all depend on the same event.
- Many small positions, repeated. That's the whole strategy.
---
## Autobond
https://www.olympusx.app/docs/19-autobond
Set a budget and your rules once, and let Autobond buy 97%+ bonds for you around the clock, with a stop loss and a loss limit you control.
# 🤖 Autobond
Bonds at 97% and up do not sit around waiting for you. They appear when news lands, and the good ones are taken within minutes. Overnight, most of them come and go while you are asleep.
Autobond watches for you. You set a budget and the rules you are comfortable with, and it buys the bonds that fit, sells them if they turn against you, and stops when it has lost more than you said it could.
Open it from [Bonds](/app/markets/bonds), or go straight to [Autobond](/app/markets/bonds/autobond).
---
## What you set
Seven things decide everything Autobond does.
**Budget.** The most it will have tied up at once. Your money stays in your wallet until it actually buys something.
**Positions at once.** How many bonds it can hold. Your budget is split evenly between them, so a $300 budget across 3 positions puts $100 into each. No bond takes more than its share of the positions your budget can fund. If you raise your budget later, the extra spreads across your positions as they settle, instead of going into the next bond at once.
Each position needs at least $5. Polymarket will not take an order smaller than 5 shares, so a budget that leaves less than that per position cannot buy anything, and Autobond will not let you save it. Give it a bigger budget or fewer positions.
**Lowest odds to buy.** It will not buy anything the market rates below this. The floor is 97% and you cannot go under it.
**Highest odds to buy.** An optional ceiling on what Autobond will pay. Leave it empty for no ceiling. A ceiling can keep a high annualised return from disguising the tiny possible gain on a near-$1 buy.
**Lowest return to accept.** Expressed per year, so short bonds show large numbers. See [why that can mislead](#why-apr-can-mislead).
**Settles within.** Only bonds that finish inside this many hours are eligible.
**Sell if it drops.** Your stop loss, in cents. See [what it can and cannot do](#what-the-stop-loss-can-and-cannot-do).
You can also limit which subjects it buys, which risk ratings it accepts, and whether it may hold two positions on the same event. New setups block crypto, Elon Tweets and weather, because those markets can swing in seconds. You can remove any of those rules.
---
## How Autobond picks a bond
Every so often it looks at the bonds currently on offer and drops any that fail one of your rules. What is left has to also be buyable: there has to be someone selling, at a price that still meets your odds and return thresholds, in enough size to fill your per-position amount.
Before buying, Autobond also checks the current bids to make sure the entire planned position could be sold immediately. It skips the bond if there are not enough buyers for every share, or if the average available sale price is more than 2 cents below the planned buy price. It repeats this check immediately before placing or repricing the order.
If nothing survives, it buys nothing and waits. That is the normal case, not a fault. The panel titled **Why Autobond has not bought** on the Autobond page shows you exactly which rule ruled out the most bonds on its last look, and which bond came closest.
Loosening one rule at a time is the fastest way to widen the pool. Dropping your odds threshold from 99% to 97% usually has the biggest effect, and it is also the one that raises your risk the most.
---
## Why APR can mislead
A bond that pays 1% and settles tomorrow is roughly 365% a year. The same 1% over a month is about 12%. Nothing about the trade changed, only the clock.
That is why a very high return threshold does not filter for better bonds. It filters for bonds that settle soonest, and for the ones other people are not buying. If a bond is offering far more than its neighbours at the same odds, the usual reason is that the market is less sure than the price suggests, or that there is very little of it to buy.
Your odds threshold and your risk ratings do more to control your actual risk than the return threshold does.
---
## Fixed or reinvested profits
**Keep them.** Autobond keeps aiming at the budget you set. Profits build up in your wallet and are not put back to work. If you lose, it will use other available funds in your wallet to get back to your budget.
**Reinvest them.** Autobond adds your profits to its target, so positions grow as you win. Losses can take back profits you reinvested, but they never shrink your positions below your budget. Your Lifetime PnL and your loss limit still count every loss.
A worked example. You set a $1,000 budget across 4 positions, so $250 each.
- On **Keep them**, after making $200 you still have a $1,000 target and $250 positions. The $200 sits in your wallet.
- On **Reinvest them**, that $200 raises the target to $1,200, so positions become $300. After a $150 loss the target falls to $1,050 and positions become about $262.
- If you are down instead, say $150 from the start, the target stays at $1,000 and positions stay at $250.
Reinvesting puts your winnings at risk again. It is the more aggressive choice.
---
## What the stop loss can and cannot do
If you set 3 cents, Autobond tries to sell when the best price anyone is offering falls 3 cents below what you paid.
What it does well: it caps the slow bleed, where an outcome drifts from 98¢ to 95¢ to 90¢ as the market changes its mind over hours.
What it cannot do:
- **It cannot beat a settlement.** Most bonds that go wrong do not drift. They resolve. A 98¢ outcome that loses goes to zero at settlement, with no path down for a stop loss to catch.
- **It needs a buyer.** Selling requires someone on the other side. In a thin market at a bad moment, there may be nobody at your price, and the sale can take several tries or fail.
- **It sells at the going price, not your trigger.** The price it gets can be worse than the one that set it off.
Leaving it empty turns it off completely. Autobond will then hold every position until it settles, or until you sell it yourself from the Holding now tab.
---
## Why losses can pass your limit
**Stop buying after losing** is a circuit breaker on new buys. When your realised losses reach it, Autobond stops opening positions. It does not sell what you already hold.
So your total losses can end up larger than the number you set. Positions that were already open when the limit hit are still exposed, and they still settle on their own terms. If you want out of those too, sell them yourself from the Holding now tab.
The same is true of Stop Autobond: it stops new buying, and leaves your open positions running with their stop losses and settlement handling intact.
---
## Following what it did
**Holding now** lists what Autobond currently owns for you, what you paid, and what you make if each one wins. A row highlighted in amber or red is trading below what you paid.
**Finished** lists what has settled or been closed, with what you made or lost after fees. It starts with positions that actually opened; use **How it ended** to show all attempts, the ones held to the end, the ones you closed, stop losses, or attempts that did not open.
**What Autobond did** is the running log: every buy, sale, payout, and stop.
Each wallet runs its own Autobond, with its own budget, its own rules, and its own results. Switching wallets at the top of the page switches all of it.
---
## The honest part
These are still bets. A 98% outcome loses about one time in fifty, and when it loses you lose the whole position, not 2% of it. Run enough of them and you will meet that one.
Autobond does not change those odds. It only saves you from watching a screen. Set a budget you would be comfortable losing, keep the loss limit low while you are learning, and give it small positions until you have seen it run through a losing bond.
---
## Multi-Wallet
https://www.olympusx.app/docs/13-multi-wallet
Run separate Olympus wallet strategies, copy different leaders per account, and compare copy-trading performance wallet by wallet.
# 🧩 Multi-Wallet
Multi-Wallet lets you run several Olympus trading accounts side by side. Each wallet can copy its own set of leaders with its own settings, so you can separate strategies instead of mixing every copied trade into one account.
Use it when you want to:
- copy different traders from different wallets
- compare market-order and limit-order versions of the same copy strategy
- isolate higher-risk wallets from lower-risk wallets
- keep PnL curves clean for each account
- transfer funds between your own Olympus wallets when a wallet type supports it
Open Multi-Wallet from the app header or go directly to [Multi-Wallet](/app/multi-wallet).
---
## What the Page Shows
The Multi-Wallet page gives you an account-level view of your copy-trading setup.
You can see:
- total equity, cash, open-position value, and recent PnL across wallets
- each trading wallet connected to your Olympus account
- which copied wallets belong to each trading wallet
- per-wallet balances, positions, copied-wallet counts, and activity state
- PnL comparison charts for the account wallet and the wallet being copied
> You can use one global webhook for all activity, or set wallet-specific webhooks for individual followed wallets.
> 💡 **Why set up a webhook?**
>
> It gives you real-time trade notifications without needing to watch the dashboard.
> ❗ **Note:** Wallet-specific Discord webhooks override the global webhook.
---
## ▶️ Step 6: You're Live
By default the bot is ON!
That means:
- When a followed wallet opens or closes a trade, your trading wallet can mirror that action
- Your configured limits and settings will still be respected
> **Note:** Olympus continues running server-side, so your copy trading can keep working even if your browser is closed.
---
## 🎉 You're All Set!
You're now ready to use Olympus for manual trading, copy trading, or both.
---
## How Copy Trading Works on Olympus
https://www.olympusx.app/docs/04-how-copy-trading-works
Learn how copy trading works on Olympus for Polymarket, including trade mirroring, ratios, filters, limit modes, and wallet settings.
# ⚙️ How Copy Trading Works on Olympus
Olympus lets you copy trade on Polymarket by following trader wallets and mirroring their activity from your own trading wallet.
When a wallet you follow opens or closes a position, Olympus attempts to place the corresponding trade for you based on your wallet settings, risk limits, and execution rules.
Olympus is designed for instant mirroring, with copied trades submitted within the same second (0-second delay) when conditions allow.
That means your results are shaped by more than just the leader's trade. Your copy settings control position size, market filters, price protection, and whether Olympus uses market or limit orders.
---
## 🧠 The Core Mechanism
When a trader you follow opens or closes a position on Polymarket:
1. Olympus detects the trade activity.
2. Your wallet checks whether the trade passes your copy settings.
3. Olympus places the mirrored trade using your configured execution mode.
4. The result appears in your **Positions** and **Activity** tabs.
A copied trade may be skipped or changed if:
- it exceeds your size limits
- it fails your filters
- it falls outside your allowed price deviation
- a limit order does not fill in time
So copy trading is automated, but still governed by your own controls.
---
## 🧩 Where You Control Copy Trading
Each followed wallet has its own settings panel.
Those controls are grouped into three areas:
- **Overview** — size, ratio, and execution behavior
- **Filters** — which trades and markets are allowed
- **Advanced** — webhook, fallback execution, and special trading modes
This is where you decide how aggressively or conservatively each wallet should be copied.
---
## 📏 Overview Settings
These settings control how much you copy and how orders are placed.
| Setting | Description |
| --- | --- |
| **Ratio %** | The percentage of the leader's trade size that you copy. |
| **Max Trade Size (USD)** | The maximum size allowed for any single copied trade. |
| **Max Market Size (USD)** | A lifetime cap on how much total capital you can deploy into one market for that wallet. |
| **Below Min Limit, Buy at Min** | If your calculated trade amount is very small, Olympus rounds up to the minimum tradable amount instead of skipping it. |
| **Accumulation Buy** | Olympus can combine small buys in the same market outcome until they reach a tradable size. In limit mode, partial fills still accumulate per leader order. |
> Example:
>
> If a leader buys **$400 YES**, and your **Ratio %** is **25%**, your copied trade would aim for **$100**. If your **Max Trade Size** is **$80**, Olympus caps your trade at **$80**.
Olympus also includes a **Recalculate Ratio** option to help size your wallet relative to the leader's current balance.
---
## 📊 Filters
Filters let you control which copied trades are allowed.
### Trade and Position Limits
| Filter | Description |
| --- | --- |
| **Maximum Price Deviation (%)** | Limits how far your fill price is allowed to drift from the leader's trade before Olympus skips the copy. You can set a global default in General Settings and optionally override it per wallet in that wallet's Filters settings. |
| **Max Trades / Market** | Limits how many times Olympus can add into the same market for that wallet. |
| **Max Open Markets** | Limits how many different open markets this wallet can have at once. |
| **Max Trades / 24h** | Caps how many copied trades can be taken from that wallet in a 24-hour period. |
| **Minimum Trigger Amount (USD)** | Ignores very small leader trades that fall below your threshold. |
| **Skip Markets Expiring After (days)** | Skips trades in markets that expire too far in the future. |
### Market Quality Filters
| Filter | Description |
| --- | --- |
| **Minimum Odds (%)** | Skips trades below your chosen odds floor. |
| **Maximum Odds (%)** | Skips trades above your chosen odds ceiling. |
| **Minimum Liquidity (USD)** | Avoids illiquid markets where execution may be worse. |
| **Minimum 24h Volume (USD)** | Avoids inactive markets with weak price discovery. |
These filters are some of the most important tools for keeping copy trading disciplined instead of blindly following every move.
> Note:
>
> **Maximum Price Deviation (%)** has both a global default and an optional per-wallet override. If you leave the wallet-level field empty, Olympus uses your global setting. If you set it on a wallet, that wallet uses its own value instead.
---
## 🧱 Limit Buy Mode
By default, Olympus uses standard market-style copy execution for buys.
Market-style copied buys prioritize fast fills, but they can cross the bid/ask spread and pay taker fees. That drag can compound quickly when copying many trades, thin markets, or fast 5- or 15-minute markets.
You can enable **Limit Buy Mode** when you want to prioritize price discipline over fill certainty.
With **Limit Buy Mode**, Olympus places buy orders at the leader's fill price instead of forcing market-style execution.
### Why use it?
- potentially better entries
- less spread crossing and slippage
- more control in thin or fast-moving markets
- possible maker liquidity if the order rests instead of filling immediately
### Trade-off
- the order may not fill if the market moves away before your order lands
- you trade fill certainty for price discipline
- if your limit price crosses the current ask, the order can still fill immediately as a taker order and may still incur taker fees
This can reduce spread crossing and may let orders rest as maker liquidity, but fills are not guaranteed. Resting limit orders may earn liquidity rewards on eligible Polymarket markets, even if they never fill. That is a possible upside, not a guarantee.
For fast or bot-like wallets, Olympus may show a **Risk checkpoint** recommending Limit Buy Mode before you follow the wallet. That warning means the wallet's pace may be hard to copy profitably with market-style execution, even when concurrent processing is enabled.
You can also choose how long those limit buy orders stay active using **Order Expiration**.
In practice:
- **Market-style copy:** faster fills, more spread and fee drag.
- **Limit Buy Mode:** better price control, possible missed trades.
---
## 🧱 Limit Sell Mode
Olympus also supports **Limit Sell Mode**.
When enabled, Olympus tries to exit copied positions using a limit sell at the leader's execution price instead of immediately selling at market.
This can improve exits, but it comes with extra risk:
- the limit sell may not fill quickly
- if it stays open too long, market conditions can worsen
- Olympus uses a **Sell Timeout** so unfilled limit sells can fall back to a market sell
In practice, this gives you more control over exits, but requires tighter timeout settings and more caution than standard sell behavior.
---
## 🛟 Fallback Limit Orders
Olympus also supports **Fallback Limit Order** in the **Advanced** settings tab.
When enabled, if a copied buy cannot execute immediately, Olympus can place a short-lived limit order at the leader's price instead of skipping the trade outright.
This helps in fast or thin markets where immediate execution may fail, but it also means you can end up with pending orders that never fill if price runs away.
---
## 🔄 Counter-Trading Mode
In the **Advanced** settings tab, you can enable **Reverse Copy Mode (Counter-Trade)**.
That means if the wallet you follow buys **YES**, your wallet takes the opposite side instead.
This mode is useful for specialized strategies, but it should be used carefully. It changes the logic of the copied trade completely and is best treated as a separate strategy, not a minor setting tweak.
---
## 🧱 Merge / Split Copying and Safeguards
Olympus supports **merge and split copying** so your positions stay aligned with more complex leader behavior.
That includes:
- **Merge copy** — when a leader merges positions back into pUSD
- **Split copy** — when a leader splits capital into YES/NO legs
Olympus also applies safeguards through your settings, including:
- per-trade caps
- per-market caps
- trade-count limits
- trigger thresholds
- market quality filters
- price-deviation protection
These controls help reduce unwanted exposure and keep copied trades inside your own risk boundaries.
---
## 🤖 Optional: AI Trade Analysis
Olympus also includes **AI Trade Analysis**, which reviews your recent copy-trading activity and helps you improve settings using your own execution data.
It can help you:
- compare your fills against the leader's entries
- spot slippage patterns
- identify skipped-trade patterns
- refine ratios and filters
This is best thought of as an optimization tool, not part of the basic copy-trading flow.
---
## 🧪 Optional: Backtesting
Every setting on this page changes what you would have copied — and you do not have to guess how. [Backtesting](/docs/18-backtesting) replays a leader's past trades through these exact filters and reports the simulated PnL, ROI, drawdown, and a per-trade reason for everything your settings skipped.
The two tools sit on opposite sides of the decision:
- **Backtesting** runs **before** you follow, on a leader's history, with modeled fills
- **AI Trade Analysis** runs **after** you follow, on your own trades, with real fills
Backtesting is a simulation and cannot replay your real fills, since Polymarket publishes no historical order book. A few settings on this page — stop loss, take profit, max drawdown, counter trading, and min spend — are accepted by the backtest but not simulated yet.
---
## 🎯 Stop-Loss and Take-Profit
Olympus supports **stop-loss and take-profit** for copy-traded positions.
You can set them as defaults or per wallet, and Olympus will automatically place an exit when your configured threshold is hit.
For the full setup and behavior details, see [Stop-Loss & Take-Profit](/docs/11-stop-loss-take-profit).
---
## How to Choose Wallets to Copy on Olympus
https://www.olympusx.app/docs/07-wallet-selection-guide
Learn how to choose copy trading wallets on Olympus and Polymarket by spotting good habits, avoiding red flags, and finding traders you can realistically mirror.
# 🎯 How to Choose Wallets to Copy on Olympus
Not every profitable wallet is a good wallet to copy.
Some traders make money in ways that are hard for followers to replicate. Others may look strong on the surface but take too much risk, trade too fast, or spread themselves across too many markets.
The goal is not just to find winning wallets. The goal is to find wallets you can **realistically copy well** on Olympus.
> 💡 **Quick start:** Browse [Top Wallets](/app/top-wallets) to discover active traders, then inspect them more closely before following.
---
## 🧭 Where to Find Wallets
### 1. Polymarket Leaderboard
The [Polymarket leaderboard](https://polymarket.com/leaderboard) is one of the fastest ways to discover active traders.
It is useful for finding wallets that:
- trade meaningful size
- have recent realized profits
- are active in current markets
A good way to use it:
- check **Monthly** to find traders who are active now
- check **All-time** to avoid chasing one-off lucky runs
- click into traders and review their behavior before copying
> ⚠️ The leaderboard is a discovery tool, not proof of skill.
---
### 2. Olympus Trader Pages
After you find a wallet, paste the address into the Olympus search bar to open that trader's profile page.
This is where wallet selection gets serious.
Use the profile to check:
- open vs. closed positions
- overall consistency
- what categories they trade
- how often they trade
- whether their activity looks copyable in practice
This is usually more useful than looking at raw profit alone.
The profile also has a **Backtesting** button, which is the closest thing to an answer this page can give you. It replays the leader's history against your own settings and reports what the simulation says you would have made — with your ratio, your filters, and your fees. A leader can be genuinely profitable and still be a bad wallet for *you* to copy, and this is where that shows up as a number instead of a hunch. See [Backtesting](/docs/18-backtesting).
> 💡 **Pro tip:** Backtest **before** you follow, then use **AI Trade Analysis** **after** you follow to review your real copied results. The first is a simulation of a past window; the second uses your actual fill data. They answer different questions, and the second one is the one that counts.
---
### 3. Whale Alerts and Trade Feeds
Whale alerts can help you find wallets to investigate, but they should not be treated as automatic copy signals.
Use them for lead generation only.
Why blind whale-following is dangerous:
- some wallets trade too fast to copy well
- some rely on speed or execution edge
- some rotate wallets or behave inconsistently
- some are profitable for reasons that do not translate well to followers
Use whale alerts to **find candidates**, then inspect them properly before following.
---
## ⚡ Short-Horizon Crypto Bot Wallets
Fast crypto wallets can be profitable, whether they trade 5-minute markets, 15-minute markets, or both. They need stricter testing than slower traders. Before copying one seriously, treat it like an experiment.
### ⚠️ The #1 mistake: copying a bot with Buy Minimum on
This is the single most common way followers lose money copying a fast wallet, so it is worth understanding before anything else.
A "bot-speed" leader fires hundreds of tiny trades a day. Polymarket enforces a minimum order size (about `$1` for market orders, or 5 shares for limit orders). If your copy ratio would place an order below that minimum, **Buy Minimum** rounds it up to the floor. When a leader sends hundreds of tiny trades, that rounding happens on almost every one, so your real spend can run many times your intended ratio.
The result: you can **lose money even in a window where the leader profits**, because your oversized copies land on the leader's losing trades while your intended small size would have kept those losses tiny. In one reviewed case, a follower lost money over a day where the leader made thousands.
**The fix is Accumulation Buy.** Instead of forcing each tiny trade up to the minimum, Accumulation Buy adds up the small copies in the same market outcome and places one right-sized order once they cross the minimum. Your spend tracks your ratio instead of overshooting it.
Because this matters so much, Olympus now warns you in three places:
- a **bot-speed badge** on any followed wallet in your Wallets and Multi-Wallet tables when the leader is trading at bot speed and Accumulation Buy is off
- an inline warning in the wallet's settings, next to the Buy Minimum / Accumulation Buy toggle
- a **risk checkpoint** when you first follow a bot-speed wallet, with a one-click option to apply bot-safe defaults
If you see any of those warnings, switch that wallet to Accumulation Buy before scaling up.
### Where to find candidates
Good places to look:
- automated Olympus wallet feeds in Discord, especially the wallet-talk channel
- pinned wallet suggestions from the community
- the [Polymarket leaderboard](https://polymarket.com/leaderboard), filtered for top crypto traders today, this week, or this month
- wallets already being discussed by experienced users
Do not follow a wallet just because it had one good day. Use those sources to find candidates, then inspect the wallet before copying.
### What to look for
A good 5- or 15-minute crypto bot wallet usually has:
- consistent recent activity, ideally at least around 30 trades per hour when active
- a PnL curve that trends upward over time
- trades that are held long enough for followers to enter
- behavior that looks repeatable rather than random
- very rare, or better yet, no split/merge trades
- enough activity to evaluate, but not constant spam that is impossible to follow cleanly
Be cautious with wallets that trade extremely fast, frequently split or merge positions, or rely on execution that followers are unlikely to match.
Avoid wallets that routinely buy both outcomes in the same market. That often means the wallet is arbitraging or managing inventory in a way copy traders usually cannot mirror. You can end up filled on the losing side while your limit orders miss the winning side.
Also be cautious when a wallet is crowded. If a bot has many Olympus copy traders or very high Polymarket attention, followers may compete for the same fills. In that case, Old Analysis and the trade activity feed matter more than the wallet's headline PnL.
When possible, prefer wallets that hold until expiry or at least hold long enough that your copy orders have time to fill.
### Suggested starting settings
When testing a new fast crypto wallet, start conservatively:
- use **Limit Buy Mode**
- set **Minimum Odds** around `10-22%`
- set **Max Price Deviation** around `200%`
- set a **Max Drawdown** you are comfortable losing during the test
- let Olympus calculate the **Ratio %** automatically
- avoid manually pushing the **Ratio %** much higher than the calculator suggests
- avoid a high **Max Open Markets** setting while testing, since a bot can lose several trades in a row
- keep **Max Market Size** around `5%` of your total account
- set **Max Trade Size** to about one-fifth of Max Market Size
- be cautious with **Buy at Min**
- be cautious with **Concurrent Buy Processing**
Example:
- account size: `$500`
- max market size: `$25`
- max trade size: `$5`
The goal is not to maximize size immediately. The goal is to see whether the wallet copies well with your settings.
#### Buy at Min risk
Buy at Min can make a low ratio behave like a much higher ratio when the leader sends many tiny fills. For example, if your intended 5% copy size would be `$0.50`, but the order is rounded up to the minimum copy size, you are no longer copying close to 5%.
If Old Analysis shows your actual exposure is far above your configured ratio and Buy at Min is enabled, disable Buy at Min and use Accumulation Buys so tiny entries can batch into fewer meaningful orders.
#### Concurrent buy risk
Concurrent Buy Processing can help Olympus keep up with very fast wallets, but it can also amplify overbuying. When many buy jobs start at the same time, they can temporarily read the same current exposure, open-trade count, and balance before earlier jobs finish recording their orders.
That can exceed your intended copy ratio, Max Market Size, max open trades, or available balance checks. If Old Analysis shows you are already over your target exposure and Concurrent Buy Processing is on, turn it off while testing that wallet.
### How to test safely
When testing a new wallet:
- **backtest it first** — replay it against your intended settings before risking anything. For a fast bot, use the **Number of last trades** mode rather than a date window, since a bot firing thousands of trades a day will not fit a full week inside the data limits
- copy only that wallet at first
- use a separate Olympus wallet if possible
- compare your copied PnL against the target wallet's PnL
- use **AI Analysis** and **Old Analysis** to see skipped trades, unfilled limit orders, position coverage, and whether you overbought your intended ratio
- adjust settings slowly based on actual results
- move profits out to other wallets or strategies once the setup works
Fast crypto bots can look attractive, but execution quality matters a lot. A wallet can be profitable for itself and still perform poorly when copied if your fills are worse, your limits are too loose, or your sizing is too aggressive.
---
## ✅ What Makes a Wallet Copyable?
This is the most important question on the page.
A wallet is not just "good" because it made money. A wallet is copyable when its style still makes sense after follower lag, spread, slippage, and your own settings are factored in.
Wallets are usually more copyable when they:
- hold positions long enough for followers to enter reasonably
- avoid constant hyperactive in-and-out trading
- trade markets with decent liquidity
- show a clear style or category focus
- do not overload themselves with too many open positions at once
In plain English:
> **You want wallets whose edge survives being copied.**
---
## ✅ Good Signs
### 1. Recent Activity
A wallet should still be actively trading.
Inactive wallets do not help you, no matter how good their older results look.
Check whether they have:
- recent trades
- recent openings and exits
- signs of ongoing participation
> 💡 In Olympus, search the wallet and check the **Activity** tab on their trader page.
---
### 2. Manageable Position Count
Wallets with a reasonable number of open positions are often easier to understand and copy.
That usually suggests:
- more selectivity
- clearer conviction
- less random spray-and-pray behavior
A wallet holding too many positions at once can become hard to mirror cleanly, especially for smaller accounts.
---
### 3. Repeatable Market Types
Wallets are often easier to copy when they focus on market types that are:
- short to medium duration
- liquid enough to enter cleanly
- repeated often enough to judge over time
Examples include:
- sports
- short-horizon crypto markets
- recurring event-driven markets
These styles are often easier to evaluate because capital frees up faster and results become visible sooner.
> 💡 Olympus can help filter long-dated markets using **Skip Markets Expiring After (days)** in wallet Filters.
---
### 4. Clear Style and Specialization
A wallet with a recognizable style is usually easier to trust than one that jumps randomly between everything.
Look for traders who seem to have:
- a category focus
- repeatable habits
- similar trade structure over time
- a coherent approach to entries and exits
You do not need them to trade only one category. You just want them to look intentional rather than chaotic.
---
### 5. Realistic Execution Fit
A wallet may be profitable but still bad for followers if its trades depend on speed, low latency, or aggressive market timing.
Good follower-friendly wallets usually:
- do not rely on micro-second execution
- are not constantly sniping tiny inefficiencies
- leave enough room for followers to get acceptable fills
- trade in ways that still make sense after spread and slippage
This matters a lot.
Some wallets win because they are good traders.
Some wallets win because they are fast.
Those are not always the same thing.
---
## ❌ Red Flags
### 1. Extremely High Trade Frequency
Wallets doing very high numbers of trades per day are often poor copy candidates.
That includes:
- bot-like behavior
- constant rapid entries and exits
- very short holding periods
- heavy market churn
Why this is dangerous for followers:
- by the time you copy, the edge may be gone
- slippage becomes more painful
- your fills may be much worse than theirs
- the strategy may depend on speed you do not have
Not every active trader is bad. But if the wallet looks too fast to follow cleanly, it usually is.
---
### 2. Too Many Open Positions
A wallet with a huge number of simultaneous open positions can be hard to copy responsibly.
This can lead to:
- overexposure
- fragmented attention
- weaker conviction
- too much capital tied up in too many places
It may also be a bad fit for smaller followers who need tighter limits and cleaner selection.
---
### 3. Mostly Long-Duration Markets
Long-dated markets are not automatically bad, but they are harder on capital efficiency.
They can:
- lock up your funds for long periods
- reduce flexibility
- slow down learning and evaluation
- make it harder to rotate into better opportunities
If a wallet lives mostly in long-duration markets, make sure that actually fits your own goals.
---
### 4. No Clear Pattern
If you cannot explain how a wallet seems to win, be careful.
That does not mean every trader needs to be simple. But if their activity looks random, scattered, or inconsistent, it becomes much harder to copy with confidence.
Be cautious with wallets that:
- jump between unrelated narratives constantly
- change style every few days
- show no clear market preference
- seem profitable without any obvious repeatable logic
---
### 5. Looks Good on PnL, Bad for Followers
This is the trap many users fall into.
A wallet can look great on realized profit and still be a poor choice for copy trading.
That can happen when:
- entries are too fast
- markets are too thin
- spreads are too wide
- trades are too frequent
- the wallet's size or speed gives it an edge you cannot mirror
The right question is not:
> "Did this wallet make money?"
The better question is:
> "Could I have copied this wallet with acceptable fills and acceptable risk?"
---
## 🧪 A Simple Checklist Before Following
Before you follow a wallet, ask:
- Is the wallet still active?
- Does it trade in a style I can realistically copy?
- Are the markets liquid enough?
- Does it hold positions long enough for follower execution to make sense?
- Is the number of open positions manageable?
- Does the wallet have a clear style or edge?
- Would this still fit my account size and settings?
If too many of those answers are unclear, keep looking.
---
## 🎯 Final Rule
**Copy behavior, not outcomes.**
A wallet becomes worth following when you understand how it trades, why it may work, and whether that style still makes sense once copied through your own settings on Olympus.
---
## Backtesting
https://www.olympusx.app/docs/18-backtesting
Replay any Polymarket trader against your own copy settings before you follow them, and see the simulated PnL, ROI, drawdown, and skipped trades.
# 🧪 Backtesting
Backtesting replays a leader's past trades against **your** copy settings and shows what the simulation says you would have made. It answers the question the trader page cannot: _the leader was profitable, but would **I** have been profitable copying them with **my** ratio, **my** filters, and **my** balance?_
Those are different questions. A leader pays no copy fees, has no follower lag, and never has a trade filtered out. You have all three. Backtesting is where that gap becomes a number.
Open it from any trader profile: search a wallet address, or pick a trader from [Top Wallets](/app/top-wallets), then click **Backtesting** in the header. You need to be signed in.
> ⚠️ **Read this first:** a backtest is a **simulation, not a recording**. Polymarket does not publish historical order books. Olympus therefore reconstructs executions from the public historical trade tape and marks positions from historical price data, while reporting when either source is missing. See [What The Simulation Does Not Model](#what-the-simulation-does-not-model) before you trust a number.
---
## Step-By-Step: Running A Backtest
### Step 1 — Open A Trader Profile
Find a wallet through [Top Wallets](/app/top-wallets), the [Polymarket leaderboard](https://polymarket.com/leaderboard), or by pasting an address into the Olympus search bar.
### Step 2 — Click Backtesting
The **Backtesting** button sits in the profile header, next to **AI Analyze** and **Copy trade**.
### Step 3 — Choose Your Window
Two ways to bound the replay:
- **By date** (default) — `7d`, `30d`, or a `Custom` from/to range. Windows are capped at **90 days**.
- **By trade count** — turn **By date** off and set **Number of last trades** instead (default `100`, up to `80,000`). This replays the leader's most recent N trades, scanning back up to 90 days.
Trade count mode exists for fast leaders. A bot firing thousands of trades a day will not fit a full week inside the data limits, so asking for "the last 500 trades" gets you a complete, honest sample where "the last 7 days" would get you a truncated one. If the leader trades fast enough for this to matter, Olympus estimates their pace when the modal opens and warns you before you run.
### Step 4 — Pick A Settings Source
- **My settings** — the settings you already use for this leader, if you follow them
- **Manual** — start from defaults and edit freely
- **Public preset** — a shared preset, when one is available
Tabs only appear when you have more than one option. Edits here are local to the backtest and never touch your live copy settings.
### Step 5 — Set Your Sizing
**Starting balance** seeds from your active wallet's equity, and defaults to `$1,000` if that is unavailable. Leave it blank to simulate an unlimited bankroll — useful for judging the strategy in isolation, but it changes what ROI means (see [Reading The Results](#reading-the-results)).
**Ratio %** is what fraction of the leader's trade you copy. The refresh icon next to it recalculates the ratio from your starting balance against the leader's balance, both including open positions — the same calculation the live ratio calculator uses.
Everything else lives in collapsible sections: **Entry filters**, **Market filters**, **Execution mode**, and **Risk exits**.
### Step 6 — Run It
The run is queued and polls until it finishes, with a progress bar tracking rows fetched. Identical requests share one run, and results are cached for about 15 minutes.
---
## Reading The Results
### The Headline Numbers
| Metric | What it actually means |
| ------------------- | ----------------------------------------------------------------------------------- |
| **PnL** | Realized PnL plus mark-to-market on still-open positions, **net of estimated fees** |
| **ROI** | PnL divided by your bankroll — but see the warning below |
| **Win rate** | Share of positions with a terminal outcome that ended positive |
| **Participation** | Leader BUY/SELL fills mirrored out of every eligible leader trade fill |
| **Follower orders** | Filled follower orders; one accumulated order may represent several leader fills |
| **Drawdown** | The largest peak-to-trough fall during the window |
> ⚠️ **ROI means two different things.** If you set a **Starting balance**, ROI is measured against that bankroll — return on the money you committed. If you leave it blank, ROI is measured against **capital at risk**: the peak amount deployed at once. The second number is almost always larger and is _not_ a return on your account. Compare two backtests only when both used the same basis.
### The Chart
Your simulated equity curve is plotted against the **leader's** curve on the same grid. The leader's line is deliberately raw — no fees, no sizing, and no filters. Drag the timeline brush to zoom, use **Reset zoom** to return to the full window, and click either legend series to hide it; Shift-click isolates that series. The Y-axis follows only the visible series and selected time range.
### Evidence Gates
Six conservative checks on whether the result is worth believing at all. They are about **sample quality**, not profit:
| Gate | Passes when |
| ----------- | ------------------------------------------------------------------ |
| Trades | at least **100** copied trades |
| Markets | at least **20** unique markets |
| Active days | at least **14** distinct trading days |
| Top market | no single market drives more than **40%** of realized PnL |
| Unrealized | no more than **50%** of PnL is still marked-open |
| Unpriced | no more than **25%** of capital at risk sits in unpriced positions |
A big green PnL that passes two of six gates is a small sample with a lucky streak, not an edge. The gates exist specifically so that a thin result cannot present itself as a confident one.
### The Verdict
Olympus grades each run as **Do not follow**, **Cautiously follow**, or **Strong candidate**, with a confidence level. The rules are fixed:
- **Do not follow** — the sample is too thin, or the simulation lost money
- **Strong candidate** — requires the walk-forward test to hold **and** every quality gate to pass. There is no shortcut to this grade
- **Cautiously follow** — everything in between
The verdict is a heuristic over the gates above. It is not advice.
### Walk-Forward
The covered window is split into **three consecutive sub-periods** and your settings are replayed in each. If a strategy only worked in one of the three, you are looking at a streak rather than a method.
> 💡 **What this is not:** nothing is trained on one period and tested on another. The same settings run on all three. It catches results that depend on one hot streak; it does **not** validate that your parameters generalize to a wallet or period the backtest never saw.
Sub-periods where you copied zero trades are excluded rather than counted as failures.
### Execution Sensitivity
The replay still reports the existing spread-sensitivity passes for compatibility. Evidence-priced fills do not receive an invented spread adjustment, so these passes may be identical when historical execution coverage is complete. Treat a flat sensitivity result as “the historical evidence was reused,” not proof that future slippage cannot matter.
### Skipped Trades
Every skipped leader trade is tagged with a reason, and the top reasons are counted with the leader dollars behind them. Each reason links to the setting that caused it, so you can go straight to the knob.
Skips are not automatically bad — filtering out a leader's worst markets is the entire point of filters. What matters is _which_ trades you skipped. Skipping their losers is an edge. Skipping their winners is a leak. Some reasons are not filters at all: `ACCUMULATING_BUY` means small buys were batched, and `LEADER_PRICE_EXTREME` means the leader traded under 1¢ or over 99¢, which Olympus never copies regardless of settings.
### Leader vs You
The result itemizes _why_ your number differs from the leader's: position sizing, fees, execution spread, filtered trades, size caps, bankroll limits, and missed fills.
> 💡 The leader baseline here is **windowed and coverage-matched**, so it will not match the lifetime PnL on their trader page. That is intentional — comparing your 30-day simulation against their all-time profit would be meaningless.
---
## Auto-Tune With AI
**Auto-tune with AI** reads the finished run — your settings, the metrics, the skip reasons, the verdict, and your cached Wallet Analysis if you have one — and suggests settings changes with a written rationale. The changes are applied and the backtest re-runs automatically.
It can adjust 14 knobs: ratio, max trade size, max market size, the odds band, liquidity and volume floors, max days out, the trade-count caps, min trigger, and the buy-at-minimum / accumulation choice. Every value is clamped to a valid range, so a tuned re-run cannot fail validation.
> ⚠️ **Auto-tune does not guarantee a better result.** It is a single model suggestion, and nothing compares the tuned run against the previous one or rejects a worse outcome. Treat it as a starting hypothesis and read the new numbers yourself. If the tuned run is worse, that is a real and useful answer.
Auto-tune is limited to **once per hour per user**, and the button shows a live countdown when it is on cooldown. A failed attempt does not burn your hour. Auto-tune also recalculates your ratio from balances, which overrides whatever ratio the model suggested.
---
## What The Simulation Does Not Model
This is the most important section on the page. Olympus reports these limits inside the result rather than hiding them, and you should read a backtest with all of them in mind.
**Executions are reconstructed from trades, not historical books.** Polymarket does not expose historical order-book snapshots. For an immediate order, Olympus searches the public trade tape from the next whole second through the next 15 seconds and supports partial fills. For a resting maker order, the tape must trade at least one tick through the submitted limit; merely touching it is classified as uncertain and unfilled. This cannot prove queue position or exact depth, so the result labels this source as trade-proxy evidence rather than full book coverage.
**Missing execution evidence never invents a fill.** Limit-order runs fetch complete public trade slices only for markets that the selected settings could copy. If the requested interval contains more candidate markets than one run can support, the replay uses the newest contiguous fully evidenced interval and reports the shorter duration. If no non-empty supported interval remains, the run fails instead of treating missing evidence as an unfilled order. Post-only execution also requires historical book state that Polymarket does not provide, so it is reported as unavailable rather than guessed.
**Settlement coverage can shorten a fast leader's window.** One run can enrich at most 2,500 replay markets with complete lifecycle and filter metadata. When a leader exceeds that budget, Olympus uses the newest contiguous supported suffix and shows both the requested and effective durations. If lifecycle, metadata, reconciliation, execution, or terminal valuation remains incomplete, diagnostics retain the partial accounting but PnL, ROI, win rate, drawdown, leader comparison, and setting advice are shown as unavailable.
**Resting orders use their actual evidence time.** Cash or shares are reserved while an order rests. Later trades see those reservations, expirations release them, and every order whose configured expiry falls after the replay remains pending at the window boundary. A configured limit-sell fallback runs only when its expiry is reached inside the replay. BUY and SELL expiration settings therefore affect the replay.
**Some settings are accepted but not simulated.** These do nothing to the replay today, and the result panel lists them explicitly:
- Stop loss
- Take profit
- Max drawdown, and Include unrealized PnL
- Counter trading
- Min spend
**Open positions are marked without lookahead.** At each replay timestamp, Olympus uses only the latest historical price at or before that time, carries it forward with a reported age, and uses execution price before the first mark. Historical windows never substitute today's price. Positions with no defensible historical or terminal price remain unpriced and are excluded from PnL, ROI, and win rate; the Unpriced gate exposes how much capital this affects.
**Coverage may be shorter than you asked for.** Activity pulls and limit-execution evidence are bounded by separate row, market, and time budgets. On a fast leader those bind long before the 90-day cap does. The Coverage panel reports the actual interval, the requested interval, why it was shortened, and the candidate markets covered by complete trade evidence.
**Fees are modeled at the standard rate.** The replay charges the Olympus fee of **0.75%** of notional — tapering toward zero below 3¢ and above 97¢ — plus Polymarket's own market fee where the market has one. Subscription and community fee discounts are **not** modeled, so if you have one, your real fees would be lower than simulated. The leader's baseline curve pays no fees at all.
---
## Limits
- **Sign-in required.** Backtesting itself is not geo-restricted; the **start copying** action inside the modal is
- **10 runs per 10 minutes** per user. Joining an identical in-flight run or getting a cached result does not count against it
- **Auto-tune: once per hour** per user
- **90-day cap** on date windows; up to **80,000** trades in trade-count mode
- Results are cached for roughly **15 minutes**; identical requests share one run
- Interactive rows are capped for browser performance, while summaries use the full ledger. Diagnostic CSV export fetches every retained detail page and aborts instead of producing a partial file if any page expired
---
## Reproducibility
The replay itself is deterministic — no randomness anywhere, so the same request returns the same result. But **re-running later can legitimately give a different answer**, because:
- the `7d` / `30d` presets and trade-count mode all end at _now_, so the window slides
- current-ending windows may use live terminal marks, and those marks move
- markets resolve and data coverage improves over time
Pin a **Custom** window if you want a stable basis for comparing settings.
---
## Good Practices
- **Backtest before you follow, not after you lose money.** That is the entire point of the feature
- **Check the gates before the PnL.** A result that fails the sample gates is noise, no matter how green it is
- **Change one setting at a time.** Otherwise you learn that something helped, but not what
- **Check execution and valuation coverage.** A profitable result with missing trade evidence or stale marks is not a fully evidenced result
- **Check what you skipped.** If your filters removed the leader's winners, tighten the thesis, not the filters
- **Use a fixed Custom window when comparing runs**, so you are comparing settings rather than comparing two different weeks
- **Do not read a backtest as a forecast.** A good backtest tells you a leader was _plausibly copyable over one past window_. It does not tell you what next month does
> ⚠️ **Past performance is not a promise of future results.** A backtest is a simulation over a window the market has already resolved, using reconstructed executions, historical marks, and estimated fees. It cannot know about a leader who changes strategy, a market regime that shifts, or liquidity that dries up. Use it to eliminate wallets you should not copy — that is what it is genuinely good at — rather than to predict what you will earn.
---
## Olympus Sample Copy Trading Settings
https://www.olympusx.app/docs/05-sample-settings
Example copy trading settings for Olympus and Polymarket, with sample profiles for conservative, event-driven, active, and conviction-based trading styles.
# 🧭 Olympus Sample Copy Trading Settings
This page gives you **example copy trading settings** for different styles of trading on Olympus.
These are not magic numbers or one-size-fits-all presets. They are meant to help you start with a setup that matches your risk tolerance, trading pace, and market preference.
Use them as a starting point, then adjust based on your own balance, goals, and experience.
---
## 💡 Before You Copy These Settings
A good wallet setup should match:
- your account size
- your risk tolerance
- the type of wallets you follow
- how active or selective you want your bot to be
A setup that works well for a slow macro trader can be terrible for a fast sports or high-frequency wallet.
If you're new, start more conservatively than you think you need.
Olympus may also show a **Risk checkpoint** before you copy a wallet that looks bot-like or extremely high-frequency. Treat that as a sign to reduce size, tighten filters, and consider **Limit Buy Mode** before enabling copying.
> 💡 **Do not guess which profile fits.** Every setup below is a starting point, not an answer. Open the trader's profile, click **Backtesting**, and replay these settings against that specific leader's history before you apply them. A profile that suits one wallet can be badly wrong for another, and a backtest tells you which in about a minute. See [Backtesting](/docs/18-backtesting).
---
## 💰 Example Assumptions
The examples below assume:
- **Account size:** around `$10,000`
- **Max Trade Size:** usually around `5%` of account value or less
- **You are using wallet-specific filters**
- **You may need to adjust these settings upward or downward based on the trader you follow**
- **Maximum Price Deviation (%)** can use your global default or a wallet-specific override
If your balance is much smaller or larger, your settings should usually scale with it.
---
## ⚡ Following 5-Minute Crypto Wallets
_High-frequency copying of crypto bot wallets that trade Polymarket's 5-minute (and 15-minute) up/down markets._
This style is different enough from the profiles below that it gets its own dedicated guide, including a real example setup. Click below to expand it.
Fast crypto bot wallets can place dozens of trades per hour. They can be profitable to copy, but they punish sloppy sizing and loose execution harder than any other wallet type. Before copying one, read the [5 and 15 minute crypto bot wallet guidance](/docs/07-wallet-selection-guide#-short-horizon-crypto-bot-wallets) and treat your first weeks as an experiment.
### Get the ratio right first
Your **Ratio %** is the single most important setting here, and the rule is simple:
> **Match the leader's risk, not their dollar size. If the trader is risking `1%` of their portfolio per position, your copied position should also be about `1%` of yours.**
The ratio that achieves this is your portfolio value divided by the leader's portfolio value. That is exactly what the **Ratio Recalculator** (the circular-arrows button next to the Ratio % field) computes for you — click it instead of guessing.
In the example below, the recalculated ratio is `5%`, which means this follower's portfolio is about a twentieth the size of the leader's. When the leader risks `1%` of their stack on a position, the copied trade lands at roughly `1%` of the follower's stack too.
Never reuse a ratio number you saw someone else use. The correct ratio is specific to **your balance vs. that leader's balance**, and it changes as either one grows or shrinks — recalculate it periodically.
### Real example setup



**Overview tab:**
- **Ratio %:** set via the **Ratio Recalculator** (the circular-arrows button next to the field) — `5%` here, but yours will differ
- **Max Trade Size (USD):** `$50` — keeps any single copied trade modest while testing
- **Max Market Size (USD):** `$250` — deliberately tighter than the recommended `$282.88` shown under the field; you can apply the recommendation later once the wallet proves it copies well
- **Accumulation Buy:** enabled, so tiny eligible copies are batched into fewer, right-sized orders instead of each one being rounded up to the minimum tradable size — 5-minute bots often send hundreds of small clips, and rounding each one up to the minimum is the single most common way followers lose money copying a fast wallet (see the watch-out below)
- **Limit Buy Mode:** enabled, with **Order Expiration** at `1 hour` — limit entries protect you from spread crossing and taker-fee drag, which compound fast at this trade frequency
- **Limit Sell Mode / Post-Only:** off
- **Stop-Loss / Take-Profit:** left empty — 5-minute markets resolve too quickly for them to matter much here
- **Max Loss ($):** `$200` — a hard kill switch that pauses copying this wallet once your realized losses on it reach the threshold. Always set this when testing a fast bot; a bot can lose many trades in a row before you notice. **Include unrealized PnL in Max Loss** and **Close positions on pause** are both left off, so the kill switch is based on live realized PnL only and won't force-close open positions when it trips
**Filters tab:**
- **Minimum Trigger Amount (USD):** `$1` — effectively no trigger filter, because bot wallets often split entries into small clips you still want to follow
- **Skip Markets Expiring After (days):** `10` — a light backstop in case a longer-dated market ever shows up under the same wallet
- **Minimum Odds (%):** `10` — skips extreme long-shots and very late entries below 10¢
- **Maximum Price Deviation (%):** left on the global default; fast markets move quickly, so an overly tight deviation will skip most entries
- **Max Trades / Market** and **Max Trades / 24h:** left open in this example — the small trade size and the Max Loss kill switch do the capping instead. Set them if you want a harder bound on activity
- Liquidity and volume filters are unnecessary here since the wallet only trades one market type
### Watch-outs
- **Buy Minimum can inflate your effective ratio — this is the #1 way followers lose money on fast wallets.** If your intended copy size is `$0.50` and it gets rounded up to the minimum on every one of hundreds of daily clips, your real spend can run many times your configured ratio, so you can lose money even in a window where the leader profits. Olympus warns you about this in three places — a bot-speed badge on the wallet in your Wallets and Multi-Wallet tables, an inline warning next to the Buy Minimum / Accumulation Buy toggle, and a risk checkpoint when you first follow a bot-speed wallet — but the fix is always the same: use **Accumulation Buy**, as in the example above.
- **Test in isolation.** Copy only this wallet at first (a separate Olympus wallet is ideal), compare your copied PnL against the leader's, and only scale up after the results hold.
- **Crowded bots copy worse.** If a wallet has many copiers, you compete for the same fills — judge it by your own fill quality, not its headline PnL.
---
## 🟢 Conservative Macro Trader
_Long-hold, lower-frequency copying for political, macro, or slower-moving markets._
**Best for:** Users who want steadier exposure, fewer trades, and tighter control over position sizing.
### Suggested Settings
- **Ratio %:** `0.5%`
- **Max Trade Size (USD):** `$500`
- **Max Market Size (USD):** `$1,000`
- **Minimum Trigger Amount (USD):** `$1,000`
- **Max Open Markets:** `10`
- **Max Trades / Market:** `2`
- **Skip Markets Expiring After (days):** `30-90`
- **Minimum Odds (%):** `15`
- **Maximum Odds (%):** `90`
- **Maximum Price Deviation (%):** `3-5`
**Limit Buy Mode:** Usually optional. It can help with entry quality, but slower-moving wallets often work fine without it.
**Why this works:** This setup is built to avoid overtrading, ignore noise, and keep sizing controlled in markets where trades tend to be more thesis-driven.
---
## 🟡 Event or Sports Trader
_Medium-frequency copying for sports, event-driven, or faster-resolving markets._
**Best for:** Users who want more activity than macro trading, but still want reasonable guardrails.
### Suggested Settings
- **Ratio %:** `0.25%`
- **Max Trade Size (USD):** `$500`
- **Max Market Size (USD):** `$1,000-$1,500`
- **Minimum Trigger Amount (USD):** `$2,000`
- **Max Open Markets:** `7`
- **Max Trades / Market:** `3`
- **Skip Markets Expiring After (days):** `7-21`
- **Minimum Odds (%):** `20`
- **Maximum Odds (%):** `85`
- **Maximum Price Deviation (%):** `4-6`
**Limit Buy Mode:** Often worth testing, especially in thinner or fast-moving event markets.
**Why this works:** This profile gives you more flexibility for active event trading while still limiting churn and avoiding very small or low-quality entries.
---
## 🔵 Active Trader
_Higher-frequency copying for wallets that enter often, scale in, or trade shorter-term setups._
**Best for:** More advanced users who understand slippage, missed fills, and execution trade-offs.
### Suggested Settings
- **Ratio %:** `0.1%`
- **Max Trade Size (USD):** `$100-$250`
- **Max Market Size (USD):** `$500`
- **Minimum Trigger Amount (USD):** `$500`
- **Max Open Markets:** `5`
- **Max Trades / Market:** `3-5`
- **Skip Markets Expiring After (days):** `1-7`
- **Minimum Odds (%):** `40`
- **Maximum Odds (%):** `65`
- **Minimum Liquidity (USD):** `$10,000+`
- **Minimum 24h Volume (USD):** `$5,000+`
- **Maximum Price Deviation (%):** `5-8`
**Limit Buy Mode:** Often helpful. If you copy active traders without price protection, slippage can add up quickly.
**Limit Sell Mode:** Use carefully. If you enable it, keep the sell timeout short.
**Why this works:** This setup is designed to stay selective, reduce slippage risk, and avoid getting dragged into too many weak or noisy markets.
If Olympus flags the wallet as bot-like or shows very high recent trade counts, avoid copying it with aggressive market-style buys until you understand the fill quality. Limit Buy Mode may miss some trades, but it can reduce spread crossing and taker-fee drag.
For fast 5 and 15 minute crypto bot wallets, see the **Following 5-Minute Crypto Wallets** section above and the [5 and 15 minute crypto bot wallet guidance](/docs/07-wallet-selection-guide#-short-horizon-crypto-bot-wallets) before sizing up. Those wallets usually need isolated testing, conservative market caps, and stricter execution controls.
---
## 🟣 Conviction Trader
_Lower-frequency copying for larger directional trades and stronger conviction entries._
**Best for:** Users who want exposure to bigger thesis trades without letting one wallet dominate the whole account.
### Suggested Settings
- **Ratio %:** `0.3-0.5%`
- **Max Trade Size (USD):** `$500`
- **Max Market Size (USD):** `$1,000-$1,500`
- **Minimum Trigger Amount (USD):** `$3,000+`
- **Max Open Markets:** `5`
- **Max Trades / Market:** `1-2`
- **Minimum Odds (%):** `25`
- **Maximum Odds (%):** `75`
- **Maximum Price Deviation (%):** `4-6`
**Limit Buy Mode:** Optional, but useful when you want cleaner entries on larger trades.
**Why this works:** This profile is meant to participate in strong trades without overexposing your balance to one leader, one market, or one idea.
---
## ⚠️ A Few Practical Rules
- Start with a lower **Ratio %** than feels exciting.
- Always set a **Max Market Size (USD)**.
- Use **Maximum Price Deviation (%)** to protect against bad fills, but remember that setting it too tight can cause missed entries, especially on market buys.
- Use **Minimum Trigger Amount (USD)** to filter out tiny leader trades.
- Use **Buy at Min** only for slower wallets where tiny eligible trades are rare — for any bot-speed wallet (500+ trades/48h), use **Accumulation Buy** so small copies build into right-sized orders instead of each one being rounded up.
- High-frequency wallets usually need stricter filters than slower wallets.
- If you enable **Limit Buy Mode** or **Limit Sell Mode**, expect different fill behavior than standard copying.
- Consider **Fallback Limit Order** for fast or thin markets where you would rather leave a short-lived order than skip the trade entirely.
- If you want automatic exits, you can layer **Stop-Loss / Take-Profit** on top of these profiles after your core copy settings are dialed in.
---
## 🎯 Final Note
These examples are meant to help you get started faster, not replace judgment.
The best settings depend on the wallet you follow, the market category, and how much execution risk you are willing to accept. Start simple, stay conservative, and adjust over time as you learn how your bot behaves.
---
## Olympus Risk & Ratio Management
https://www.olympusx.app/docs/06-risk-ratio-management
Learn how to manage copy trading risk on Olympus and Polymarket using better sizing, ratio settings, market caps, and execution controls.
# ⚠️ Olympus Risk & Ratio Management
Copy trading can save time, but it can also magnify mistakes fast if your settings are too aggressive.
The goal is not to copy every trade as closely as possible. The goal is to copy in a way that fits **your own balance, risk tolerance, and execution limits**.
Olympus gives you the tools to do that, but they only work if you use them well.
---
## 📐 Start With Ratio Sizing
Your **Ratio %** is one of the most important settings in Olympus.
It controls how much of a leader's trade you copy. If your ratio is too high for your account size, you can become overexposed very quickly.
### Simple rule of thumb
> **Your Ratio % should roughly reflect your balance compared with the leader's portfolio size.**
Example:
- Your balance: `$1,000`
- Leader balance: `$2,000,000`
That is roughly `0.05%` of their size.
If they place a `$60,000` trade, your copied size would be about `$30`.
That is much safer than blindly using the same ratio on every wallet.
### Best practice
- use a lower ratio than feels exciting
- treat each wallet differently
- recalculate your ratio as your balance changes
- do not use the same ratio for a whale and a smaller trader
Olympus includes a **Ratio Recalculator** for each wallet. It helps you size more realistically based on your portfolio, the leader's portfolio, and current open positions.
In practice, it is usually a conservative place to start. If you are not sure what ratio to use for a specific wallet, clicking that button is a good way to get an initial value instead of guessing.
From there, you can watch how the wallet behaves and raise the ratio gradually by hand if the recommended size feels too small for your goals.
---
## 💰 Control Market Exposure
Even a good ratio can still create bad risk if you do not cap exposure at the market level.
### The most important protection
**Max Market Size (USD)** is one of the best safety settings in the product.
It acts as a cap on how much total capital you can commit to one market for that wallet.
That matters because some traders:
- scale in multiple times
- re-enter after partial exits
- keep adding to the same idea
Without a market cap, one active wallet can quietly pull too much of your account into one prediction.
### Good rule of thumb
> Keep **Max Market Size (USD)** modest relative to your total balance, especially when starting out.
For many users, something around `2-5%` of account value per market is a much safer place to start than leaving it wide open.
### Other settings that help control exposure
- **Max Trade Size (USD)** limits the size of any one copied trade
- **Max Trades / Market** limits how many times the bot can add into one market
- **Max Open Markets** limits how many separate markets a wallet can have open at once
- **Max Trades / 24h** helps keep very active wallets from overwhelming your account in a single day
---
## 🎯 A Practical Sizing Mindset
If you are not sure where to start, keep it simple:
- keep single-trade size small relative to your account
- keep market-level exposure capped
- assume some wallets will trade more often than expected
- increase size only after you understand how a wallet behaves
A small setup that survives is better than an aggressive setup that blows up early.
---
## 💸 Execution Risk Matters More Than Most Users Expect
A leader can be directionally right and still give you a bad copy-trading result if execution is sloppy.
That is because your performance is affected by:
- spread
- slippage
- trade timing
- market liquidity
- price deviation settings
If a wallet constantly enters in thin markets or aggressive spots, your fills may be worse than theirs even when copying correctly.
### Two settings that matter a lot here
**Maximum Price Deviation (%)**
This controls how far your fill is allowed to drift from the leader's price before Olympus skips the trade.
- too tight: you may miss many entries
- too loose: you may enter poor fills
You can set a global default in General Settings and optionally override it per wallet in Filters.
**Limit Buy Mode**
This can help reduce slippage by placing a limit order at the leader's execution price instead of forcing an immediate market-style fill.
That can improve entries, but it also creates fill risk. Some trades simply will not fill if the market moves away too quickly.
Limit buys are not guaranteed maker orders. If your limit price crosses the current ask by the time the order lands, the buy can fill immediately as a taker order and may still incur taker fees.
**Market-style copied buys**
When Limit Buy Mode is off, Olympus prioritizes faster copied buys. This can help capture more leader trades, but market-style buys may cross the bid/ask spread and pay taker fees.
For active wallets, thin markets, and fast 5- or 15-minute markets, that fee and spread drag can compound quickly.
**Fallback Limit Order**
If you prefer not to skip a copied buy when immediate execution fails, Olympus can place a short-lived fallback limit order instead.
That can recover some otherwise missed trades, but it also means you may have more pending orders sitting open in fast markets.
### The real trade-off
> Better protection usually means more skipped trades. More aggressive copying usually means worse fills.
That is normal. You are choosing where to sit on that trade-off.
### Stop arguing with yourself and measure it
[Backtesting](/docs/18-backtesting) puts numbers on both sides of that trade-off for a specific leader. Two panels matter most here:
- **Slippage sensitivity** re-runs the whole simulation at 0.5×, 1×, 2×, and 3× the modeled spread. If the result only works at 1×, execution risk is not a footnote for that wallet — it is the whole story
- **Skipped trades** shows what your protection actually cost you, broken down by which setting did the skipping
Keep in mind the backtest models fills with an assumed spread rather than replaying real ones, so treat it as a way to compare settings against each other, not as a promise of your fill quality.
---
## 🧪 Use Filters to Avoid Bad Markets
Not every copied trade is worth taking.
Filters help you avoid low-quality setups before they become expensive mistakes.
Useful filters include:
- **Minimum Odds (%)**
- **Maximum Odds (%)**
- **Minimum Liquidity (USD)**
- **Minimum 24h Volume (USD)**
- **Minimum Trigger Amount (USD)**
- **Skip Markets Expiring After (days)**
These are especially helpful when copying:
- fast traders
- noisy wallets
- traders who jump into thin or low-volume markets
- wallets that make lots of tiny probe trades
If you are taking too many weak entries, the answer is often not a higher ratio. It is better filters.
Another practical choice is how Olympus handles very small copied buys:
- **Buy at Min** rounds tiny eligible trades up to the minimum tradable size
- **Accumulation Buy** lets small buys build up until they reach tradable size
That setting affects how much noise or overtrading you pick up from active wallets.
---
## 🧘 Be Careful With High-Churn Wallets
Some wallets trade too often, too broadly, or too noisily to copy well.
That does not always mean they are bad traders. It may simply mean their style is not a good fit for your account size or your execution settings.
Be more cautious with wallets that:
- jump between too many unrelated categories
- trade very frequently without clear selectivity
- scale in constantly
- rely on aggressive execution in thin markets
- generate more activity than your account can comfortably absorb
For those wallets, you usually want:
- a lower **Ratio %**
- a lower **Max Market Size (USD)**
- stricter filters
- tighter daily trade caps
- more caution around market buys
- a stronger preference for **Limit Buy Mode** when price discipline matters
---
## 🚨 Common Mistakes
- setting a high **Ratio %** without comparing your account to the leader's size
- leaving **Max Market Size (USD)** blank
- copying active wallets with no trade caps
- using overly loose settings in thin markets
- using overly tight **Maximum Price Deviation (%)** and wondering why trades do not enter
- assuming Olympus automatically manages your risk for you
Olympus helps enforce your rules. It does not replace judgment.
---
## ⏳ Stop-Loss and Take-Profit
Stop-loss and take-profit are now part of Olympus's live risk controls.
They should not replace good ratio sizing or exposure caps, but they can add another layer of protection once your core copy settings are already disciplined.
For full setup details, see [Stop-Loss & Take-Profit](/docs/11-stop-loss-take-profit).
For now, the more important live protections are:
- **Ratio %**
- **Max Trade Size (USD)**
- **Max Market Size (USD)**
- **Max Trades / Market**
- **Max Trades / 24h**
- **Maximum Price Deviation (%)**
- **Limit Buy Mode**
- market quality filters
---
## 🎯 Final Takeaway
The safest copy-trading setups usually look a little boring.
They use smaller ratios, tighter market caps, better filters, and more patience.
That may feel less exciting at first, but it gives you more room to learn how a wallet behaves before you scale up.
---
## Stop-Loss & Take-Profit
https://www.olympusx.app/docs/11-stop-loss-take-profit
Automatically protect your positions with stop-loss and take-profit
# Stop-Loss & Take-Profit
Olympus can automatically sell your positions when they hit a price threshold you set. **Stop-loss** sells when your position drops too much. **Take-profit** sells when your position gains enough.
Triggers execute automatically once your threshold is hit — Olympus places a market sell as soon as the trigger condition is detected.
---
## Where to Set SL/TP
You can configure stop-loss and take-profit at three levels:
### 1. Global Defaults
Set default SL/TP percentages that apply to copy trading across all your followed wallets.
**How:** Settings > Trading > Default Stop-Loss & Take-Profit
These are used as fallbacks when a wallet doesn't have its own SL/TP configured. They apply to copy trading only — manual trades use per-position SL/TP settings.
### 2. Per-Wallet (Copy Trading)
Override the global defaults for a specific followed wallet. These apply to all copy-traded positions from that wallet.
**How:** Click a followed wallet > Overview tab > Risk Management section
Per-wallet settings take priority over global defaults.
### 3. Per-Position (Manual Trades)
Set SL/TP when placing a manual buy order, or add/edit them later from the Triggers tab on any market page.
**How:**
- **At buy time:** Check the "Take Profit / Stop Loss" box in the buy panel
- **After buying:** Go to the market page > Triggers tab > click "Add SL/TP" or edit existing triggers
---
## How It Works
1. You set a stop-loss (e.g. 20%) and/or take-profit (e.g. 50%) on a position
2. Olympus monitors the price in real time
3. When the price drops 20% below your entry → stop-loss triggers an automatic sell
4. When the price rises 50% above your entry → take-profit triggers an automatic sell
5. Whichever threshold is hit first executes — the other is cancelled
6. You get a Discord notification (if configured) with the result
---
## Good to Know
- **One trigger per position** — If you buy the same token twice, the first SL/TP values are kept. You can change them anytime from the Triggers tab.
- **You can edit or remove triggers** at any time from the Triggers tab on the market page.
- **Triggers sell your entire position** when they fire — partial sells are not supported for triggers.
- **If a sell fails** (rare), a 30-minute cooldown prevents repeated attempts. The trigger stays active and will try again after the cooldown.
---
## Recommended Starting Points
| Strategy | Stop-Loss | Take-Profit |
| ------------ | --------- | ----------- |
| Conservative | 10% | 25% |
| Balanced | 20% | 50% |
| Aggressive | 50% | 100%+ |
These are suggestions — adjust based on your risk tolerance and the market.
---
## Olympus Market Pages
https://www.olympusx.app/docs/09-market-pages
Learn how Olympus market pages work for manual trading on Polymarket, including charts, order books, live trades, and order types.
# 📊 Olympus Market Pages
Olympus market pages are where you research markets and place manual trades on Polymarket.
Whether you are checking a market before following a wallet or trading directly yourself, these pages give you the core tools you need in one place.
---
## 🔍 Finding Markets
You can open any market page through the **global search bar** in the header.
Start typing a market name, topic, team, or event, then click the result you want to open.
Market pages are useful for:
- researching price action
- checking liquidity
- watching live trades
- placing manual trades directly
---
## 📈 Price Chart
The price chart shows how a market has moved over time.
Depending on the market, you can use it to:
- switch between different timeframes
- inspect recent or long-term price action
- compare outcomes
- hover to see exact prices and timestamps
For binary markets, the chart helps you understand how **Yes** and **No** have moved.
For multi-outcome events, it helps you compare different candidates or outcomes more clearly.
On sports markets, Olympus can also show live game context directly on the market page.
---
## 📕 Order Book
The order book shows current bids and asks in the market.
This is one of the most useful parts of the page if you care about execution quality.
### What to look at
| Column | Description |
| --- | --- |
| **Price** | The price level for current orders |
| **Size** | The size available at that level |
| **Total** | The cumulative size up to that level |
### Why it matters
- **Bids** show what buyers are willing to pay
- **Asks** show what sellers are asking
- **Spread** shows the gap between the best bid and best ask
- **Depth** shows how much size is sitting near the current market
Tighter spreads and better depth usually mean cleaner execution.
If the spread is wide, market orders can become much more expensive than they first appear.
---
## ⚡ Live Trades
The live trades feed shows market activity as trades happen.
This helps you see:
- whether the market is active right now
- where recent executions are happening
- whether aggressive buyers or sellers are moving the market
- whether a sudden price move is happening with real volume behind it
Watching live trades is especially useful before entering thinner or faster-moving markets.
---
## 🎯 Multi-Outcome Events
Some Polymarket events have more than two possible outcomes.
In these cases, Olympus lets you inspect the event at a broader level instead of treating it like a simple Yes/No market.
You can:
- view the different outcomes in one event
- compare probabilities across outcomes
- switch between outcomes in the chart and trading panel
- inspect volume and liquidity for each outcome
This is especially useful for markets like elections, awards, or other outcome sets with many candidates.
---
## 💹 Trading Panel
The trading panel is where you place manual trades.
It updates based on the market, outcome, and order type you choose.
### Common controls
- **Buy / Sell** selection
- **Outcome selection**
- **Amount or share inputs**
- **Price previews**
- **execution or slippage warnings**
- **order-type controls**
Depending on the market and your current position, the panel can also support:
- **Split / Merge** actions for eligible positions
- quick access to **Stop-Loss / Take-Profit** setup through the market page workflow
Manual trading on market pages is separate from copy trading.
Your copy bot handles followed-wallet trades automatically, while market pages are for your own direct trading decisions.
---
## 🛒 Order Types
Olympus market pages support multiple order types depending on how you want to trade.
### Market Buy
Use this when you want to enter immediately.
- buys at the best available ask
- prioritizes speed
- can cost more when spreads are wide
This is the most direct way to enter a position, but it also means you are crossing the spread.
---
### Market Sell
Use this when you want to exit immediately.
- sells at the best available bid
- prioritizes speed
- can give you a worse exit when liquidity is thin
Like market buys, this crosses the spread.
---
### Limit Buy
Use this when you want more control over your entry price.
- you choose the maximum price you are willing to pay
- the order rests until someone sells into it
- you avoid paying above your limit price
- the trade may never fill if price runs away
This is often the better choice when spreads are wide or when you care more about price discipline than instant execution.
---
### Limit Sell
Use this when you want more control over your exit price.
- you choose the minimum price you are willing to accept
- the order rests until someone buys from you
- you avoid dumping immediately at a weak bid
- the trade may stay open longer or fail to fill if price moves away
This can help protect exits, but it also introduces timing risk.
---
## ⏱️ Limit Order Expiration
When using limit orders, Olympus lets you control how long those orders stay open.
That matters because an unfilled order can sit for a while if the market never returns to your price.
In practice, expiration settings help you balance:
- patience for a better fill
- risk of missing the trade
- how long you want capital tied up in an open order
You can then monitor those orders through the market's order views and the dashboard's **Open Orders** section.
---
## 🛡️ Triggers Tab
Market pages also include a **Triggers** tab for manual **Stop-Loss / Take-Profit** management.
From there, you can:
- add SL/TP to positions in the current market
- edit existing triggers
- remove triggers you no longer want
This gives you a direct way to manage exits without leaving the market page.
---
## 📱 Mobile Experience
Market pages also work on mobile.
On smaller screens, the layout is organized into tabs so you can switch between the main views more easily, such as:
- trading
- chart
- order book
- live market activity
That makes it possible to research and trade without needing the full desktop layout.
---
## 💡 Tips for Using Market Pages
- check the **spread** before placing market orders
- use the **order book** to judge whether your size is realistic
- watch **live trades** to see whether the move is active or fading
- use **limit orders** when price matters more than immediate entry
- compare outcomes before trading multi-outcome events
- be more careful in thin markets, especially when entering with size
---
## 🎯 Final Takeaway
Market pages are where Olympus becomes more than just a copy-trading tool.
They give you a full manual trading workspace for Polymarket, with the context you need to evaluate a market, understand execution, and choose how to enter or exit with more control.
---
## Bonds
https://www.olympusx.app/docs/18-bonds
Buy Polymarket outcomes the market has already made up its mind about, at 97¢ and up — and see exactly what you keep after fees before you commit a dollar.
# 🏦 Bonds
Every prediction market ends at exactly one of two prices: **$1.00** or **$0.00**.
Which means that somewhere on Polymarket, right now, there are outcomes trading at 98¢ because the market thinks they are very likely to land there. Usually most of the news is already in. What stands between that price and a dollar is **time, and the 2% chance the market has it wrong** — and somebody has to be willing to carry both.
Bonds finds those outcomes for you. All of them. Sorted, priced, and stress-tested.
Open [Bonds](/app/markets/bonds) from the app header.
---
## The Idea In One Line
**You pay 98¢ for something that pays $1.00 when it settles.** That's the whole product.
The catch — and there is always a catch — is that it pays $1.00 *if it wins*. If it loses, it pays zero. High probability is not certainty. We'll come back to that, and we'll be blunt about it, because the people who make money here are the ones who took that sentence seriously.
But first, the part nobody tells you.
---
## Why Anyone Buys These
**A high probability is not a decided outcome.**
At 97¢+ the market is saying something is very likely, usually because most of the news is already in. That's a genuinely different thing to hold than a coin flip, and it's why these behave a little like short-dated paper: a small return in exchange for parking USDC for a defined stretch of time. But the price is an estimate, not a verdict. At 97¢ the market itself is telling you that about 3 in 100 of these go the other way, and the ones that do cost you the entire stake. Everything below assumes you've taken that sentence seriously.
**A small edge, annualized, is not a small number.**
2% over 10 days is roughly **90% a year** at simple interest. Even 0.5% over 3 days annualizes to something no savings product will offer you. That's the part people miss when they see "2%" and move on: the number that matters isn't the return, it's the return *per unit of time your money was tied up*. The catch is symmetrical and you should hold both halves at once: the same math means one loss at 98¢ wipes out roughly 50 winners. This scales with patience and position count, not with size or cleverness.
**Somebody has to want out early, and they do.**
Winners often don't want to wait weeks for a market to formally resolve. They'd rather have their capital back today and put it into the next thing, so they sell at 96¢–98¢ and leave the last few cents on the table. That's where your return comes from, and it's worth being precise about what you're being paid for: not patience, but risk transfer. They hand you the remaining upside *and* the tail where the market or the oracle lands somewhere else. It isn't a mispricing you have to be smart enough to spot, and it isn't free money either.
**And the work is already done.**
There are thousands of markets. Finding the handful trading above your threshold *with* real depth *and* a tight spread *and* a near-term resolution date is hours of manual work that has to be redone every morning. Bonds is that scan, kept warm, sorted by what each one actually pays you after fees.
---
## Why Costs Decide This Trade
Here's the uncomfortable math of buying near-certainty: your upside is thin. A $100 bond at 98¢ buys you about 102 shares, and 102 shares pay out about $102 when they win. Two cents on the dollar. That's the trade.
Which means **costs are not a footnote — costs are the entire game.** When your gross return is 2%, the fee isn't a rounding error you can ignore. It's a real slice of the only thing you came for. It is, very often, the difference between a bond being worth doing and being a waste of capital.
That is exactly where these prices sit best on Olympus. **Positions this close to certainty fall into the cheapest band on the platform** — the rate slides down further the closer the price gets to $1 — and whatever discount you've already earned comes off on top of that. A bond that doesn't clear the bar somewhere else can still clear it here.
You don't have to take that on faith, and you shouldn't. **Every row shows your net return after fees, not the headline price.** Log in and it's calculated at your own rate, not a generic one — so the number on the row is the number that applies to you. Your current rate is always visible under [Fees](/docs/08-faq#-fees) and in your settings.
This is why Bonds is its own page. The pricing was already there. Bonds is the surface that finds every position that qualifies for it.
---
## Read This Before You Trade
We could sell this page harder if we left this section out. We're not going to.
**A 98¢ outcome that loses costs you the whole 98¢.** You risked $98 to make $2. That ratio is brutal and it is the honest shape of this trade: you will be right most of the time, and the times you are wrong will erase a lot of the times you were right.
This is the exact trade that feels safest and punishes carelessness hardest — because "97% likely" reads to your brain as "basically done," and your brain is wrong about that roughly 3 times in 100. Three percent doesn't sound like much until it's your position.
There's also a second failure mode that has nothing to do with the event. Even when the real-world outcome is settled beyond argument, Polymarket's oracle still has to say so, and it can be delayed, disputed, or land somewhere you didn't expect on a technicality. **Resolution risk is not the same as event risk**, and a bond can be right about the world and still cost you.
So Bonds is built to argue with you. Every row carries a risk label, a spread, real fill depth, and a plain-language list of what's wrong with it. **High**-risk rows are hidden until you deliberately go looking for them. None of that is decoration. It's there because the losing trade on this page always looks fine right up until it doesn't.
Trade this like an insurer, not like a lottery player: many small positions, priced carefully, never one that can hurt you.
---
## How People Actually Make Money Here
Three things separate the traders who compound on this from the ones who donate:
**1. Time is your real cost.** Two cents in three days is a completely different business than two cents in eight months. Same profit, same risk of being wrong — but one of them ties up your capital for a season while the world gets a chance to change its mind. Sort by **Ends**. Short windows are where the edge lives.
**2. Volume beats size.** The way you win at 2% is by doing it repeatedly with money you can afford to lose entirely, not by doing it once with everything you have. One 98¢ bond that resolves against you eats fifty winners. Position sizing *is* the strategy.
**3. Read the resolution rules.** Every single time. The most expensive losses on this page aren't surprises — they're markets that resolved exactly as written while the trader was reading the headline instead of the terms. Click **Open market** and read the actual winning condition before you size up.
And one thing that quietly ruins portfolios: **correlation**. Six bonds on six different markets that all hinge on the same election, the same ruling, or the same game is not six positions. It's one position, six times over, and it can go to zero all at once. Spread across *events*, not just across rows.
---
## Step-By-Step: Finding And Trading A Bond
### Step 1 — Open Bonds
Go to [/app/markets/bonds](/app/markets/bonds). The page opens on **97%+** with sensible defaults already applied.
### Step 2 — Pick Your Threshold
The **97%+ / 98%+ / 99%+** tabs set how certain you want the market to be. Higher threshold, less chance of it flipping, less profit per dollar. This is the trade-off, and it's yours to make.
### Step 3 — Cut The List Down
Use the filters: keyword search, resolution window (**6h** through **180d**), minimum 24h volume, maximum spread, and outcome side.
If you only touch one filter, make it **resolution window**. Start at 7d or shorter.
### Step 4 — Set Your Risk Appetite
Toggle the **Risk** chips — Low, Medium, Elevated, High. High is off by default and you have to opt in to see it. If you're new here, leave it off.
### Step 5 — Scan The Table
Sort by any column. The two that matter most: **Net Return** (what you actually keep after fees) and **Ends** (how long your money is locked up earning it).
### Step 6 — Open The Row
Click any row for the full picture: a 7-day price chart, payout previews at $100/$1k/custom, what your fill would actually cost at size, every reason the risk score flagged it, and the market's own rules.
**Check the price chart.** A bond that was at 80¢ yesterday and 98¢ today is a very different animal from one that's sat at 98¢ for a month.
### Step 7 — Trade It
Hit the cart icon for a quick buy pre-loaded with the right market and outcome, or **Open market** for the full trading panel. Bonds isn't a separate exchange — it's the same Polymarket order book you already trade, just filtered down to the part that qualifies for the cheapest fees.
---
## What The Numbers Mean
| Column | What it's telling you |
| --- | --- |
| **Buy** | What one share costs now. A winning share pays $1.00 at settlement |
| **Net Return** | What you keep on $100 if it wins, after fees. Not annualized. **This is the honest number** |
| **Ends** | How long your capital is committed |
| **Executable** | How much you can actually buy at this price. If this is small, your real price is worse than the one shown |
| **Vol 24h** | Real trading in the last 24h. Thin volume means you may be alone in this position |
| **Spread** | Gap between buy and sell price. Wide spread = expensive to change your mind |
| **Risk** | Our label, with reasons attached in the detail view |
**Net Return** is calculated on a simulated $100 fill and already has estimated fees baked in. Log in and it uses *your* rate rather than a generic one. Fees are estimates — the book can move between looking and trading.
**APR** annualizes that return so you can compare a 3-day bond against a 3-month one. It's a simple rate, not compounding — a bond settles once. On very short windows we cap the displayed number and show it with a `>`, because a true annualized figure on a 6-hour position is a fantasy number and we won't print it.
---
## The Risk Label, Plainly
Every row gets scored on what's visibly wrong with it: how far from certain the price is, how wide the spread is, whether there's real depth behind the price, whether anyone's actually been trading it, how soon it settles (too far out is risk; so is *right now*), whether the price just jumped, and what kind of market it is.
**Low** (0–14) · **Medium** (15–34) · **Elevated** (35–59) · **High** (60+)
Anything above Low tells you exactly why in the detail view. Read those reasons.
This score describes what the order book looks like today. **It is not a prediction and it is not a promise.** A Low-risk bond can lose. It just doesn't have anything visibly broken about it.
---
## Freshness
The badge next to the title tells you whether prices are **Fresh**, **Stale**, **Degraded**, or still **Warming up**, plus when they were last updated. If it isn't fresh, hit **Refresh** before you commit money.
Prices come from a cached snapshot that refreshes in the background, which is why the page is instant. It also means the number you're looking at is seconds-to-minutes old, not live to the millisecond. On a 98¢ bond that rarely matters. On a bond that's moving, it does — which is why we show you the badge instead of hiding it.
---
- You're buying outcomes at 97¢+ that pay $1.00 **if** they win and $0.00 if they don't. You're paid for carrying that risk, not for waiting.
- The return looks small until you annualize it. 2% over 10 days is roughly 90% a year at simple interest.
- The profit is small, so **costs decide whether this works at all** — these prices sit in the cheapest band on the platform, with your own discount on top, and every row shows the net return at your rate.
- Being wrong costs you the entire stake, not the 2%. Size accordingly.
- Prefer bonds that settle **soon**. Time is the thing you're actually being paid for.
- Read the resolution rules. Check **Executable** and **Spread** before sizing up.
- Don't stack six bonds that all depend on the same event.
- Many small positions, repeated. That's the whole strategy.
---
## Autobond
https://www.olympusx.app/docs/19-autobond
Set a budget and your rules once, and let Autobond buy 97%+ bonds for you around the clock, with a stop loss and a loss limit you control.
# 🤖 Autobond
Bonds at 97% and up do not sit around waiting for you. They appear when news lands, and the good ones are taken within minutes. Overnight, most of them come and go while you are asleep.
Autobond watches for you. You set a budget and the rules you are comfortable with, and it buys the bonds that fit, sells them if they turn against you, and stops when it has lost more than you said it could.
Open it from [Bonds](/app/markets/bonds), or go straight to [Autobond](/app/markets/bonds/autobond).
---
## What you set
Seven things decide everything Autobond does.
**Budget.** The most it will have tied up at once. Your money stays in your wallet until it actually buys something.
**Positions at once.** How many bonds it can hold. Your budget is split evenly between them, so a $300 budget across 3 positions puts $100 into each. No bond takes more than its share of the positions your budget can fund. If you raise your budget later, the extra spreads across your positions as they settle, instead of going into the next bond at once.
Each position needs at least $5. Polymarket will not take an order smaller than 5 shares, so a budget that leaves less than that per position cannot buy anything, and Autobond will not let you save it. Give it a bigger budget or fewer positions.
**Lowest odds to buy.** It will not buy anything the market rates below this. The floor is 97% and you cannot go under it.
**Highest odds to buy.** An optional ceiling on what Autobond will pay. Leave it empty for no ceiling. A ceiling can keep a high annualised return from disguising the tiny possible gain on a near-$1 buy.
**Lowest return to accept.** Expressed per year, so short bonds show large numbers. See [why that can mislead](#why-apr-can-mislead).
**Settles within.** Only bonds that finish inside this many hours are eligible.
**Sell if it drops.** Your stop loss, in cents. See [what it can and cannot do](#what-the-stop-loss-can-and-cannot-do).
You can also limit which subjects it buys, which risk ratings it accepts, and whether it may hold two positions on the same event. New setups block crypto, Elon Tweets and weather, because those markets can swing in seconds. You can remove any of those rules.
---
## How Autobond picks a bond
Every so often it looks at the bonds currently on offer and drops any that fail one of your rules. What is left has to also be buyable: there has to be someone selling, at a price that still meets your odds and return thresholds, in enough size to fill your per-position amount.
Before buying, Autobond also checks the current bids to make sure the entire planned position could be sold immediately. It skips the bond if there are not enough buyers for every share, or if the average available sale price is more than 2 cents below the planned buy price. It repeats this check immediately before placing or repricing the order.
If nothing survives, it buys nothing and waits. That is the normal case, not a fault. The panel titled **Why Autobond has not bought** on the Autobond page shows you exactly which rule ruled out the most bonds on its last look, and which bond came closest.
Loosening one rule at a time is the fastest way to widen the pool. Dropping your odds threshold from 99% to 97% usually has the biggest effect, and it is also the one that raises your risk the most.
---
## Why APR can mislead
A bond that pays 1% and settles tomorrow is roughly 365% a year. The same 1% over a month is about 12%. Nothing about the trade changed, only the clock.
That is why a very high return threshold does not filter for better bonds. It filters for bonds that settle soonest, and for the ones other people are not buying. If a bond is offering far more than its neighbours at the same odds, the usual reason is that the market is less sure than the price suggests, or that there is very little of it to buy.
Your odds threshold and your risk ratings do more to control your actual risk than the return threshold does.
---
## Fixed or reinvested profits
**Keep them.** Autobond keeps aiming at the budget you set. Profits build up in your wallet and are not put back to work. If you lose, it will use other available funds in your wallet to get back to your budget.
**Reinvest them.** Autobond adds your profits to its target, so positions grow as you win. Losses can take back profits you reinvested, but they never shrink your positions below your budget. Your Lifetime PnL and your loss limit still count every loss.
A worked example. You set a $1,000 budget across 4 positions, so $250 each.
- On **Keep them**, after making $200 you still have a $1,000 target and $250 positions. The $200 sits in your wallet.
- On **Reinvest them**, that $200 raises the target to $1,200, so positions become $300. After a $150 loss the target falls to $1,050 and positions become about $262.
- If you are down instead, say $150 from the start, the target stays at $1,000 and positions stay at $250.
Reinvesting puts your winnings at risk again. It is the more aggressive choice.
---
## What the stop loss can and cannot do
If you set 3 cents, Autobond tries to sell when the best price anyone is offering falls 3 cents below what you paid.
What it does well: it caps the slow bleed, where an outcome drifts from 98¢ to 95¢ to 90¢ as the market changes its mind over hours.
What it cannot do:
- **It cannot beat a settlement.** Most bonds that go wrong do not drift. They resolve. A 98¢ outcome that loses goes to zero at settlement, with no path down for a stop loss to catch.
- **It needs a buyer.** Selling requires someone on the other side. In a thin market at a bad moment, there may be nobody at your price, and the sale can take several tries or fail.
- **It sells at the going price, not your trigger.** The price it gets can be worse than the one that set it off.
Leaving it empty turns it off completely. Autobond will then hold every position until it settles, or until you sell it yourself from the Holding now tab.
---
## Why losses can pass your limit
**Stop buying after losing** is a circuit breaker on new buys. When your realised losses reach it, Autobond stops opening positions. It does not sell what you already hold.
So your total losses can end up larger than the number you set. Positions that were already open when the limit hit are still exposed, and they still settle on their own terms. If you want out of those too, sell them yourself from the Holding now tab.
The same is true of Stop Autobond: it stops new buying, and leaves your open positions running with their stop losses and settlement handling intact.
---
## Following what it did
**Holding now** lists what Autobond currently owns for you, what you paid, and what you make if each one wins. A row highlighted in amber or red is trading below what you paid.
**Finished** lists what has settled or been closed, with what you made or lost after fees. It starts with positions that actually opened; use **How it ended** to show all attempts, the ones held to the end, the ones you closed, stop losses, or attempts that did not open.
**What Autobond did** is the running log: every buy, sale, payout, and stop.
Each wallet runs its own Autobond, with its own budget, its own rules, and its own results. Switching wallets at the top of the page switches all of it.
---
## The honest part
These are still bets. A 98% outcome loses about one time in fifty, and when it loses you lose the whole position, not 2% of it. Run enough of them and you will meet that one.
Autobond does not change those odds. It only saves you from watching a screen. Set a budget you would be comfortable losing, keep the loss limit low while you are learning, and give it small positions until you have seen it run through a losing bond.
---
## Multi-Wallet
https://www.olympusx.app/docs/13-multi-wallet
Run separate Olympus wallet strategies, copy different leaders per account, and compare copy-trading performance wallet by wallet.
# 🧩 Multi-Wallet
Multi-Wallet lets you run several Olympus trading accounts side by side. Each wallet can copy its own set of leaders with its own settings, so you can separate strategies instead of mixing every copied trade into one account.
Use it when you want to:
- copy different traders from different wallets
- compare market-order and limit-order versions of the same copy strategy
- isolate higher-risk wallets from lower-risk wallets
- keep PnL curves clean for each account
- transfer funds between your own Olympus wallets when a wallet type supports it
Open Multi-Wallet from the app header or go directly to [Multi-Wallet](/app/multi-wallet).
---
## What the Page Shows
The Multi-Wallet page gives you an account-level view of your copy-trading setup.
You can see:
- total equity, cash, open-position value, and recent PnL across wallets
- each trading wallet connected to your Olympus account
- which copied wallets belong to each trading wallet
- per-wallet balances, positions, copied-wallet counts, and activity state
- PnL comparison charts for the account wallet and the wallet being copied
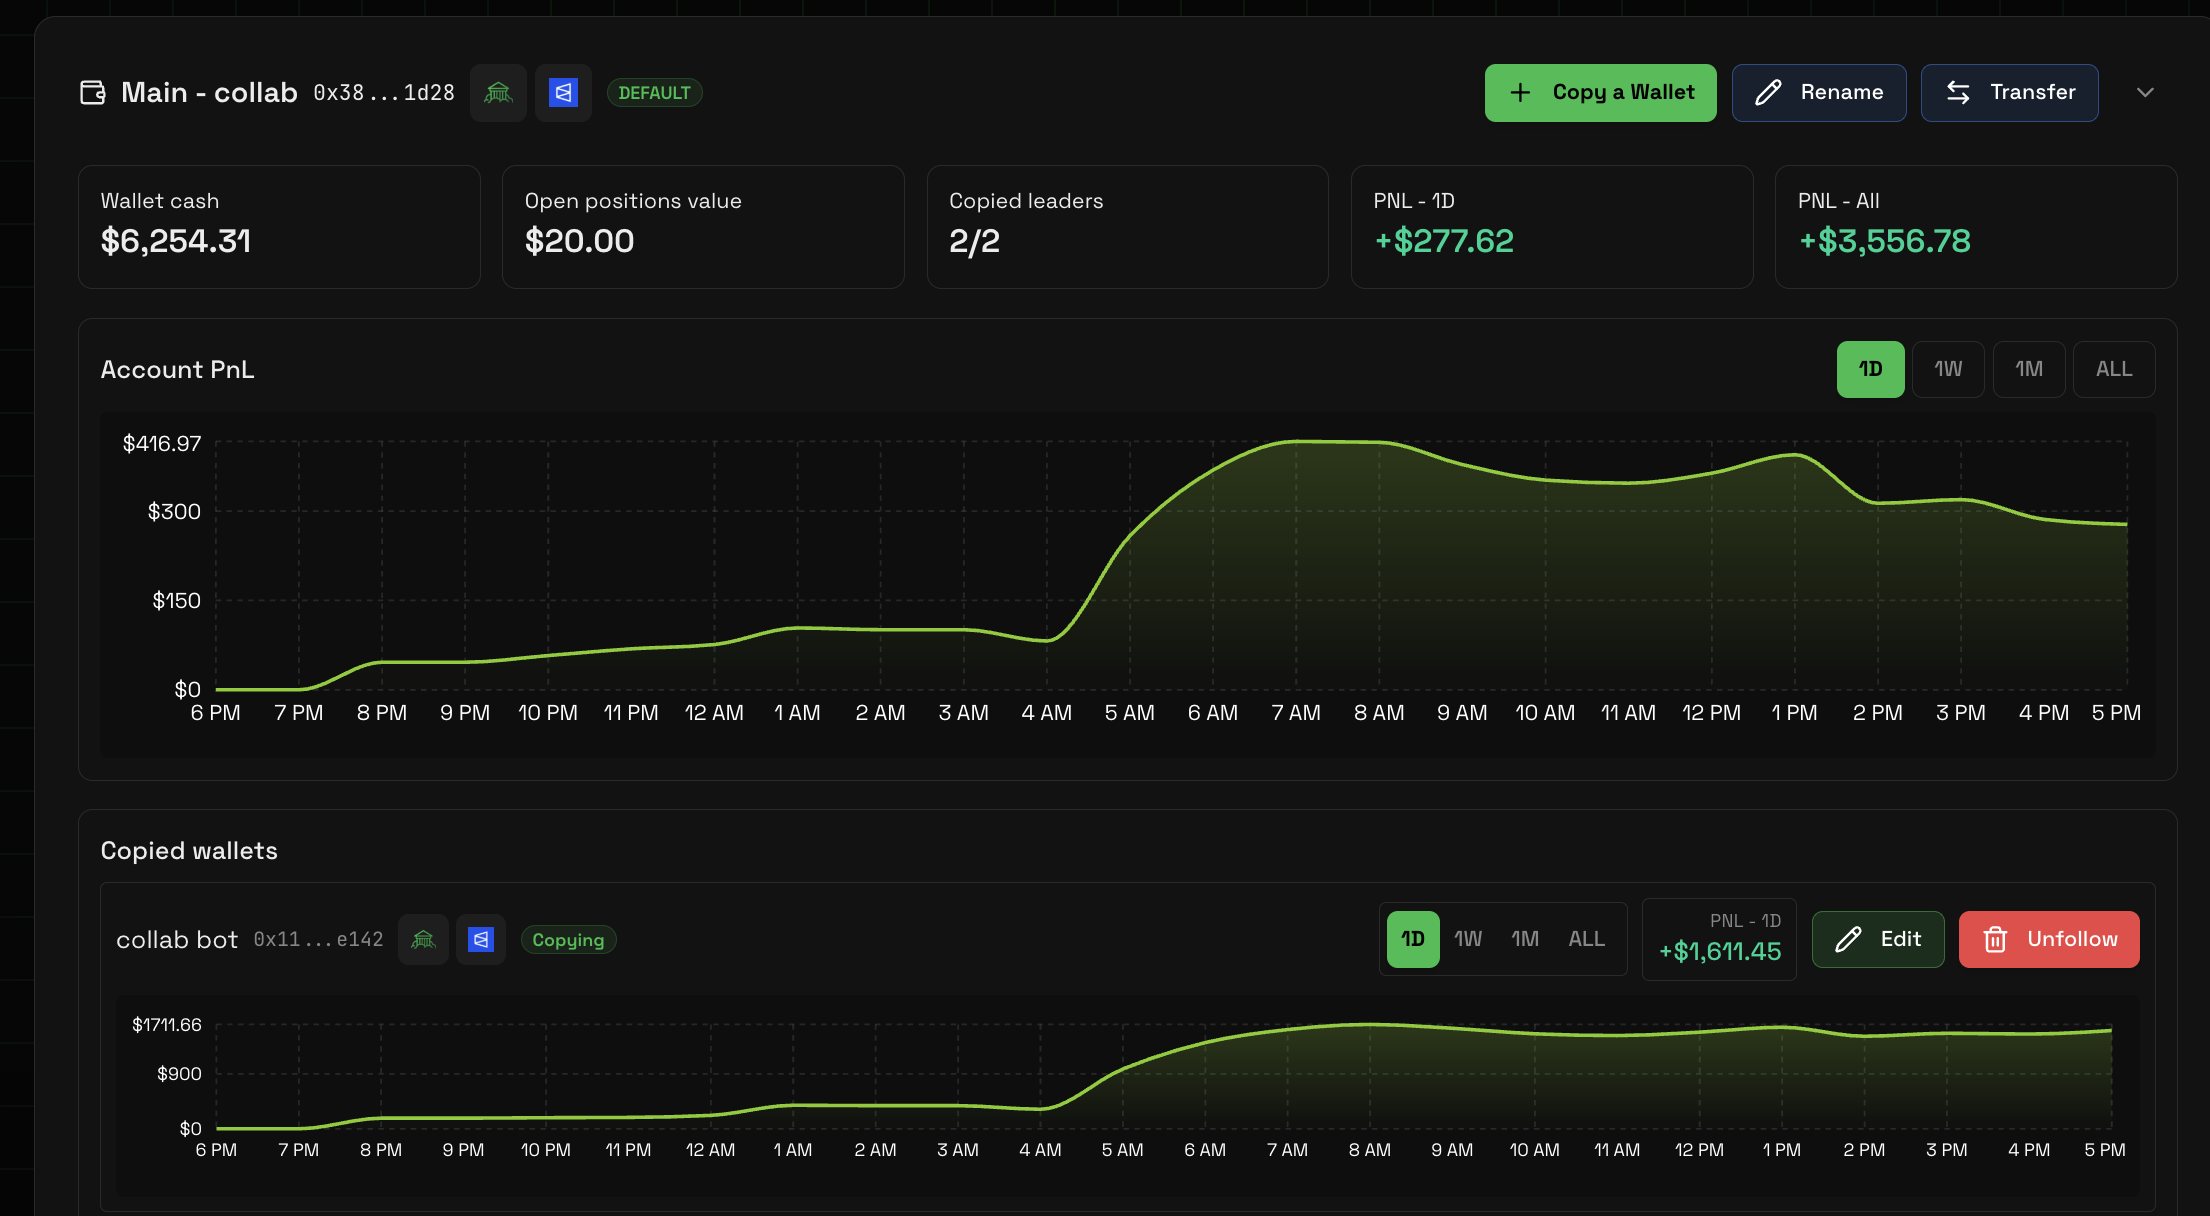 ---
## Copying With Multiple Wallets
Each copied wallet belongs to one of your trading wallets. This means two Olympus wallets can copy the same leader with different settings.
For example:
| Wallet | Copied leader | Strategy |
| ------------- | ------------- | ---------------------------------------------- |
| Main wallet | Leader A | Smaller market orders with tighter risk limits |
| Test wallet | Leader A | Limit orders with different max price settings |
| Sports wallet | Leader B | Sports-only copy settings |
This keeps the results easier to read. If every experiment runs from one account, the position list and PnL chart can become hard to interpret.
---
## Comparing PnL Curves
Use the PnL comparison chart as a copy-trading health check.
If your account curve roughly follows the copied wallet's curve over the same timeframe, Olympus is tracking that leader as expected. If the curves drift, review:
- wallet-specific trade ratio
- max trade size
- market or odds filters
- limit-order settings
- stop-loss and take-profit settings
- whether the copied wallet is paused
Some drift is normal when your sizing, balance, or filters differ from the leader. Large drift usually means your settings intentionally skipped trades or your wallet could not execute the same fills.
---
## Managing Wallets
Use [Multi-Wallet](/app/multi-wallet) when you need to create, import, rename, remove, deposit to, withdraw from, transfer between, or compare trading wallets.
After a wallet exists, use the same Multi-Wallet page to decide what it copies and how it performs. Use the regular dashboard tabs for detailed positions, activity, and open orders.
---
## Perps
https://www.olympusx.app/docs/14-perps
Trade Polymarket perpetuals in Olympus, manage leveraged positions, and use optional RSI automation.
# 📈 Perps
Perps let you trade Polymarket perpetual markets from Olympus. They are separate from prediction-market copy trading: you manage margin, leverage, entries, exits, and protection directly from the Perps pages.
Open Perps from the app header or go directly to [Perps](/app/perps).
---
## What You Can Trade
Olympus supports the current Polymarket perps instruments, including crypto, equity indexes, metals, and oil.
The Perps overview page shows available markets with live prices, recent movement, and direct links into each instrument's trading view.
---
## Step-By-Step: Opening A Perps Position
### Step 1 — Open The Perps Page
Go to [/app/perps](/app/perps). You will see the market overview grid with live prices and percentage moves for each instrument.
### Step 2 — Pick A Market
Click any market card to go to that instrument's trading view. Each market page shows a live chart, order book, and trade controls.
### Step 3 — Choose Long Or Short
Select **Long** if you expect the price to rise, or **Short** if you expect it to fall.
### Step 4 — Set Your Leverage And Size
Use the leverage control to choose your multiplier, then enter the collateral amount or position size. The panel shows your estimated liquidation price and margin requirement before you confirm.
### Step 5 — Choose Market Or Limit
- **Market order** — executes immediately at the current best price
- **Limit order** — sits in the book until the price reaches your target
### Step 6 — Fund Your Perps Balance If Needed
Perps use separate **pUSD** collateral from your copy-trading balance. If you have no pUSD, use the **Transfer** action on the Perps page to move funds from your main balance.
### Step 7 — Confirm The Order
Review leverage, size, and estimated price, then submit. The position appears in your open positions panel once confirmed.
### Step 8 — Set Stop-Loss And Take-Profit (Recommended)
From the positions panel, add a stop-loss and take-profit to protect the position. These execute automatically when the price hits your target.
---
## Trading View
Each perps market page includes:
- a live price chart
- order book and recent trades
- long and short order controls
- leverage controls
- market and limit entry support
- open-position management
Perps use separate pUSD collateral from your prediction-market balance. Use the **Transfer** action on the Perps view when you need to move funds between balances.
---
## Positions And Exits
The Perps portfolio view shows your open positions, margin, estimated PnL, and position actions.
From there, you can:
- close a position
- add or edit take-profit and stop-loss protection
- monitor unrealized PnL
- refresh account state
- share a PnL image
Stop-loss and take-profit controls are risk tools, not guarantees. Fast markets, thin books, and API delays can affect execution quality.
---
## Automation
The Perps page also includes optional RSI automation for users who want rule-based entries.
Automation rules can open a position when RSI conditions are met, then attach configured take-profit and stop-loss protection. Start small, review the rule before enabling it, and monitor activity after the first trigger.
---
## Good Practices
- trade with size you can afford to lose
- check leverage before every order
- keep enough available collateral for open positions
- use limit orders when price discipline matters
- use stop-loss and take-profit settings as safeguards, not substitutes for monitoring
- avoid running multiple strategies on the same instrument unless you understand how net positions work
---
## Combos
https://www.olympusx.app/docs/15-combos
Build multi-leg combo parlays in Olympus, preview combined odds, place a combo, and share the slip.
# 🎟️ Combos
Combos are multi-leg parlays. Instead of buying one prediction-market outcome, you select multiple eligible legs and receive one combo position that pays only if every leg wins.
Open Combos from the app header or go directly to [Combos](/app/combos).
𝕏 Watch the short combo copy trading tutorial
## Copy Trading Combos
Olympus can automatically mirror the multi-leg parlays placed by traders you follow. Open a top trader, follow their wallet, then enable **Combo copy trading** in the **Advanced** tab of that wallet's settings.
Combo copying uses its own controls, so you can choose which traders to mirror without changing your regular copy-trading setup. Review the trader's combo history and use conservative sizing before enabling it.
---
## Step-By-Step: Building And Placing A Combo
### Step 1 — Open The Combos Page
Go to [/app/combos](/app/combos). The page opens on the market browser with your slip panel on the right (desktop) or below (mobile).
### Step 2 — Find Markets To Add
Browse the eligible market list. You can search by keyword or scroll through active markets. Not every Polymarket market is combo-eligible — only markets the Combos system accepts will appear here.
### Step 3 — Add Legs To Your Slip
Click a market to open its outcome selector. Choose **YES** or **NO**, then add it to your slip. Repeat for each additional leg you want to include.
Your slip panel updates in real time showing:
- each selected outcome
- the combined implied odds
- the estimated payout multiplier
### Step 4 — Review The Slip
Before entering an amount, review every leg. Check that each selected outcome is the one you intend to trade. Removing a leg is easier than unwinding a placed combo.
### Step 5 — Enter Your Amount
Type the USDC amount you want to put on the combo. The slip shows your estimated payout if every leg wins. Use conservative sizing — long combos have low win probability even when each leg looks likely.
### Step 6 — Request The Final Quote
Click **Get quote** (or the equivalent confirm button). Olympus fetches a live quote from the Combos system. The confirmed price may differ from the estimate if any market prices moved since you built the slip.
If the quote is too far from the estimate, review whether any market moved significantly and edit or retry.
### Step 7 — Confirm And Place
Accept the quote to submit the combo. Once placed, the combo appears in your **My Combos** tab with pending status.
### Step 8 — Track Settlement
Each leg settles independently. You can monitor status from the My Combos view. If every leg resolves in your favor, the full payout is credited. A single losing leg means the combo loses.
---
## Pricing And Fills
Olympus shows an instant local estimate while you build. The final quote is requested when you place the combo, so the confirmed price can move if market prices change.
If a quote is unavailable, contradictory, expired, or too far from the expected price, edit the slip and try again instead of forcing the trade.
---
## Tracking Combos
After placement, Combos can show your open and historical combo positions.
Depending on position state, you may be able to:
- view the legs
- track pending or resolved outcomes
- close early when supported
- share the combo slip
- share a PnL card after settlement
Combo positions settle based on all legs. A single losing leg can make the full combo lose.
---
## Good Practices
- keep the number of legs manageable (2–4 legs is a good starting range)
- check each leg before placing
- use smaller sizing than single-market trades when odds are long
- treat local payout previews as estimates until the final quote is accepted
- avoid combining markets that depend on the same uncertain event unless that is intentional
---
## Leverage
https://www.olympusx.app/docs/17-leverage
Open leveraged positions on prediction market outcomes using Dimes Multiply, directly inside Olympus.
# ⚡ Leverage
Leverage lets you open amplified positions on Polymarket outcomes using **Dimes Multiply** — a leveraged synthetics protocol built on prediction markets. Instead of buying a YES or NO share at face value, you post a fraction of the notional as collateral and multiply your exposure.
Open Leverage from the app header or go directly to [Leverage](/app/leverage).
---
## Tutorial
Read the full walkthrough on X:
𝕏 Dimes Leverage tutorial on X →
---
## How It Works
When you take a leveraged position you post collateral (USDC) against a notional larger than that collateral. A 5× leverage position on a $0.50 YES outcome means $100 collateral controls a $500 notional exposure. Your PnL, liquidation price, and fees all scale with the notional.
Positions are managed by the Dimes protocol. Olympus handles the interface, wallet routing, and fee collection. The underlying position lives on-chain.
---
## What Markets Are Available
The leverage market catalog shows all prediction markets currently accepting new positions. Markets are filtered into:
- **All** — every available market
- **Crypto** — crypto-outcome markets
- **Sports** — live sports event markets
Markets open and close based on Dimes eligibility. If a market is not listed, it is not currently accepting new leveraged positions.
---
## Step-By-Step: Opening A Position
### Step 1 — Go to Leverage
Navigate to [/app/leverage](/app/leverage). The **Browse markets** tab shows all currently available markets.
### Step 2 — Pick A Market
Browse the grid or use the category filter on the left (desktop) or top (mobile). Click a market card to open the trading panel for that market.
### Step 3 — Choose A Side
Select **YES** or **NO** depending on your directional view on the outcome.
### Step 4 — Set Your Leverage
Use the leverage slider to choose your multiplier. The available range depends on the market and current liquidity. Start low — higher leverage means a tighter liquidation price.
### Step 5 — Enter Your Collateral
Type the collateral amount in USDC, or use the quick-amount buttons. The panel will show you:
- the notional value at your chosen leverage
- the estimated fee
- the quote price before you confirm
### Step 6 — Review The Quote
Check the live quote before confirming. The quote updates automatically. If the price moves beyond your slippage tolerance, the order will not execute — you can widen the slippage or wait for a better quote.
### Step 7 — Confirm And Submit
Click **Open position** and approve the transaction in your wallet. Once the on-chain transaction confirms, the position appears in your **My positions** tab, on the Leverage page.
### Step 8 — Monitor And Close
From **My positions** you can:
- track your unrealized PnL
- see your liquidation price
- close the position at any time
When you close, proceeds (minus fees) are returned to your wallet balance.
---
## Liquidation
If the market price moves against your position far enough, Dimes will liquidate the position to protect protocol solvency. The liquidation price is shown when you open and is visible in your positions table.
A few things to know:
- liquidation happens automatically on-chain — you do not need to be watching
- thin liquidity at extremes can cause liquidation before the displayed price in fast-moving markets
- adding more collateral is not currently supported — size positions to leave room for price movement
---
## Good Practices
- start with small collateral to learn how leverage, quotes, and slippage behave
- keep leverage low until you understand how quickly positions move
- check the liquidation price every time before confirming
- do not use money you cannot afford to lose — leveraged prediction markets amplify both gains and losses
- close positions before market resolution if you want to exit rather than settle
---
## LP Rewards
https://www.olympusx.app/docs/16-lp-rewards
A short guide to the Olympus LP Rewards page and tutorial.
# 💧 LP Rewards
LP Rewards is a liquidity workflow for users who want to place orders on reward markets from one focused page.
It helps you find reward opportunities, review suggested order levels, and manage liquidity orders without jumping between many market pages.
Open the in-app walkthrough here:
Open the LP Rewards tutorial in Olympus →
Use conservative sizing while learning the workflow. Liquidity orders can fill when markets move, so review order prices and expiration before placing them.
## Restoring canceled LP orders
When an LP order fills, Polymarket may cancel other LP orders from the same trading wallet as collateral or shares change. Olympus identifies recent cancellations that closely follow an LP fill and shows a restore prompt above **Filled Orders**.
Review the prompt before starting a restore. Olympus checks each order again against the live market, available balance or shares, automation state, minimum reward size, and maker-safe reward range. Eligible orders are reopened one at a time; unsafe orders are skipped with a reason. The original canceled orders are never modified.
Restore candidates remain available for 24 hours. A restore request can process up to 500 orders and can be safely retried if the request is interrupted.
---
## Olympus FAQ
https://www.olympusx.app/docs/08-faq
Frequently asked questions about Olympus, including copy trading, wallets, fees, withdrawals, risk, and Polymarket setup.
# ❓ Olympus FAQ
Answers to the most common questions about using Olympus.
---
## 🧭 Access & Accounts
**❓ Who can use Olympus and how do I log in?**
Olympus is open to everyone.
You can get started by visiting [olympusx.app](https://olympusx.app/) and logging in with **Discord** or **Google** through Privy. If you have a referral code, you can also use that flow when applicable.
---
**❓ Can I use my own wallet instead of the Olympus trading wallet?**
No. Olympus uses an automatically created trading wallet because of how the Polymarket wallet and proxy setup works.
That wallet is still yours, but Olympus does not use your existing external wallet directly for trading.
---
**❓ Is my wallet custodial?**
No. Olympus is **non-custodial**.
Your funds remain in your own trading wallet, and Olympus does not take custody of your assets.
---
**❓ If I export my private key, can I log into Polymarket with it?**
No.
Do **not** log into Polymarket with an exported Olympus trading-wallet key. Doing that can create a new proxy wallet and break wallet tracking behavior.
> ⚠️ Only use an exported key for withdrawing, transferring, or swapping funds. Do not use it to log into Polymarket.
---
## 💰 Fees
**❓ What fees does Olympus charge?**
Olympus charges a trading fee when a trade, claim, or redeem successfully executes through an Olympus-tracked wallet position.
The standard Olympus base fee is **0.75%** of the executed USD amount before discounts.
Fees can apply to:
- copied buys and sells
- manual buys and sells placed through Olympus
- manual limit orders that fill
- split or merge actions copied from a followed wallet
- claims or redeems for positions Olympus opened or tracked
- Polymarket auto-redeems or manual Polymarket UI redeems, but only for the Olympus-attributed part of the payout
Fees do not apply to:
- idle balance
- deposits
- withdrawals
- failed or cancelled trades that never execute
- trades or redeems made directly on Polymarket that Olympus did not open or track
Perps and leverage (Dimes) positions have their own fee schedules — see the dedicated questions below.
Supported discounts can include things like:
- eligible NFT holdings such as [SOL Decoder NFTs](https://tensor.trade/trade/soldecoder) - get 10-80% off fees!
- supported subscriptions such as [Whop](https://whop.com/decoder-valhalla/decoder-valhalla/) or [Blinkord](https://blinkord.com/925207817923743794) - get 70% off fees!
---
**❓ How do I check my current fee tier?**
Open **Settings → Fees** in the app to see your current fee tier, active discounts, and breakdown.
If your account perks or linked status change, such as after an NFT purchase or subscription update, logging out and back in can help refresh the displayed tier.
---
**❓ What is the extreme-price fee discount?**
For buys at very low or very high prices, Olympus applies a reduced fee schedule. The closer the buy is to the extreme ends of the market, the lower the fee becomes.
---
**❓ What's the fee on perps trades?**
Perps have their own fee, separate from the prediction-market fee above: a flat **0.045%** of each fill's notional size. It applies to both opening and closing fills and is collected automatically from your wallet.
---
**❓ What's the fee on leverage (Dimes) positions?**
Leverage positions carry an Olympus fee separate from Dimes' own protocol fees and the Polymarket venue fee (both shown in the leverage quote tooltip before you open):
- **Open:** 0.75% on the first 1x (your collateral) **+** 0.25% on borrowed notional above 1x.
- **Close or normal settlement:** 0.75% of proceeds, capped at your original collateral (1x).
- **Liquidation or cancellation:** $0.
Example: **$1,000** collateral at **10x** ($10,000 notional) → **$30** at open ($7.50 + $22.50). Discounts may reduce it.
---
**❓ What fees do I pay for LP (liquidity farming)?**
LP / liquidity farming has two dedicated fees, both separate from the standard trading fee:
- **LP fill fee — a flat 0.2%** of each fill's notional. It is charged on **both legs** of an LP position: the entry (maker buy) and the exit (auto-sell), whether the fill is a resting limit order or an immediate/market fill.
- **LP reward-share — a flat 5%** of the liquidity-mining rewards Polymarket pays you. Polymarket settles these rewards to your wallet daily at around midnight UTC, and Olympus takes 5% of that daily total. Reward payouts below **$1** (Polymarket's own payout minimum) are skipped and not charged.
> ⚠️ **LP fees are not discounted.** Unlike the standard trading fee, the 0.2% fill fee and 5% reward-share are flat and **bypass all discounts** — (ie. no NFT discounts, subscription discounts). This is the only fee that bypasses those discounts.
---
## ⚙️ Following & Copying
**❓ Can I test a wallet before I actually copy it?**
Yes. Open the trader's profile and click **Backtesting**. It replays their past trades against your settings and reports simulated PnL, ROI, win rate, drawdown, and which trades your filters would have skipped.
Two things to know before you trust the number:
- it is a **simulation**, not a recording. Polymarket publishes no historical order book, so fills are modeled with an assumed spread rather than replayed
- a few settings are accepted but not simulated yet, including stop loss, take profit, and max drawdown
It is far better at telling you which wallets **not** to copy than at predicting your earnings. See [Backtesting](/docs/18-backtesting).
---
**❓ My backtest was profitable but I lost money copying. Why?**
Common reasons, roughly in order of how often they bite:
- **Your real fills were worse than modeled.** The backtest assumes a fixed spread. Real fills depend on real liquidity at the moment you traded. Check the slippage sensitivity panel — if the result flips negative at 2× spread, it was already fragile
- **The sample was too thin.** Check the evidence gates. A green result that fails the trades/markets/active-days gates is a lucky streak, not an edge
- **Unpriced positions were excluded.** If a lot of capital sat in unpriced positions, the headline was computed over a survivor subset that quietly dropped the leader's underwater bags
- **The past is not the future.** The leader may have changed strategy, or the market regime shifted
---
**❓ Does Auto-tune with AI guarantee better settings?**
No. It is a single model suggestion based on the finished run, clamped to valid ranges. Nothing compares the tuned result against the previous one or rejects a worse outcome — so read the new numbers yourself. If the tuned run is worse, that is a real and useful answer. It is limited to once per hour.
---
**❓ Do I need to keep my browser open or my computer on?**
No.
If your bot status is running, Olympus continues operating server-side. You do not need to keep the browser open for copy trading to keep working.
---
**❓ How many wallets can I follow at once?**
Olympus currently limits how many wallets you can actively copy at one time.
Check the current app behavior for the live cap, since this kind of limit can change over time.
---
**❓ What happens if I pause or unfollow a wallet?**
If you pause a wallet, Olympus stops copying new trades from that wallet.
If you unfollow a wallet, Olympus removes it from your copy setup. Position handling may depend on the specific action and flow in the app, so always confirm before removing a wallet if you still have linked exposure.
---
**❓ Why did my trade fill above my Max Odds setting?**
Because **Maximum Odds (%)** and **Maximum Price Deviation (%)** are different checks.
- **Maximum Odds (%)** checks the leader's entry price
- **Maximum Price Deviation (%)** checks how far your own fill price is allowed to drift from the leader's entry
That means a trade can pass your odds filter based on the leader's price, but your actual fill may still land higher because of slippage or market movement.
If you want tighter control, combine:
- lower **Maximum Odds (%)**
- reasonable **Maximum Price Deviation (%)**
- **Limit Buy Mode** where appropriate
---
**❓ How does Maximum Price Deviation (%) work?**
It controls how far your fill price is allowed to move away from the leader's execution price before Olympus skips the trade.
You can set:
- a global default in **General Settings**
- an optional per-wallet override in that wallet's **Filters** settings
If the wallet-level field is left empty, Olympus uses your global value.
---
**❓ How does Limit Buy Mode work?**
Olympus does not see a leader's pending limit orders in advance.
Instead, Olympus waits for the leader's trade to execute, then places a limit order for you at that same execution price.
That helps protect you from paying more than the leader did, but it also means your order may not fill if the market moves away immediately.
---
**❓ Does Olympus support Stop-Loss / Take-Profit?**
Yes.
Olympus supports **Stop-Loss / Take-Profit** for copy trading and manual positions.
You can set:
- global defaults for copy trading
- per-wallet overrides for followed wallets
- per-position triggers for manual trades
For the full setup and behavior details, see [Stop-Loss & Take-Profit](/docs/11-stop-loss-take-profit).
---
## 🪙 Wallets, Withdrawals, and Swaps
**❓ How do I withdraw funds?**
Use the in-app wallet tools in Olympus to withdraw from your trading wallet when supported by your wallet type and route.
If not, you can export your trading-wallet private key and move funds manually through another wallet such as MetaMask or Rabby.
> ⚠️ If you export your key, use it only for transfers or swaps. Do not log into Polymarket with it.
---
**❓ How do I swap tokens?**
Olympus supports the in-app **USDC / USDC.e → pUSD** conversion flow when conversion is needed for Polymarket V2 trading.
If Olympus does not support the specific swap flow you want in-app, you can:
1. export your trading-wallet key
2. import it into a wallet like MetaMask or Rabby
3. use a Polygon-compatible swap app
4. move the assets back if needed
Use caution and make sure you are on the correct network.
---
**❓ Why does my dashboard show 0 trades?**
Usually one of these is true:
- the wallet you follow has not traded yet
- your filters are too restrictive
- your ratio or trade-size settings are too small
- your price-deviation settings are blocking entries
A good first step is to check:
- the wallet's recent activity
- your **Activity** tab
- your ratio, odds, liquidity, and trade-limit settings
---
## ⚠️ Risk
**❓ Can I lose money using Olympus?**
Yes.
Copy trading carries the same core financial risk as trading on Polymarket directly. Olympus helps you manage that risk, but it does not remove it.
---
**❓ Is Olympus guaranteed to be profitable?**
No.
Your results depend on the wallets you follow, your settings, market conditions, and how well the strategy survives being copied.
---
**❓ What are the most important risk controls?**
The most important live controls usually include:
- **Ratio %**
- **Max Trade Size (USD)**
- **Max Market Size (USD)**
- **Max Trades / Market**
- **Max Trades / 24h**
- **Maximum Price Deviation (%)**
- **Limit Buy Mode**
- liquidity and odds filters
For a deeper walkthrough, see [Olympus Risk & Ratio Management](/docs/06-risk-ratio-management).
---
## 🔧 Troubleshooting
**❓ Something is not working properly. What should I try first?**
Start with:
1. log out and log back in
2. refresh the page
3. clear cookies or site data if needed
4. log in again
If the issue still persists, reach out through the Olympus Discord.
---
**❓ The export private key button is missing. What should I try?**
Log out and log back in first.
If it still does not appear, try refreshing the session and checking again.
---
## 💡 Other
**❓ What happens if I lose access to Discord?**
Your funds remain tied to your wallet, not to Discord itself.
If you lose Discord access, contact Olympus support for account-access or community-role help.
---
**❓ Will Olympus have a token?**
Check official Olympus announcements for anything related to tokens, rewards, or future ecosystem plans.
Docs should not be treated as the source of truth for unreleased announcements.
---
## Trading API
https://www.olympusx.app/docs/12-api
Create wallet-scoped API keys, read the Top Wallets list, and trade through the Olympus API
# Trading API
> Prefer a command-line tool? Check out the community-built Olympus CLI: [github.com/fciaf420/olympus-cli](https://github.com/fciaf420/olympus-cli).
Use the Olympus Trading API to read your pUSD balance, positions, and equity in one call, or to queue buy and sell trades from your selected Olympus wallet, including buys with built-in stop losses and take profits.
---
## Authentication
Create an API key while logged in above. Each key is linked to one wallet:
- **Olympus Wallet** by default — your current Olympus-created EOA/Safe/deposit wallet.
- **Imported wallet** when you select one before creating the key.
The plaintext key is shown only once. After creation, the UI displays only the first four characters and lets you delete the key.
Send the key as a bearer token:
```bash
Authorization: Bearer YOUR_API_KEY
```
You can also send it with `X-API-Key`, but `Authorization: Bearer` is preferred.
## Base URL
Use the Olympus production API host:
```text
https://api.olympusx.app
```
## Rate limits
Rate limits are enforced per API key:
| Endpoint | Limit |
| --- | --- |
| `GET /v1/top-wallets` | 60 requests per minute |
| `GET /v1/wallets/:address` | 30 requests per minute |
| `GET /v1/portfolio` | 30 requests per minute |
| `GET /v1/trades/:tradeId` | 100 requests per minute |
| `POST /v1/trade` | 60 requests per minute |
When you exceed a limit, Olympus returns `429 Too Many Requests` with a `Retry-After` header in seconds.
## Find Polymarket market fields
Olympus uses Polymarket market identifiers. You can get them from Polymarket's public APIs before
calling `POST /v1/trade`.
Useful Polymarket docs:
- [Fetching Markets](https://docs.polymarket.com/market-data/fetching-markets)
- [List markets](https://docs.polymarket.com/api-reference/markets/list-markets)
- [Get CLOB market info](https://docs.polymarket.com/api-reference/markets/get-clob-market-info)
Fetch a market by slug:
```bash
curl "https://gamma-api.polymarket.com/markets?slug=new-rhianna-album-before-gta-vi-926"
```
Or fetch active order-book markets:
```bash
curl "https://gamma-api.polymarket.com/markets?active=true&closed=false&enableOrderBook=true&limit=1"
```
Example Polymarket market data:
```json
{
"id": "540817",
"question": "New Rihanna Album before GTA VI?",
"conditionId": "0x1fad72fae204143ff1c3035e99e7c0f65ea8d5cd9bd1070987bd1a3316f772be",
"slug": "new-rhianna-album-before-gta-vi-926",
"outcomes": "[\"Yes\", \"No\"]",
"clobTokenIds": "[\"98022490269692409998126496127597032490334070080325855126491859374983463996227\", \"53831553061883006530739877284105938919721408776239639687877978808906551086026\"]",
"enableOrderBook": true,
"acceptingOrders": true
}
```
Parse `outcomes` and `clobTokenIds` before choosing a token:
```js
const [market] = await fetch(
'https://gamma-api.polymarket.com/markets?slug=new-rhianna-album-before-gta-vi-926',
).then((res) => res.json());
const outcomes = JSON.parse(market.outcomes);
const tokenIds = JSON.parse(market.clobTokenIds);
console.log({
conditionId: market.conditionId,
marketId: market.id,
marketSlug: market.slug,
marketTitle: market.question,
yesTokenId: tokenIds[outcomes.indexOf('Yes')],
noTokenId: tokenIds[outcomes.indexOf('No')],
});
```
Use the matching index in `outcomes` and `clobTokenIds`:
| Outcome | `outcomeLabel` | `tokenId` |
| --- | --- | --- |
| Yes | `Yes` | `98022490269692409998126496127597032490334070080325855126491859374983463996227` |
| No | `No` | `53831553061883006530739877284105938919721408776239639687877978808906551086026` |
For Olympus:
| Olympus field | Polymarket field | Example |
| --- | --- | --- |
| `tokenId` | One value from `clobTokenIds` | `98022490269692409998126496127597032490334070080325855126491859374983463996227` |
| `conditionId` | `conditionId` | `0x1fad72fae204143ff1c3035e99e7c0f65ea8d5cd9bd1070987bd1a3316f772be` |
| `marketTitle` | `question` | `New Rihanna Album before GTA VI?` |
| `marketId` | `id` | `540817` |
| `marketSlug` | `slug` | `new-rhianna-album-before-gta-vi-926` |
| `outcomeLabel` | Matching value from `outcomes` | `Yes` |
Only submit trades for markets where `enableOrderBook` is `true` and the market is accepting orders.
## GET /v1/top-wallets
Returns the wallets Olympus currently ranks as worth copying, the same lists the Top Wallets page
shows. Rebuilt once a day, so polling more often than hourly gains you nothing.
Access to this endpoint requires an `extraAuth` token in addition to your API key. Submit a support ticket at olympusx.app to receive it.
```bash
curl "https://api.olympusx.app/v1/top-wallets?list=daily&limit=10&extraAuth=olympus4ever" \
-H "Authorization: Bearer YOUR_API_KEY"
```
Query parameters:
| Parameter | Default | Notes |
| --- | --- | --- |
| `extraAuth` | — | **Required.** Must be the token provided when you submitted your access request. |
| `list` | `daily` | `daily` is the ranked list. `picks` is the shorter list our daily scan selects. |
| `limit` | `50` | 1 to 200. The whole list fits in one request. |
| `offset` | `0` | Skip this many wallets. Ranks do not renumber, so page two starts at 51. |
Example response:
```json
{
"list": "daily",
"capturedAt": "2026-08-18T05:00:00.000Z",
"stale": false,
"total": 154,
"count": 10,
"offset": 0,
"wallets": [
{
"rank": 1,
"wallet": "0x12d6cccfc7470a3f4bafc53599a4779cbf2cf2a8",
"name": "classified",
"equityUsd": 299218.4,
"totalPnlUsd": 832344.8,
"windowDays": 14,
"windowPnlUsd": -194.7,
"avgDailyRoi14d": null,
"profitableDays": 9,
"winRate": 0.6413,
"activePositions": 98,
"lastTradeAt": "2026-08-04T18:19:47.000Z",
"views": 24922
}
]
}
```
Wallet fields:
| Field | Notes |
| --- | --- |
| `rank` | Position in the list, 1 based and gap free. `null` for a hand-picked wallet that no ranking covers. |
| `wallet` | The trader's wallet address. This is a leader to follow, not a market, so use it to look the trader up or to follow them in the app. |
| `name` | Public Polymarket display name, or `null` when the wallet has none. |
| `equityUsd` | Cash plus the value of open positions. |
| `totalPnlUsd` | All-time profit or loss. `null` when we could not measure it. |
| `windowDays` | The number of days `windowPnlUsd`, `avgDailyRoi14d` and `profitableDays` cover. |
| `windowPnlUsd` | Profit over that window, in dollars. |
| `avgDailyRoi14d` | Average daily return as a decimal fraction, so `0.0043` is 0.43% a day. **`null` for roughly half the list, and that is expected**: the figure is measured against the capital that actually earned it, reconstructed from the wallet's stablecoin flows, and a wallet moving money through routes we cannot follow has no honest denominator. Use `windowPnlUsd` for those. |
| `profitableDays` | Days in the window that ended in profit. |
| `winRate` | Fraction between 0 and 1. |
| `activePositions` | Open positions right now. |
| `lastTradeAt` | ISO timestamp of the last trade, or `null` when unknown. |
| `views` | Profile views on Polymarket. |
`capturedAt` is when the list was built and `stale` is true when the newest build is older than a
daily cadence allows for. Responses carry an `ETag`; send it back as `If-None-Match` and you get a
`304` until the next build lands.
Past performance is not a prediction. These figures describe what a wallet did, not what copying it
would earn you, which also moves with the prices you get, fees, and your own copy settings.
## GET /v1/wallets/:address
Returns basic stats for any Polymarket wallet address. The wallet does not need to appear in Olympus's Top Wallets lists — you can look up any trader on Polymarket.
Access to this endpoint requires an `extraAuth` token in addition to your API key. Submit a support ticket at olympusx.app to receive it.
```bash
curl "https://api.olympusx.app/v1/wallets/0x12d6cccfc7470a3f4bafc53599a4779cbf2cf2a8?extraAuth=olympus4ever" \
-H "Authorization: Bearer YOUR_API_KEY"
```
Query parameters:
| Parameter | Notes |
| --- | --- |
| `extraAuth` | **Required.** Must be the token provided when you submitted your access request. |
Example response:
```json
{
"wallet": "0x12d6cccfc7470a3f4bafc53599a4779cbf2cf2a8",
"name": "classified",
"totalPnlUsd": 832344.8,
"winRate": 0.6413,
"equityUsd": null,
"activePositions": 98,
"lastActivityAt": "2026-09-14T18:19:47.000Z",
"views": 24922
}
```
Response fields:
| Field | Notes |
| --- | --- |
| `wallet` | Normalized (lowercase) Ethereum address. |
| `name` | Polymarket display name or pseudonym. `null` when the wallet has no public name. |
| `totalPnlUsd` | All-time profit or loss in USD from the Polymarket leaderboard. `null` when the wallet has no recorded history. |
| `winRate` | Fraction between 0 and 1. `null` when unmeasured. |
| `equityUsd` | Always `null`. Use `GET /v1/portfolio` for equity on your own linked wallet. |
| `activePositions` | Number of currently open positions. `null` when unmeasured. |
| `lastActivityAt` | ISO 8601 timestamp of the wallet's last recorded trade. `null` when unknown. |
| `views` | Cumulative Polymarket profile view count. `null` when unmeasured. |
Any field can be `null` — treat `null` as "data not available" rather than "the value is zero". Responses are cached server-side for 5 minutes.
## GET /v1/portfolio
Returns your linked wallet's pUSD balance, total cash balance, open positions, open-position value, and equity in one response.
```bash
curl https://api.olympusx.app/v1/portfolio \
-H "Authorization: Bearer YOUR_API_KEY"
```
Example response:
```json
{
"walletAddress": "0x...",
"pusdBalance": 125.5,
"totalCashBalanceUsd": 125.5,
"positionsValueUsd": 74.25,
"equityUsd": 199.75,
"positionCount": 2,
"positions": [
{
"asset": "98022490269692409998126496127597032490334070080325855126491859374983463996227",
"conditionId": "0x1fad72fae204143ff1c3035e99e7c0f65ea8d5cd9bd1070987bd1a3316f772be",
"marketId": "540817",
"slug": "new-rhianna-album-before-gta-vi-926",
"title": "Yes",
"size": 128.75,
"avgPrice": 0.56,
"curPrice": 0.58,
"currentValue": 74.25,
"cashPnl": 2.58,
"percentPnl": 3.58,
"redeemable": false
}
],
"calculatedAt": "2026-05-09T00:00:00.000Z"
}
```
`equityUsd` is `totalCashBalanceUsd + positionsValueUsd`.
For sells, use a position's `asset` as the trade `tokenId`, and reuse its `conditionId`,
`marketId`, `slug`, and `title`/`outcome` metadata when building the sell request.
## POST /v1/trade
Queues a trade exactly like a manual trade from the Olympus frontend. The response returns a `tradeId`; execution happens asynchronously through the same worker queue used by the app.
### Buy Yes with stop-loss and take-profit
```bash
curl https://api.olympusx.app/v1/trade \
-X POST \
-H "Authorization: Bearer YOUR_API_KEY" \
-H "Content-Type: application/json" \
-d '{
"side": "BUY",
"tokenId": "98022490269692409998126496127597032490334070080325855126491859374983463996227",
"conditionId": "0x1fad72fae204143ff1c3035e99e7c0f65ea8d5cd9bd1070987bd1a3316f772be",
"amountUsd": 25,
"maxPrice": 0.62,
"marketTitle": "New Rihanna Album before GTA VI?",
"marketId": "540817",
"marketSlug": "new-rhianna-album-before-gta-vi-926",
"outcomeLabel": "Yes",
"stopLossPercent": 20,
"takeProfitPercent": 50
}'
```
Buy fields:
| Field | Required | Notes |
| --- | --- | --- |
| `side` | Yes | Must be `BUY`. |
| `tokenId` | Yes | Pick the outcome token from Polymarket `clobTokenIds`. For a Yes buy in the example above, use the first token ID because `outcomes[0]` is `Yes`. |
| `conditionId` | Yes | Use the Polymarket market `conditionId`. |
| `amountUsd` | Yes | USD notional to spend from the linked Olympus wallet. |
| `maxPrice` | No | Maximum acceptable price from `0` to `1`; `0.62` means do not buy above 62c. Omit it to use the current market price behavior. |
| `marketTitle` | Yes | Use the Polymarket `question`. This appears in Olympus logs and notifications. |
| `marketId` | No | Use the Polymarket Gamma `id`, or `null` if you do not have it. |
| `marketSlug` | No | Use the Polymarket `slug`, or `null` if you do not have it. |
| `outcomeLabel` | Yes | The matching outcome label from Polymarket `outcomes`, such as `Yes` or `No`. |
| `stopLossPercent` | No | Auto-sell when the position loses this percent from entry. `20` means sell after a 20% loss. |
| `takeProfitPercent` | No | Auto-sell when the position gains this percent from entry. `50` means sell after a 50% gain. |
### Buy No
To buy the `No` side of the same market, use the second token ID and set `outcomeLabel` to `No`:
```json
{
"side": "BUY",
"tokenId": "53831553061883006530739877284105938919721408776239639687877978808906551086026",
"conditionId": "0x1fad72fae204143ff1c3035e99e7c0f65ea8d5cd9bd1070987bd1a3316f772be",
"amountUsd": 25,
"maxPrice": 0.45,
"marketTitle": "New Rihanna Album before GTA VI?",
"marketId": "540817",
"marketSlug": "new-rhianna-album-before-gta-vi-926",
"outcomeLabel": "No"
}
```
### Sell by percent
```bash
curl https://api.olympusx.app/v1/trade \
-X POST \
-H "Authorization: Bearer YOUR_API_KEY" \
-H "Content-Type: application/json" \
-d '{
"side": "SELL",
"tokenId": "98022490269692409998126496127597032490334070080325855126491859374983463996227",
"conditionId": "0x1fad72fae204143ff1c3035e99e7c0f65ea8d5cd9bd1070987bd1a3316f772be",
"sellSpec": { "type": "percent", "sharePercent": 100 },
"minPrice": 0.55,
"marketTitle": "New Rihanna Album before GTA VI?",
"marketId": "540817",
"marketSlug": "new-rhianna-album-before-gta-vi-926"
}'
```
### Sell by shares
```json
{
"side": "SELL",
"tokenId": "98022490269692409998126496127597032490334070080325855126491859374983463996227",
"conditionId": "0x1fad72fae204143ff1c3035e99e7c0f65ea8d5cd9bd1070987bd1a3316f772be",
"sellSpec": { "type": "shares", "sharesNormalized": 25 },
"minPrice": 0.55,
"marketTitle": "New Rihanna Album before GTA VI?",
"marketId": "540817",
"marketSlug": "new-rhianna-album-before-gta-vi-926"
}
```
Sell fields:
| Field | Required | Notes |
| --- | --- | --- |
| `side` | Yes | Must be `SELL`. |
| `tokenId` | Yes | Use the token you hold. From `GET /v1/portfolio`, this is `positions[].asset`. |
| `conditionId` | Yes | Use the same `conditionId` from the portfolio position or the Polymarket market. |
| `sellSpec` | Yes | Use `{ "type": "percent", "sharePercent": 1-100 }` to sell a percent of the position, or `{ "type": "shares", "sharesNormalized": 10 }` to sell an exact share amount. |
| `minPrice` | No | Minimum acceptable price from `0` to `1`; `0.55` means do not sell below 55c. |
| `marketTitle` | Yes | Use the market question/title. |
| `marketId` | No | Use the Gamma market ID from Polymarket or your portfolio position, or `null`. |
| `marketSlug` | No | Use the market slug from Polymarket or your portfolio position, or `null`. |
Example queued response:
```json
{
"success": true,
"tradeId": "tr_1234abcd5678ef90",
"status": "QUEUED"
}
```
### Check trade status
```bash
curl https://api.olympusx.app/v1/trades/tr_1234abcd5678ef90 \
-H "Authorization: Bearer YOUR_API_KEY"
```
The status response moves through `QUEUED`, `PROCESSING`, then either `SUCCEEDED` or `FAILED`.
Successful fills include `orderHash`, `transactionHash`, filled shares, filled price, and USD fill
value when available.
Example successful status response:
```json
{
"tradeId": "tr_1234abcd5678ef90",
"status": "SUCCEEDED",
"side": "BUY",
"tokenId": "98022490269692409998126496127597032490334070080325855126491859374983463996227",
"conditionId": "0x1fad72fae204143ff1c3035e99e7c0f65ea8d5cd9bd1070987bd1a3316f772be",
"marketTitle": "New Rihanna Album before GTA VI?",
"marketId": "540817",
"marketSlug": "new-rhianna-album-before-gta-vi-926",
"outcomeLabel": "Yes",
"requestedAmountUsd": 25,
"requestedSellSpec": null,
"orderHash": "0x...",
"transactionHash": "0x...",
"filledSharesNormalized": 43.1,
"filledPrice": 0.58,
"spentUsd": 25,
"errorCode": null,
"errorMessage": null,
"createdAt": "2026-05-09T00:00:00.000Z",
"updatedAt": "2026-05-09T00:00:01.000Z",
"completedAt": "2026-05-09T00:00:01.000Z"
}
```
## Errors
Errors use this shape:
```json
{
"error": "UNAUTHORIZED",
"message": "Invalid API key."
}
```
Rate-limit responses include `Retry-After`:
```json
{
"error": "TOO_MANY_REQUESTS",
"message": "Rate limit exceeded. Try again later."
}
```
Common status codes:
| Status | Meaning |
| --- | --- |
| `400` | Invalid JSON or request body. |
| `401` | Missing, invalid, or deleted API key. |
| `403` | Trading is blocked, terms acceptance is required, or region is restricted. |
| `412` | The linked wallet is currently being upgraded. |
| `429` | Rate limit exceeded. Wait for the `Retry-After` duration before retrying. |
| `500` | Temporary server error. |
## Security notes
- Keep API keys secret. Anyone with the key can trade from the linked wallet.
- Delete a key immediately if it is exposed.
- Create separate keys for separate wallets when you want wallet-level isolation.
- Olympus stores only a hash of your key, so the plaintext value cannot be recovered after the one-time display.
---
## Copying With Multiple Wallets
Each copied wallet belongs to one of your trading wallets. This means two Olympus wallets can copy the same leader with different settings.
For example:
| Wallet | Copied leader | Strategy |
| ------------- | ------------- | ---------------------------------------------- |
| Main wallet | Leader A | Smaller market orders with tighter risk limits |
| Test wallet | Leader A | Limit orders with different max price settings |
| Sports wallet | Leader B | Sports-only copy settings |
This keeps the results easier to read. If every experiment runs from one account, the position list and PnL chart can become hard to interpret.
---
## Comparing PnL Curves
Use the PnL comparison chart as a copy-trading health check.
If your account curve roughly follows the copied wallet's curve over the same timeframe, Olympus is tracking that leader as expected. If the curves drift, review:
- wallet-specific trade ratio
- max trade size
- market or odds filters
- limit-order settings
- stop-loss and take-profit settings
- whether the copied wallet is paused
Some drift is normal when your sizing, balance, or filters differ from the leader. Large drift usually means your settings intentionally skipped trades or your wallet could not execute the same fills.
---
## Managing Wallets
Use [Multi-Wallet](/app/multi-wallet) when you need to create, import, rename, remove, deposit to, withdraw from, transfer between, or compare trading wallets.
After a wallet exists, use the same Multi-Wallet page to decide what it copies and how it performs. Use the regular dashboard tabs for detailed positions, activity, and open orders.
---
## Perps
https://www.olympusx.app/docs/14-perps
Trade Polymarket perpetuals in Olympus, manage leveraged positions, and use optional RSI automation.
# 📈 Perps
Perps let you trade Polymarket perpetual markets from Olympus. They are separate from prediction-market copy trading: you manage margin, leverage, entries, exits, and protection directly from the Perps pages.
Open Perps from the app header or go directly to [Perps](/app/perps).
---
## What You Can Trade
Olympus supports the current Polymarket perps instruments, including crypto, equity indexes, metals, and oil.
The Perps overview page shows available markets with live prices, recent movement, and direct links into each instrument's trading view.
---
## Step-By-Step: Opening A Perps Position
### Step 1 — Open The Perps Page
Go to [/app/perps](/app/perps). You will see the market overview grid with live prices and percentage moves for each instrument.
### Step 2 — Pick A Market
Click any market card to go to that instrument's trading view. Each market page shows a live chart, order book, and trade controls.
### Step 3 — Choose Long Or Short
Select **Long** if you expect the price to rise, or **Short** if you expect it to fall.
### Step 4 — Set Your Leverage And Size
Use the leverage control to choose your multiplier, then enter the collateral amount or position size. The panel shows your estimated liquidation price and margin requirement before you confirm.
### Step 5 — Choose Market Or Limit
- **Market order** — executes immediately at the current best price
- **Limit order** — sits in the book until the price reaches your target
### Step 6 — Fund Your Perps Balance If Needed
Perps use separate **pUSD** collateral from your copy-trading balance. If you have no pUSD, use the **Transfer** action on the Perps page to move funds from your main balance.
### Step 7 — Confirm The Order
Review leverage, size, and estimated price, then submit. The position appears in your open positions panel once confirmed.
### Step 8 — Set Stop-Loss And Take-Profit (Recommended)
From the positions panel, add a stop-loss and take-profit to protect the position. These execute automatically when the price hits your target.
---
## Trading View
Each perps market page includes:
- a live price chart
- order book and recent trades
- long and short order controls
- leverage controls
- market and limit entry support
- open-position management
Perps use separate pUSD collateral from your prediction-market balance. Use the **Transfer** action on the Perps view when you need to move funds between balances.
---
## Positions And Exits
The Perps portfolio view shows your open positions, margin, estimated PnL, and position actions.
From there, you can:
- close a position
- add or edit take-profit and stop-loss protection
- monitor unrealized PnL
- refresh account state
- share a PnL image
Stop-loss and take-profit controls are risk tools, not guarantees. Fast markets, thin books, and API delays can affect execution quality.
---
## Automation
The Perps page also includes optional RSI automation for users who want rule-based entries.
Automation rules can open a position when RSI conditions are met, then attach configured take-profit and stop-loss protection. Start small, review the rule before enabling it, and monitor activity after the first trigger.
---
## Good Practices
- trade with size you can afford to lose
- check leverage before every order
- keep enough available collateral for open positions
- use limit orders when price discipline matters
- use stop-loss and take-profit settings as safeguards, not substitutes for monitoring
- avoid running multiple strategies on the same instrument unless you understand how net positions work
---
## Combos
https://www.olympusx.app/docs/15-combos
Build multi-leg combo parlays in Olympus, preview combined odds, place a combo, and share the slip.
# 🎟️ Combos
Combos are multi-leg parlays. Instead of buying one prediction-market outcome, you select multiple eligible legs and receive one combo position that pays only if every leg wins.
Open Combos from the app header or go directly to [Combos](/app/combos).
𝕏 Watch the short combo copy trading tutorial
## Copy Trading Combos
Olympus can automatically mirror the multi-leg parlays placed by traders you follow. Open a top trader, follow their wallet, then enable **Combo copy trading** in the **Advanced** tab of that wallet's settings.
Combo copying uses its own controls, so you can choose which traders to mirror without changing your regular copy-trading setup. Review the trader's combo history and use conservative sizing before enabling it.
---
## Step-By-Step: Building And Placing A Combo
### Step 1 — Open The Combos Page
Go to [/app/combos](/app/combos). The page opens on the market browser with your slip panel on the right (desktop) or below (mobile).
### Step 2 — Find Markets To Add
Browse the eligible market list. You can search by keyword or scroll through active markets. Not every Polymarket market is combo-eligible — only markets the Combos system accepts will appear here.
### Step 3 — Add Legs To Your Slip
Click a market to open its outcome selector. Choose **YES** or **NO**, then add it to your slip. Repeat for each additional leg you want to include.
Your slip panel updates in real time showing:
- each selected outcome
- the combined implied odds
- the estimated payout multiplier
### Step 4 — Review The Slip
Before entering an amount, review every leg. Check that each selected outcome is the one you intend to trade. Removing a leg is easier than unwinding a placed combo.
### Step 5 — Enter Your Amount
Type the USDC amount you want to put on the combo. The slip shows your estimated payout if every leg wins. Use conservative sizing — long combos have low win probability even when each leg looks likely.
### Step 6 — Request The Final Quote
Click **Get quote** (or the equivalent confirm button). Olympus fetches a live quote from the Combos system. The confirmed price may differ from the estimate if any market prices moved since you built the slip.
If the quote is too far from the estimate, review whether any market moved significantly and edit or retry.
### Step 7 — Confirm And Place
Accept the quote to submit the combo. Once placed, the combo appears in your **My Combos** tab with pending status.
### Step 8 — Track Settlement
Each leg settles independently. You can monitor status from the My Combos view. If every leg resolves in your favor, the full payout is credited. A single losing leg means the combo loses.
---
## Pricing And Fills
Olympus shows an instant local estimate while you build. The final quote is requested when you place the combo, so the confirmed price can move if market prices change.
If a quote is unavailable, contradictory, expired, or too far from the expected price, edit the slip and try again instead of forcing the trade.
---
## Tracking Combos
After placement, Combos can show your open and historical combo positions.
Depending on position state, you may be able to:
- view the legs
- track pending or resolved outcomes
- close early when supported
- share the combo slip
- share a PnL card after settlement
Combo positions settle based on all legs. A single losing leg can make the full combo lose.
---
## Good Practices
- keep the number of legs manageable (2–4 legs is a good starting range)
- check each leg before placing
- use smaller sizing than single-market trades when odds are long
- treat local payout previews as estimates until the final quote is accepted
- avoid combining markets that depend on the same uncertain event unless that is intentional
---
## Leverage
https://www.olympusx.app/docs/17-leverage
Open leveraged positions on prediction market outcomes using Dimes Multiply, directly inside Olympus.
# ⚡ Leverage
Leverage lets you open amplified positions on Polymarket outcomes using **Dimes Multiply** — a leveraged synthetics protocol built on prediction markets. Instead of buying a YES or NO share at face value, you post a fraction of the notional as collateral and multiply your exposure.
Open Leverage from the app header or go directly to [Leverage](/app/leverage).
---
## Tutorial
Read the full walkthrough on X:
𝕏 Dimes Leverage tutorial on X →
---
## How It Works
When you take a leveraged position you post collateral (USDC) against a notional larger than that collateral. A 5× leverage position on a $0.50 YES outcome means $100 collateral controls a $500 notional exposure. Your PnL, liquidation price, and fees all scale with the notional.
Positions are managed by the Dimes protocol. Olympus handles the interface, wallet routing, and fee collection. The underlying position lives on-chain.
---
## What Markets Are Available
The leverage market catalog shows all prediction markets currently accepting new positions. Markets are filtered into:
- **All** — every available market
- **Crypto** — crypto-outcome markets
- **Sports** — live sports event markets
Markets open and close based on Dimes eligibility. If a market is not listed, it is not currently accepting new leveraged positions.
---
## Step-By-Step: Opening A Position
### Step 1 — Go to Leverage
Navigate to [/app/leverage](/app/leverage). The **Browse markets** tab shows all currently available markets.
### Step 2 — Pick A Market
Browse the grid or use the category filter on the left (desktop) or top (mobile). Click a market card to open the trading panel for that market.
### Step 3 — Choose A Side
Select **YES** or **NO** depending on your directional view on the outcome.
### Step 4 — Set Your Leverage
Use the leverage slider to choose your multiplier. The available range depends on the market and current liquidity. Start low — higher leverage means a tighter liquidation price.
### Step 5 — Enter Your Collateral
Type the collateral amount in USDC, or use the quick-amount buttons. The panel will show you:
- the notional value at your chosen leverage
- the estimated fee
- the quote price before you confirm
### Step 6 — Review The Quote
Check the live quote before confirming. The quote updates automatically. If the price moves beyond your slippage tolerance, the order will not execute — you can widen the slippage or wait for a better quote.
### Step 7 — Confirm And Submit
Click **Open position** and approve the transaction in your wallet. Once the on-chain transaction confirms, the position appears in your **My positions** tab, on the Leverage page.
### Step 8 — Monitor And Close
From **My positions** you can:
- track your unrealized PnL
- see your liquidation price
- close the position at any time
When you close, proceeds (minus fees) are returned to your wallet balance.
---
## Liquidation
If the market price moves against your position far enough, Dimes will liquidate the position to protect protocol solvency. The liquidation price is shown when you open and is visible in your positions table.
A few things to know:
- liquidation happens automatically on-chain — you do not need to be watching
- thin liquidity at extremes can cause liquidation before the displayed price in fast-moving markets
- adding more collateral is not currently supported — size positions to leave room for price movement
---
## Good Practices
- start with small collateral to learn how leverage, quotes, and slippage behave
- keep leverage low until you understand how quickly positions move
- check the liquidation price every time before confirming
- do not use money you cannot afford to lose — leveraged prediction markets amplify both gains and losses
- close positions before market resolution if you want to exit rather than settle
---
## LP Rewards
https://www.olympusx.app/docs/16-lp-rewards
A short guide to the Olympus LP Rewards page and tutorial.
# 💧 LP Rewards
LP Rewards is a liquidity workflow for users who want to place orders on reward markets from one focused page.
It helps you find reward opportunities, review suggested order levels, and manage liquidity orders without jumping between many market pages.
Open the in-app walkthrough here:
Open the LP Rewards tutorial in Olympus →
Use conservative sizing while learning the workflow. Liquidity orders can fill when markets move, so review order prices and expiration before placing them.
## Restoring canceled LP orders
When an LP order fills, Polymarket may cancel other LP orders from the same trading wallet as collateral or shares change. Olympus identifies recent cancellations that closely follow an LP fill and shows a restore prompt above **Filled Orders**.
Review the prompt before starting a restore. Olympus checks each order again against the live market, available balance or shares, automation state, minimum reward size, and maker-safe reward range. Eligible orders are reopened one at a time; unsafe orders are skipped with a reason. The original canceled orders are never modified.
Restore candidates remain available for 24 hours. A restore request can process up to 500 orders and can be safely retried if the request is interrupted.
---
## Olympus FAQ
https://www.olympusx.app/docs/08-faq
Frequently asked questions about Olympus, including copy trading, wallets, fees, withdrawals, risk, and Polymarket setup.
# ❓ Olympus FAQ
Answers to the most common questions about using Olympus.
---
## 🧭 Access & Accounts
**❓ Who can use Olympus and how do I log in?**
Olympus is open to everyone.
You can get started by visiting [olympusx.app](https://olympusx.app/) and logging in with **Discord** or **Google** through Privy. If you have a referral code, you can also use that flow when applicable.
---
**❓ Can I use my own wallet instead of the Olympus trading wallet?**
No. Olympus uses an automatically created trading wallet because of how the Polymarket wallet and proxy setup works.
That wallet is still yours, but Olympus does not use your existing external wallet directly for trading.
---
**❓ Is my wallet custodial?**
No. Olympus is **non-custodial**.
Your funds remain in your own trading wallet, and Olympus does not take custody of your assets.
---
**❓ If I export my private key, can I log into Polymarket with it?**
No.
Do **not** log into Polymarket with an exported Olympus trading-wallet key. Doing that can create a new proxy wallet and break wallet tracking behavior.
> ⚠️ Only use an exported key for withdrawing, transferring, or swapping funds. Do not use it to log into Polymarket.
---
## 💰 Fees
**❓ What fees does Olympus charge?**
Olympus charges a trading fee when a trade, claim, or redeem successfully executes through an Olympus-tracked wallet position.
The standard Olympus base fee is **0.75%** of the executed USD amount before discounts.
Fees can apply to:
- copied buys and sells
- manual buys and sells placed through Olympus
- manual limit orders that fill
- split or merge actions copied from a followed wallet
- claims or redeems for positions Olympus opened or tracked
- Polymarket auto-redeems or manual Polymarket UI redeems, but only for the Olympus-attributed part of the payout
Fees do not apply to:
- idle balance
- deposits
- withdrawals
- failed or cancelled trades that never execute
- trades or redeems made directly on Polymarket that Olympus did not open or track
Perps and leverage (Dimes) positions have their own fee schedules — see the dedicated questions below.
Supported discounts can include things like:
- eligible NFT holdings such as [SOL Decoder NFTs](https://tensor.trade/trade/soldecoder) - get 10-80% off fees!
- supported subscriptions such as [Whop](https://whop.com/decoder-valhalla/decoder-valhalla/) or [Blinkord](https://blinkord.com/925207817923743794) - get 70% off fees!
---
**❓ How do I check my current fee tier?**
Open **Settings → Fees** in the app to see your current fee tier, active discounts, and breakdown.
If your account perks or linked status change, such as after an NFT purchase or subscription update, logging out and back in can help refresh the displayed tier.
---
**❓ What is the extreme-price fee discount?**
For buys at very low or very high prices, Olympus applies a reduced fee schedule. The closer the buy is to the extreme ends of the market, the lower the fee becomes.
---
**❓ What's the fee on perps trades?**
Perps have their own fee, separate from the prediction-market fee above: a flat **0.045%** of each fill's notional size. It applies to both opening and closing fills and is collected automatically from your wallet.
---
**❓ What's the fee on leverage (Dimes) positions?**
Leverage positions carry an Olympus fee separate from Dimes' own protocol fees and the Polymarket venue fee (both shown in the leverage quote tooltip before you open):
- **Open:** 0.75% on the first 1x (your collateral) **+** 0.25% on borrowed notional above 1x.
- **Close or normal settlement:** 0.75% of proceeds, capped at your original collateral (1x).
- **Liquidation or cancellation:** $0.
Example: **$1,000** collateral at **10x** ($10,000 notional) → **$30** at open ($7.50 + $22.50). Discounts may reduce it.
---
**❓ What fees do I pay for LP (liquidity farming)?**
LP / liquidity farming has two dedicated fees, both separate from the standard trading fee:
- **LP fill fee — a flat 0.2%** of each fill's notional. It is charged on **both legs** of an LP position: the entry (maker buy) and the exit (auto-sell), whether the fill is a resting limit order or an immediate/market fill.
- **LP reward-share — a flat 5%** of the liquidity-mining rewards Polymarket pays you. Polymarket settles these rewards to your wallet daily at around midnight UTC, and Olympus takes 5% of that daily total. Reward payouts below **$1** (Polymarket's own payout minimum) are skipped and not charged.
> ⚠️ **LP fees are not discounted.** Unlike the standard trading fee, the 0.2% fill fee and 5% reward-share are flat and **bypass all discounts** — (ie. no NFT discounts, subscription discounts). This is the only fee that bypasses those discounts.
---
## ⚙️ Following & Copying
**❓ Can I test a wallet before I actually copy it?**
Yes. Open the trader's profile and click **Backtesting**. It replays their past trades against your settings and reports simulated PnL, ROI, win rate, drawdown, and which trades your filters would have skipped.
Two things to know before you trust the number:
- it is a **simulation**, not a recording. Polymarket publishes no historical order book, so fills are modeled with an assumed spread rather than replayed
- a few settings are accepted but not simulated yet, including stop loss, take profit, and max drawdown
It is far better at telling you which wallets **not** to copy than at predicting your earnings. See [Backtesting](/docs/18-backtesting).
---
**❓ My backtest was profitable but I lost money copying. Why?**
Common reasons, roughly in order of how often they bite:
- **Your real fills were worse than modeled.** The backtest assumes a fixed spread. Real fills depend on real liquidity at the moment you traded. Check the slippage sensitivity panel — if the result flips negative at 2× spread, it was already fragile
- **The sample was too thin.** Check the evidence gates. A green result that fails the trades/markets/active-days gates is a lucky streak, not an edge
- **Unpriced positions were excluded.** If a lot of capital sat in unpriced positions, the headline was computed over a survivor subset that quietly dropped the leader's underwater bags
- **The past is not the future.** The leader may have changed strategy, or the market regime shifted
---
**❓ Does Auto-tune with AI guarantee better settings?**
No. It is a single model suggestion based on the finished run, clamped to valid ranges. Nothing compares the tuned result against the previous one or rejects a worse outcome — so read the new numbers yourself. If the tuned run is worse, that is a real and useful answer. It is limited to once per hour.
---
**❓ Do I need to keep my browser open or my computer on?**
No.
If your bot status is running, Olympus continues operating server-side. You do not need to keep the browser open for copy trading to keep working.
---
**❓ How many wallets can I follow at once?**
Olympus currently limits how many wallets you can actively copy at one time.
Check the current app behavior for the live cap, since this kind of limit can change over time.
---
**❓ What happens if I pause or unfollow a wallet?**
If you pause a wallet, Olympus stops copying new trades from that wallet.
If you unfollow a wallet, Olympus removes it from your copy setup. Position handling may depend on the specific action and flow in the app, so always confirm before removing a wallet if you still have linked exposure.
---
**❓ Why did my trade fill above my Max Odds setting?**
Because **Maximum Odds (%)** and **Maximum Price Deviation (%)** are different checks.
- **Maximum Odds (%)** checks the leader's entry price
- **Maximum Price Deviation (%)** checks how far your own fill price is allowed to drift from the leader's entry
That means a trade can pass your odds filter based on the leader's price, but your actual fill may still land higher because of slippage or market movement.
If you want tighter control, combine:
- lower **Maximum Odds (%)**
- reasonable **Maximum Price Deviation (%)**
- **Limit Buy Mode** where appropriate
---
**❓ How does Maximum Price Deviation (%) work?**
It controls how far your fill price is allowed to move away from the leader's execution price before Olympus skips the trade.
You can set:
- a global default in **General Settings**
- an optional per-wallet override in that wallet's **Filters** settings
If the wallet-level field is left empty, Olympus uses your global value.
---
**❓ How does Limit Buy Mode work?**
Olympus does not see a leader's pending limit orders in advance.
Instead, Olympus waits for the leader's trade to execute, then places a limit order for you at that same execution price.
That helps protect you from paying more than the leader did, but it also means your order may not fill if the market moves away immediately.
---
**❓ Does Olympus support Stop-Loss / Take-Profit?**
Yes.
Olympus supports **Stop-Loss / Take-Profit** for copy trading and manual positions.
You can set:
- global defaults for copy trading
- per-wallet overrides for followed wallets
- per-position triggers for manual trades
For the full setup and behavior details, see [Stop-Loss & Take-Profit](/docs/11-stop-loss-take-profit).
---
## 🪙 Wallets, Withdrawals, and Swaps
**❓ How do I withdraw funds?**
Use the in-app wallet tools in Olympus to withdraw from your trading wallet when supported by your wallet type and route.
If not, you can export your trading-wallet private key and move funds manually through another wallet such as MetaMask or Rabby.
> ⚠️ If you export your key, use it only for transfers or swaps. Do not log into Polymarket with it.
---
**❓ How do I swap tokens?**
Olympus supports the in-app **USDC / USDC.e → pUSD** conversion flow when conversion is needed for Polymarket V2 trading.
If Olympus does not support the specific swap flow you want in-app, you can:
1. export your trading-wallet key
2. import it into a wallet like MetaMask or Rabby
3. use a Polygon-compatible swap app
4. move the assets back if needed
Use caution and make sure you are on the correct network.
---
**❓ Why does my dashboard show 0 trades?**
Usually one of these is true:
- the wallet you follow has not traded yet
- your filters are too restrictive
- your ratio or trade-size settings are too small
- your price-deviation settings are blocking entries
A good first step is to check:
- the wallet's recent activity
- your **Activity** tab
- your ratio, odds, liquidity, and trade-limit settings
---
## ⚠️ Risk
**❓ Can I lose money using Olympus?**
Yes.
Copy trading carries the same core financial risk as trading on Polymarket directly. Olympus helps you manage that risk, but it does not remove it.
---
**❓ Is Olympus guaranteed to be profitable?**
No.
Your results depend on the wallets you follow, your settings, market conditions, and how well the strategy survives being copied.
---
**❓ What are the most important risk controls?**
The most important live controls usually include:
- **Ratio %**
- **Max Trade Size (USD)**
- **Max Market Size (USD)**
- **Max Trades / Market**
- **Max Trades / 24h**
- **Maximum Price Deviation (%)**
- **Limit Buy Mode**
- liquidity and odds filters
For a deeper walkthrough, see [Olympus Risk & Ratio Management](/docs/06-risk-ratio-management).
---
## 🔧 Troubleshooting
**❓ Something is not working properly. What should I try first?**
Start with:
1. log out and log back in
2. refresh the page
3. clear cookies or site data if needed
4. log in again
If the issue still persists, reach out through the Olympus Discord.
---
**❓ The export private key button is missing. What should I try?**
Log out and log back in first.
If it still does not appear, try refreshing the session and checking again.
---
## 💡 Other
**❓ What happens if I lose access to Discord?**
Your funds remain tied to your wallet, not to Discord itself.
If you lose Discord access, contact Olympus support for account-access or community-role help.
---
**❓ Will Olympus have a token?**
Check official Olympus announcements for anything related to tokens, rewards, or future ecosystem plans.
Docs should not be treated as the source of truth for unreleased announcements.
---
## Trading API
https://www.olympusx.app/docs/12-api
Create wallet-scoped API keys, read the Top Wallets list, and trade through the Olympus API
# Trading API
> Prefer a command-line tool? Check out the community-built Olympus CLI: [github.com/fciaf420/olympus-cli](https://github.com/fciaf420/olympus-cli).
Use the Olympus Trading API to read your pUSD balance, positions, and equity in one call, or to queue buy and sell trades from your selected Olympus wallet, including buys with built-in stop losses and take profits.
---
## Authentication
Create an API key while logged in above. Each key is linked to one wallet:
- **Olympus Wallet** by default — your current Olympus-created EOA/Safe/deposit wallet.
- **Imported wallet** when you select one before creating the key.
The plaintext key is shown only once. After creation, the UI displays only the first four characters and lets you delete the key.
Send the key as a bearer token:
```bash
Authorization: Bearer YOUR_API_KEY
```
You can also send it with `X-API-Key`, but `Authorization: Bearer` is preferred.
## Base URL
Use the Olympus production API host:
```text
https://api.olympusx.app
```
## Rate limits
Rate limits are enforced per API key:
| Endpoint | Limit |
| --- | --- |
| `GET /v1/top-wallets` | 60 requests per minute |
| `GET /v1/wallets/:address` | 30 requests per minute |
| `GET /v1/portfolio` | 30 requests per minute |
| `GET /v1/trades/:tradeId` | 100 requests per minute |
| `POST /v1/trade` | 60 requests per minute |
When you exceed a limit, Olympus returns `429 Too Many Requests` with a `Retry-After` header in seconds.
## Find Polymarket market fields
Olympus uses Polymarket market identifiers. You can get them from Polymarket's public APIs before
calling `POST /v1/trade`.
Useful Polymarket docs:
- [Fetching Markets](https://docs.polymarket.com/market-data/fetching-markets)
- [List markets](https://docs.polymarket.com/api-reference/markets/list-markets)
- [Get CLOB market info](https://docs.polymarket.com/api-reference/markets/get-clob-market-info)
Fetch a market by slug:
```bash
curl "https://gamma-api.polymarket.com/markets?slug=new-rhianna-album-before-gta-vi-926"
```
Or fetch active order-book markets:
```bash
curl "https://gamma-api.polymarket.com/markets?active=true&closed=false&enableOrderBook=true&limit=1"
```
Example Polymarket market data:
```json
{
"id": "540817",
"question": "New Rihanna Album before GTA VI?",
"conditionId": "0x1fad72fae204143ff1c3035e99e7c0f65ea8d5cd9bd1070987bd1a3316f772be",
"slug": "new-rhianna-album-before-gta-vi-926",
"outcomes": "[\"Yes\", \"No\"]",
"clobTokenIds": "[\"98022490269692409998126496127597032490334070080325855126491859374983463996227\", \"53831553061883006530739877284105938919721408776239639687877978808906551086026\"]",
"enableOrderBook": true,
"acceptingOrders": true
}
```
Parse `outcomes` and `clobTokenIds` before choosing a token:
```js
const [market] = await fetch(
'https://gamma-api.polymarket.com/markets?slug=new-rhianna-album-before-gta-vi-926',
).then((res) => res.json());
const outcomes = JSON.parse(market.outcomes);
const tokenIds = JSON.parse(market.clobTokenIds);
console.log({
conditionId: market.conditionId,
marketId: market.id,
marketSlug: market.slug,
marketTitle: market.question,
yesTokenId: tokenIds[outcomes.indexOf('Yes')],
noTokenId: tokenIds[outcomes.indexOf('No')],
});
```
Use the matching index in `outcomes` and `clobTokenIds`:
| Outcome | `outcomeLabel` | `tokenId` |
| --- | --- | --- |
| Yes | `Yes` | `98022490269692409998126496127597032490334070080325855126491859374983463996227` |
| No | `No` | `53831553061883006530739877284105938919721408776239639687877978808906551086026` |
For Olympus:
| Olympus field | Polymarket field | Example |
| --- | --- | --- |
| `tokenId` | One value from `clobTokenIds` | `98022490269692409998126496127597032490334070080325855126491859374983463996227` |
| `conditionId` | `conditionId` | `0x1fad72fae204143ff1c3035e99e7c0f65ea8d5cd9bd1070987bd1a3316f772be` |
| `marketTitle` | `question` | `New Rihanna Album before GTA VI?` |
| `marketId` | `id` | `540817` |
| `marketSlug` | `slug` | `new-rhianna-album-before-gta-vi-926` |
| `outcomeLabel` | Matching value from `outcomes` | `Yes` |
Only submit trades for markets where `enableOrderBook` is `true` and the market is accepting orders.
## GET /v1/top-wallets
Returns the wallets Olympus currently ranks as worth copying, the same lists the Top Wallets page
shows. Rebuilt once a day, so polling more often than hourly gains you nothing.
Access to this endpoint requires an `extraAuth` token in addition to your API key. Submit a support ticket at olympusx.app to receive it.
```bash
curl "https://api.olympusx.app/v1/top-wallets?list=daily&limit=10&extraAuth=olympus4ever" \
-H "Authorization: Bearer YOUR_API_KEY"
```
Query parameters:
| Parameter | Default | Notes |
| --- | --- | --- |
| `extraAuth` | — | **Required.** Must be the token provided when you submitted your access request. |
| `list` | `daily` | `daily` is the ranked list. `picks` is the shorter list our daily scan selects. |
| `limit` | `50` | 1 to 200. The whole list fits in one request. |
| `offset` | `0` | Skip this many wallets. Ranks do not renumber, so page two starts at 51. |
Example response:
```json
{
"list": "daily",
"capturedAt": "2026-08-18T05:00:00.000Z",
"stale": false,
"total": 154,
"count": 10,
"offset": 0,
"wallets": [
{
"rank": 1,
"wallet": "0x12d6cccfc7470a3f4bafc53599a4779cbf2cf2a8",
"name": "classified",
"equityUsd": 299218.4,
"totalPnlUsd": 832344.8,
"windowDays": 14,
"windowPnlUsd": -194.7,
"avgDailyRoi14d": null,
"profitableDays": 9,
"winRate": 0.6413,
"activePositions": 98,
"lastTradeAt": "2026-08-04T18:19:47.000Z",
"views": 24922
}
]
}
```
Wallet fields:
| Field | Notes |
| --- | --- |
| `rank` | Position in the list, 1 based and gap free. `null` for a hand-picked wallet that no ranking covers. |
| `wallet` | The trader's wallet address. This is a leader to follow, not a market, so use it to look the trader up or to follow them in the app. |
| `name` | Public Polymarket display name, or `null` when the wallet has none. |
| `equityUsd` | Cash plus the value of open positions. |
| `totalPnlUsd` | All-time profit or loss. `null` when we could not measure it. |
| `windowDays` | The number of days `windowPnlUsd`, `avgDailyRoi14d` and `profitableDays` cover. |
| `windowPnlUsd` | Profit over that window, in dollars. |
| `avgDailyRoi14d` | Average daily return as a decimal fraction, so `0.0043` is 0.43% a day. **`null` for roughly half the list, and that is expected**: the figure is measured against the capital that actually earned it, reconstructed from the wallet's stablecoin flows, and a wallet moving money through routes we cannot follow has no honest denominator. Use `windowPnlUsd` for those. |
| `profitableDays` | Days in the window that ended in profit. |
| `winRate` | Fraction between 0 and 1. |
| `activePositions` | Open positions right now. |
| `lastTradeAt` | ISO timestamp of the last trade, or `null` when unknown. |
| `views` | Profile views on Polymarket. |
`capturedAt` is when the list was built and `stale` is true when the newest build is older than a
daily cadence allows for. Responses carry an `ETag`; send it back as `If-None-Match` and you get a
`304` until the next build lands.
Past performance is not a prediction. These figures describe what a wallet did, not what copying it
would earn you, which also moves with the prices you get, fees, and your own copy settings.
## GET /v1/wallets/:address
Returns basic stats for any Polymarket wallet address. The wallet does not need to appear in Olympus's Top Wallets lists — you can look up any trader on Polymarket.
Access to this endpoint requires an `extraAuth` token in addition to your API key. Submit a support ticket at olympusx.app to receive it.
```bash
curl "https://api.olympusx.app/v1/wallets/0x12d6cccfc7470a3f4bafc53599a4779cbf2cf2a8?extraAuth=olympus4ever" \
-H "Authorization: Bearer YOUR_API_KEY"
```
Query parameters:
| Parameter | Notes |
| --- | --- |
| `extraAuth` | **Required.** Must be the token provided when you submitted your access request. |
Example response:
```json
{
"wallet": "0x12d6cccfc7470a3f4bafc53599a4779cbf2cf2a8",
"name": "classified",
"totalPnlUsd": 832344.8,
"winRate": 0.6413,
"equityUsd": null,
"activePositions": 98,
"lastActivityAt": "2026-09-14T18:19:47.000Z",
"views": 24922
}
```
Response fields:
| Field | Notes |
| --- | --- |
| `wallet` | Normalized (lowercase) Ethereum address. |
| `name` | Polymarket display name or pseudonym. `null` when the wallet has no public name. |
| `totalPnlUsd` | All-time profit or loss in USD from the Polymarket leaderboard. `null` when the wallet has no recorded history. |
| `winRate` | Fraction between 0 and 1. `null` when unmeasured. |
| `equityUsd` | Always `null`. Use `GET /v1/portfolio` for equity on your own linked wallet. |
| `activePositions` | Number of currently open positions. `null` when unmeasured. |
| `lastActivityAt` | ISO 8601 timestamp of the wallet's last recorded trade. `null` when unknown. |
| `views` | Cumulative Polymarket profile view count. `null` when unmeasured. |
Any field can be `null` — treat `null` as "data not available" rather than "the value is zero". Responses are cached server-side for 5 minutes.
## GET /v1/portfolio
Returns your linked wallet's pUSD balance, total cash balance, open positions, open-position value, and equity in one response.
```bash
curl https://api.olympusx.app/v1/portfolio \
-H "Authorization: Bearer YOUR_API_KEY"
```
Example response:
```json
{
"walletAddress": "0x...",
"pusdBalance": 125.5,
"totalCashBalanceUsd": 125.5,
"positionsValueUsd": 74.25,
"equityUsd": 199.75,
"positionCount": 2,
"positions": [
{
"asset": "98022490269692409998126496127597032490334070080325855126491859374983463996227",
"conditionId": "0x1fad72fae204143ff1c3035e99e7c0f65ea8d5cd9bd1070987bd1a3316f772be",
"marketId": "540817",
"slug": "new-rhianna-album-before-gta-vi-926",
"title": "Yes",
"size": 128.75,
"avgPrice": 0.56,
"curPrice": 0.58,
"currentValue": 74.25,
"cashPnl": 2.58,
"percentPnl": 3.58,
"redeemable": false
}
],
"calculatedAt": "2026-05-09T00:00:00.000Z"
}
```
`equityUsd` is `totalCashBalanceUsd + positionsValueUsd`.
For sells, use a position's `asset` as the trade `tokenId`, and reuse its `conditionId`,
`marketId`, `slug`, and `title`/`outcome` metadata when building the sell request.
## POST /v1/trade
Queues a trade exactly like a manual trade from the Olympus frontend. The response returns a `tradeId`; execution happens asynchronously through the same worker queue used by the app.
### Buy Yes with stop-loss and take-profit
```bash
curl https://api.olympusx.app/v1/trade \
-X POST \
-H "Authorization: Bearer YOUR_API_KEY" \
-H "Content-Type: application/json" \
-d '{
"side": "BUY",
"tokenId": "98022490269692409998126496127597032490334070080325855126491859374983463996227",
"conditionId": "0x1fad72fae204143ff1c3035e99e7c0f65ea8d5cd9bd1070987bd1a3316f772be",
"amountUsd": 25,
"maxPrice": 0.62,
"marketTitle": "New Rihanna Album before GTA VI?",
"marketId": "540817",
"marketSlug": "new-rhianna-album-before-gta-vi-926",
"outcomeLabel": "Yes",
"stopLossPercent": 20,
"takeProfitPercent": 50
}'
```
Buy fields:
| Field | Required | Notes |
| --- | --- | --- |
| `side` | Yes | Must be `BUY`. |
| `tokenId` | Yes | Pick the outcome token from Polymarket `clobTokenIds`. For a Yes buy in the example above, use the first token ID because `outcomes[0]` is `Yes`. |
| `conditionId` | Yes | Use the Polymarket market `conditionId`. |
| `amountUsd` | Yes | USD notional to spend from the linked Olympus wallet. |
| `maxPrice` | No | Maximum acceptable price from `0` to `1`; `0.62` means do not buy above 62c. Omit it to use the current market price behavior. |
| `marketTitle` | Yes | Use the Polymarket `question`. This appears in Olympus logs and notifications. |
| `marketId` | No | Use the Polymarket Gamma `id`, or `null` if you do not have it. |
| `marketSlug` | No | Use the Polymarket `slug`, or `null` if you do not have it. |
| `outcomeLabel` | Yes | The matching outcome label from Polymarket `outcomes`, such as `Yes` or `No`. |
| `stopLossPercent` | No | Auto-sell when the position loses this percent from entry. `20` means sell after a 20% loss. |
| `takeProfitPercent` | No | Auto-sell when the position gains this percent from entry. `50` means sell after a 50% gain. |
### Buy No
To buy the `No` side of the same market, use the second token ID and set `outcomeLabel` to `No`:
```json
{
"side": "BUY",
"tokenId": "53831553061883006530739877284105938919721408776239639687877978808906551086026",
"conditionId": "0x1fad72fae204143ff1c3035e99e7c0f65ea8d5cd9bd1070987bd1a3316f772be",
"amountUsd": 25,
"maxPrice": 0.45,
"marketTitle": "New Rihanna Album before GTA VI?",
"marketId": "540817",
"marketSlug": "new-rhianna-album-before-gta-vi-926",
"outcomeLabel": "No"
}
```
### Sell by percent
```bash
curl https://api.olympusx.app/v1/trade \
-X POST \
-H "Authorization: Bearer YOUR_API_KEY" \
-H "Content-Type: application/json" \
-d '{
"side": "SELL",
"tokenId": "98022490269692409998126496127597032490334070080325855126491859374983463996227",
"conditionId": "0x1fad72fae204143ff1c3035e99e7c0f65ea8d5cd9bd1070987bd1a3316f772be",
"sellSpec": { "type": "percent", "sharePercent": 100 },
"minPrice": 0.55,
"marketTitle": "New Rihanna Album before GTA VI?",
"marketId": "540817",
"marketSlug": "new-rhianna-album-before-gta-vi-926"
}'
```
### Sell by shares
```json
{
"side": "SELL",
"tokenId": "98022490269692409998126496127597032490334070080325855126491859374983463996227",
"conditionId": "0x1fad72fae204143ff1c3035e99e7c0f65ea8d5cd9bd1070987bd1a3316f772be",
"sellSpec": { "type": "shares", "sharesNormalized": 25 },
"minPrice": 0.55,
"marketTitle": "New Rihanna Album before GTA VI?",
"marketId": "540817",
"marketSlug": "new-rhianna-album-before-gta-vi-926"
}
```
Sell fields:
| Field | Required | Notes |
| --- | --- | --- |
| `side` | Yes | Must be `SELL`. |
| `tokenId` | Yes | Use the token you hold. From `GET /v1/portfolio`, this is `positions[].asset`. |
| `conditionId` | Yes | Use the same `conditionId` from the portfolio position or the Polymarket market. |
| `sellSpec` | Yes | Use `{ "type": "percent", "sharePercent": 1-100 }` to sell a percent of the position, or `{ "type": "shares", "sharesNormalized": 10 }` to sell an exact share amount. |
| `minPrice` | No | Minimum acceptable price from `0` to `1`; `0.55` means do not sell below 55c. |
| `marketTitle` | Yes | Use the market question/title. |
| `marketId` | No | Use the Gamma market ID from Polymarket or your portfolio position, or `null`. |
| `marketSlug` | No | Use the market slug from Polymarket or your portfolio position, or `null`. |
Example queued response:
```json
{
"success": true,
"tradeId": "tr_1234abcd5678ef90",
"status": "QUEUED"
}
```
### Check trade status
```bash
curl https://api.olympusx.app/v1/trades/tr_1234abcd5678ef90 \
-H "Authorization: Bearer YOUR_API_KEY"
```
The status response moves through `QUEUED`, `PROCESSING`, then either `SUCCEEDED` or `FAILED`.
Successful fills include `orderHash`, `transactionHash`, filled shares, filled price, and USD fill
value when available.
Example successful status response:
```json
{
"tradeId": "tr_1234abcd5678ef90",
"status": "SUCCEEDED",
"side": "BUY",
"tokenId": "98022490269692409998126496127597032490334070080325855126491859374983463996227",
"conditionId": "0x1fad72fae204143ff1c3035e99e7c0f65ea8d5cd9bd1070987bd1a3316f772be",
"marketTitle": "New Rihanna Album before GTA VI?",
"marketId": "540817",
"marketSlug": "new-rhianna-album-before-gta-vi-926",
"outcomeLabel": "Yes",
"requestedAmountUsd": 25,
"requestedSellSpec": null,
"orderHash": "0x...",
"transactionHash": "0x...",
"filledSharesNormalized": 43.1,
"filledPrice": 0.58,
"spentUsd": 25,
"errorCode": null,
"errorMessage": null,
"createdAt": "2026-05-09T00:00:00.000Z",
"updatedAt": "2026-05-09T00:00:01.000Z",
"completedAt": "2026-05-09T00:00:01.000Z"
}
```
## Errors
Errors use this shape:
```json
{
"error": "UNAUTHORIZED",
"message": "Invalid API key."
}
```
Rate-limit responses include `Retry-After`:
```json
{
"error": "TOO_MANY_REQUESTS",
"message": "Rate limit exceeded. Try again later."
}
```
Common status codes:
| Status | Meaning |
| --- | --- |
| `400` | Invalid JSON or request body. |
| `401` | Missing, invalid, or deleted API key. |
| `403` | Trading is blocked, terms acceptance is required, or region is restricted. |
| `412` | The linked wallet is currently being upgraded. |
| `429` | Rate limit exceeded. Wait for the `Retry-After` duration before retrying. |
| `500` | Temporary server error. |
## Security notes
- Keep API keys secret. Anyone with the key can trade from the linked wallet.
- Delete a key immediately if it is exposed.
- Create separate keys for separate wallets when you want wallet-level isolation.
- Olympus stores only a hash of your key, so the plaintext value cannot be recovered after the one-time display.